Showing posts with label stitched journaling card die. Show all posts

Thursday, June 23, 2016

Happy Hello

Good morning, Samantha here with a cheerful under the sea card for you. I created a simple scene using a variety of Lawn Fawn Products. The sea was created with layers of multiple pattern papers and colored vellum. I tucked the kraken under a portion of the vellum to create dimension. Transparent enamel dots were attached to the top of the vellum to create a bubbly sea. Orange pattern paper was used for the "hello" sentiment from the "Yay Kites- Lawn Cuts". The sentiment had to be cut down slightly so it did not overlap the kraken. 


Materials Used:
Beachside Petite Paper Pack
Let's Polka Mon Amie Petite Paper Pack
Lovable Legends 
Stitched Journaling Card
Yay Kites - Lawn Cuts

Thank you so much for stopping by. I hope you have a wonderful day! 

Friday, November 6, 2015

Miss You - Stretching Your Stamps

Hi everyone! Marina here! For today's card, I wanted to use the theme for the current Lawnscaping Challenge and taking this opportunity to share with you an idea how another way of using the gumball machine from the Sweet Smiles set.


So, I started off by masking away the balls in the machine and used the Distress Ink in Antique Linen to stamp as I want the border to be as light as possible.


 I like using my copic markers when I want my images to turn our sharp and vibrant. In the final image, you will notice that I've covered the brown area with some gold stickles. I thought this would as some nice shimmering touch to the card.


I've coloured a white paper with pink copic markers before using the string of hearts die from the Stitched Journal Card die set.


As for the sentiment, I took it from the Chit Chat set and masked away the bubble around the words before stamping.


I hope it will inspire you to find more looks for your stamps! Cheers!

Saturday, August 1, 2015

Watercolored thank you card ...

Hi Friends!!

It's the first Saturday of the month ... and it's Lenny from the FIT here with you today!
Hope you're having a great Saturday!! 
I'm still enjoying my summer break ... relaxing!! 

For my post today, I did some watercoloring again! I must say; I totally looooove my new
Winsor and Newton watercolors! Those colors are so vibrant!!! 

I was inspired by these photos (from Pinterest) 


Here's my card . . .


First, I stamped out my images with VersaFine ink and
then I colored them with my new watercolors.
After everything was dry, I added lots of water and a tiny bit of blue
for the background. 


For a complete list of supplies: click HERE!!

Thanks so much for dropping by today!!
And .... be sure to check out the blog on Monday ... for another fun and fab new
challenge!! 

Happy Saturday! 

hugs . . .

lenny

Tuesday, May 19, 2015

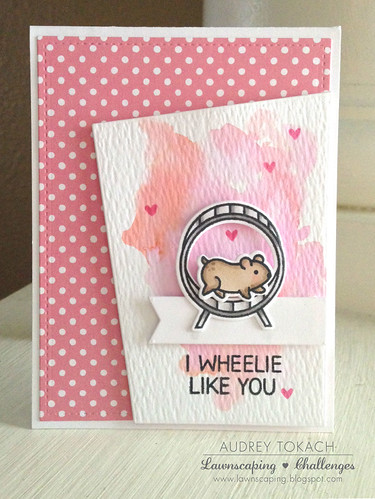
Watercolor Wheelie Like You

Hey there!  Audrey here with a fun card to share with you!  I am still loving the watercolor trend and I hope it never goes out of style!  I seem to be reaching for my watercolors on every other project!

I started off with a piece Let's Polka Mon Amie 6x6 patterned paper and I die cut it with the largest of the Small Stitched Rectangles.  Then I angled a piece of Tim Holtz Distress watercolor paper, and trimmed around the edges so that it lined up with the edge of the rectangle.  I watercolored in shades of pink and coral using Picked Raspberry and Abandoned Coral Distress Inks (LOVE this combo), and then stamped, colored and diecut the adorable little hamster and wheel from the Wheelie Like You stamp set. To ground the little scene, I used the banner from the Stitched Journaling Card die set and stamped the sentiment below the banner.  I popped the banner, wheel and hamster up on foam tape, and then after I adhered the patterned paper to a card base, I popped the finished panel up with foam tape.

I Wheelie Like You

Hope you like it!  Thanks for stopping by!! :)

Saturday, February 14, 2015

Falling (Die cut) Hearts!

Hi everyone! It's Marina :) So sorry, I know that I was supposed to post on Thursday but I had some delays for my flight and I got home late. I'm here now to share with you a card using some heart dies.


I'm taking various copic markers in different shades of pink and red. You can use any colour combinations or other types of medium, watercolour or even ink pads. I took the string of hearts die from the Lawn Fawn Stitched Journaling Card Die. I made sure to colour the cardstock first because it's much fasted to colour a big space then tiny hearts but it's your choice :) 


When that's done, I stamped out the jar from Lawn Fawn Bugs & Kisses stamp set from the top of the paper as though it looks like it's pouring out hearts. I decided to use the same concept for my sentiment. I took the letters from Lawn Fawn Milo's ABC and position them in a way that they also looks like they are falling out of the jar.


Tip : Position your letters first then use a large stamp press to pick up all the letters so that you stamp them all at once and with this you can even do multiple cards quickly.

Now I arrange the hearts until I like it and start to glue them down using Tombow liquid glue.


Hope you like it! 


Don't forget to subscribe to the Lawnscaping Challenge blog & join the Lawnscaping facebook group to catch the projects made by the Facebook Inspiration Team.  You can also catch more of me on my blog

Till next time!

Thursday, January 29, 2015

Whale You be Mine?


Hey everyone, Samantha here! Today I am sharing a sweet little Valentine's Day card I made using some of my favorite Lawn Fawn products. I used the "Stitched Journaling Card" die cut for the foundation of my card. I layered fun pastel papers to create my scene. I just had to use the whales and the sentiment from the "Whale You Be Mine" stamp set. I added rhinestones, heart shaped pearls, and pink twine for extra flair.

Materials Used:
Whale You Be Mine
Stitched Journaling Card

Thank you so much for stopping by. I hope you have a wonderful day! 

Tuesday, January 13, 2015

Die-cut Inlay featuring Lawn Fawn Notecards

Hi everyone!! Kari here!! Well, It is the second Tues. of a new month AND a new year!  So, I am back to share another project with you.  Today, I wanted to showcase the Lawn Fawn Note cards - or Lawn Fawndamentals Notecards for the "official" title of these fun cards.  If you are like me, sometimes you don't have the time to pull out a ton of supplies to make a quick card.  These note cards are the perfect size and perfect start to make that quick card.

I've taken two of the many colors to choose from, the Walnut and the Mermaid, and I wanted to keep these cards relatively flat, so I have incorporated the die-cut inlay technique to each card.  I used the smallest of the Large Stitched Rectangle Dies, and the bracket die that comes in the Large Journaling card die set, and I die cut these shapes right on the front of each note card that leaves the negative space.  From here, I thought it would be fun to choose a couple of different patterns of paper both from the Snow Day and Sweater Weather 6x6 paper pads to use to die cut those same shapes, and lay them back in those negative spaces as you see below.


Before I added the pattern papers, for stability, and also a "base" for my papers to stick to, I added a light weight piece of white card stock on the backside of the card front.  Once I have in-laid the pattern papers, I stamped a sentiment in each of the middle rectangle, and both sentiments come from the "Argyle Backdrops" stamp set.  To finish off each card, I added a little embellishment to each one.  For the Mermaid card I used the Lawn Fawn Sequins in the snowflake shapes, and for the Walnut I used one of the leaf wood veneers, and I altered it a bit by added a little Versa Mark ink, and embossed the edges with gold embossing powder, and then I adhered them to my cards.  Simple but fun cards, and these note cards were a great starting point!

Remember we have a fun new challenge going on!!  So, hope you are able to get crafty and link up your Winter Themed project!!  See you soon!!

Kari

Saturday, December 6, 2014

Daily hike ... a mini-album!

Hi Friends!! 

It's the first Saturday of the month ... so, it's Lenny, from the Facebook Inspiration Team
here with you today! 

Today, I would like to share a mini-album that I made.
I used lots of Lawn Fawn, of course!
But ... also lots of stuff from some of my Paper Issues Swag Bags!

The Lawn Fawn products that I used:
* clear stamps: Hedgehugs / Winter owl / Chit chat
* Lawn cuts: Hedgehugs / Chit chat / Stitched journaling card
* Lawn trimmings: Retro
* Sweater weather patterned paper (6x6)
* Lawn ornaments: Fall leaves wood veneer / 
                         Sweater weather Adhesive Flair
* Lawn Fawndamentals: notecard: "Spruce"

Here are some photos . . .


For a full list of supplies: visit my blog on Dec. 10!! 
Thanks for stopping by today!! 
Next Monday, Dec. 15, there will be a new Lawnscaping challenge!
The last one of the year ... Can you believe it? Time flies!

hugs . . .

lenny

Thursday, November 27, 2014

Happy Thanksgiving

Hey everyone, Samantha here with a festive Thanksgiving card using some of my favorite Lawn Fawn supplies. Today is a wonderful chance to reflect on what you are most thankful for, whether it is your family, friends, or anything else special in your life.

Materials Used:
Cole's ABCs
Gold Sparkle Single Cord
Happy Feast
Into the Woods Petite Paper Pack
So Thankful
Stitched Journaling Card
Turkey Day

Thank you so much for stopping by. I hope you have a wonderful Thanksgiving!

Thursday, September 11, 2014

Non-Christmas Card using a Christmas Stamp Set

Hey Lawnscapers from all over the world! Marina from the Lawnscaping Facebook Inspiration Team here. Today, I would like to share with you how you can make a non-Christmas card using a Christmas intended stamp set.

I'm using the Snow Day stamp set by Lawn Fawn. I took that line of tiny trees and stamp it repeatedly on a grey cardstock using Hero Arts Shadow Ink in Soft Granite to make it sort of tone-on-tone. This way, I am creating my own pattern paper. You can do this with literally any images you have, even sentiments. 


I, then, took the sentiment from the Good Fortune stamp set by Lawn Fawn and heat embossed it using clear embossing powder and went over the entire piece with Distress Ink in Barn Door. 


I cut the strip to the small size and scored both sides of the piece twice, like in the picture below, to make a dimensional banner.


This is how it looks like when I used the score lines and fold them.


Using the Stitched Journalling Card Die, I die cut the same grey cardstock and mounted it on dimensional stickers. The bunnies are from the same Snow Day stamp set.


So, there you go :) I hope you have enjoyed this mini tutorial and try to stretch your christmas stamp set to make a non-Christmas card. 

Don't forget to subscribe to the Lawnscaping Challenge blog & join the Lawnscaping facebook group to catch the projects made by the Facebook Inspiration Team.  You can also catch more of me on my blog

Till next time!

Thursday, August 14, 2014

Watercolouring Card Set

Hey Lawnscapers from all over the world! Marina here and this is my very first post for Lawnscaping as part of the Facebook Inspiration Team.

For my first post, I thought I would share with you a simple card set that you can re-create for any occasion. I'll start by showing you a few steps I took to make it.

I started by die cutting a frame using the Stitched Journalling Card die and tracing the frame area on the card panel so that I know where to put my colours. 

Go crazy and have fun with whatever colour to play with. For this I used some red, orange and yellow watercolours to create this fun background. 

For the die cut panel, I added some white dots around it because who doesn't love polka dots right? :) And pop that up with some dimensional stickers. I simply took some of my favourite sentiments and heated it with some white embossing powders. 

The first card below, I used sentiments from Science of Love

The sentiments on the card in the middle is also from Science of Love and the one on the right is from Flutter By.


I would love to hear what you think of these cards. Hope that you've been inspired to dig out all those sentiments and make your own card set! :) 

Don't forget to subscribe to Lawnscaping blog to be inspired by the rest of the team. You can catch more of me on my blog and see you! 

Tuesday, July 8, 2014

Hi There - featuring Our Friendship Grows

Hello everyone!! Kari back with you to share more on my card that I made for our newest challenge that just went up yesterday!!  We are doing a summer color combo - so one of my favorites that I thought would fit the bill is Our Friendship Grows.


I first die cut all of my frame pieces from the Hello, Sunshine 6x6 - still one of my favorite paper pads!  So happy I have a backup of this one! Then, I worked on my sunflower.  I stamped it out in Memento Tuxedo Black as I used Copic Markers to color it in.  I only used 3 colors still sticking with our color combo challenge but wanting to add definition.  I am no where near an expert when it comes to coloring with Copics - but that is just it...these markers make an amateur like me look pretty decent in my opinion.  Once I was finished coloring in my sunflower, I used the coordinating die to cut it out ( thank goodness there are dies for this set!).  I prepared my card base which is the Simon Says Stamp 120 Ultra thick white card stock and I adhered my "Hello, Sunshine" scalloped piece straight down onto my card base and then I stamped my sentiment that comes from the Simon Says Stamp Stripe Greetings set and then added some Lawn Trimmings to my blue piece and then added some foam adhesive and adhered that piece down onto my card, and then added my sunflower also with foam adhesive.  For a final touch, I added some Wink of Stella ( the clear is my favorite) and some Glossy Accents.  These two together are so fun!!


I hope you are able to join us for this newest challenge!!  Can't wait to see all the beautiful projects linked up in the gallery!!  See you all next time!!
Kari