Showing posts with label into the woods. Show all posts

Friday, October 21, 2016

Happy Halloween

Hi Everyone!
It's Karin here to share some inspiration for the Lawnscaping Challenge blog.


I started out by spattering my background with frisket/Masking fluid and then inked my  background . I used distress ink Tumbled glass and Faded Jeans. I then stamped and colored my images with watercolor pencils. I diecut the grass and created a Little scene Before trimming it and adding it to at black piece of cardstock to create a frame for my panel.
For the sentiment I used the Dymo font and printed it from my computer.

The Lawn Fawn supplies I used for my project:
Stamps;  Into the Woods , So Thankful
Dies; Grassy Border
Paper; Watercolorpaper from Canson


Pop over to the Lawnscaping challenge to be inspired by my talented teamies or play along in the latest challenge.


http://lawnscaping.blogspot.se/

Have a wonderful Halloween everyone, hugs, Karin


Tuesday, October 11, 2016

Pinterest Inspired!

Hi there!
Chrissie here! I wanted to share another card I created for our current Pinterest Inspired Challenge!


Even though I love hot weather, there is just something about Fall! The pumpkin patches, the crisp air, the leaves changing colors... I just love it all! So, I had no problem getting inspired to play along in the current challenge board.


I stamped the woodgrain background first, then went over it with some ombre ink.  To soften it, I trimmed some vellum and adhered it over the top.  I was inspired by all of the leaves and the woodgrain of the challenge board!


I stamped all images onto white cardstock and then trimmed them (or die cut them out).  Everything was colored in with Spectrum Noir markers.

Don't forget to play along in our current challenge to win! We are sponsored by Ellen Hutson and there is still time to play!

Thanks for stopping by!


SUPPLIES:

Lawn Fawn Stamp Sets: Woodgrain Backdrops, Into the Woods, Critters in Costume
Lawn Cuts (Dies): Critters in Costume
Lawn Fawn Ink: Walnut
Other Supplies:
Hero Arts Ombre Ink Butter to Orange
Spectrum Noir Markers CT4, OR1, TN3, TN5, TN7


Friday, September 16, 2016

Friends Warm the Heart

Hi Everyone!
It's Karin from PeppermintPatty's Papercraft  here to share some inspiration !


For this card I started making a bg panel from some patterned papers and by stamping and coloring the sweet images from Into the woods with watercolorpencils (I use Derwents). I then fuzzy cut them - I actually made two of each to create extra dimension. The trees are inked using distress ink and an inkblending tool. The trees and mushrooms are from the classic and awesome Critters in the forest set!
The sentiment is stamed and heatembossed in white

The Lawn Fawn supplies I used for my project:
Stamps; Into the woods and Critters in the forest


Make sure to check out the latest Lawnscaping challenge to be inspired by my talented teamies and to play along with this week's fun theme!


http://lawnscaping.blogspot.se/


Thursday, May 26, 2016

BBQ Fun

Hey everyone, Samantha here with a fun BBQ themed card. With summer just around the corner, I just had to create an outdoor grilling scene. The dachshund is the master of the grill and is happily sharing a hot dog with his friend. 

All of the stamped images are layered on top of tonal pattern paper. I wrapped "Peppermint Single Cord" around the top of the card and tied it into a bow for a final touch. 


Materials Used:
Critters at the Dog Park
Into the Woods Petite Paper Pack
Let's BBQ
Peppermint Single Cord
Perfectly Plaid Petite Paper Pack

Thank you so much for stopping by. I hope you have a great day! 

Tuesday, May 10, 2016

Masking and Colored Pencils!

Hey there fellow Fawny Fans!
Chrissie here and I have a video today, sharing how to mask and use colored pencils to create this card:


Please head on over to my channel to check it out or watch above! Thanks for stopping by and have a terrific Tuesday!

-Chrissie :)

Thursday, January 28, 2016

Wintertime in the Woods

Hey everyone! Samantha here with a fun winter themed card for you. I created a critter filled scene in a woodsy setting. I really wanted to create a scene filled with dimension and different textures. I started my card off by glueing my pattern paper to the base of my card. I colored, cut, and adhered the trees to the pattern paper. The snowy ground was cut from a piece of white cardstock. I colored my little critters and layered them on top of the snow. Glittery snow was layered on top of the animals to create depth. Wood veneer snowflakes were added in the sky. Layered on top of each wood snowflake is a smaller white snowflake and a clear rhinestone. Glittery Gold single cord was wrapped around the card and tied into a bow to add the last layer.  


Materials Used:
Critters in the Arctic
Gold Sparkle Single Cord
Into the Woods
Joy to the Woods
Snowflake Wood Veneer

Thank you so much for stopping by. I hope you have a wonderful day!

Friday, November 13, 2015

Fall Paper Clip Bookmarks

Hi, everybody! Suzanne here with a fun project that you can use to jazz up your planner or to use as a bookmark. I used a few of the stamps from Lawn Fawn's Into the Woods and Happy Harvest sets to make some fall-themed paper clip bookmarks.


I stamped two of each image on heavyweight (110 lb.) white card stock. After coloring one of the images, I cut it out and left a little tail in the middle to loop around the paper clip. Then, I folded the tail behind the colored image and adhere the second image (stamped side up) to the back. 

You can get a better idea of how it's put together with this photo. (To make sure the two images line up, I added the adhesive on top of the uncolored image.)


I made some smaller page flags with scraps of coordinating paper, and used bigger images on the bigger paper clips. Here's a look at the set:


These are fall-themed, but you could use Christmas-themed stamps to make a stationery gift set for a gift, or general images for a birthday or thank you gift.

Thanks so much for stopping by today! I hope you have a wonderful weekend and will join us on Monday for a brand new challenge!


Thursday, October 1, 2015

I Love Fall!

Good morning!  Jessica here sharing a card celebrating my favorite season of the year, fall!  I combined a bunch of my favorite fall-themed Lawn Fawn sets and did a little no-line watercoloring!
I stamped the fox from Into the Woods, the pumpkins from So Thankful, and the foliage from Blissful Botanicals onto watercolor paper with a second generation stamping of antique linen distress ink.  Using a second generation stamping provides a very faint line to help with watercoloring.  Next I scribbled various zig clean color real brush markers onto my acrylic block and watercolored the images with a #2 paintbrush.  After they dried completely I fussy cut each image and set them aside while I worked on the rest of the card.  

For the background I inked up the woodgrain stamp with perfect medium and stamped it onto kraft cardstock.  Then I sprinkled on a couple metallic shades of perfect pearls powder and swirled them onto the stamp with a soft brush before buffing them off with a swiffer cloth.  Finally to seal the perfect pearls I spritzed it with water and dried it with my heat gun.  I stamped the sentiment onto the card and heat-embossed it with gold embossing powder.  Then I colored the heart with a red marker, went over it with clear wink of stella glitter, and applied a layer of glossy accents.  
Next I started assembling my card...I trimmed down the kraft cardstock and mounted it to a chocolate brown card base.  Then I added my watercolored images.  The foliage, fox, and large pumpkin were adhered with my ATG gun and the small pumpkin was adhered with foam mounting tape for a little added dimension.  I went over the pumpkins, the foliage, and the pinks of the fox's ears with clear wink of stella glitter, and finished the card with a handful of metallic gold sequins!  

For a complete supply list, please click here.  Thanks so much for visiting!  I hope you enjoyed my card!! 

-Jessica

Monday, September 28, 2015

One Layer Fall and Christmas Cards


Hello everybody, Heidi here, welcome to the Lawnscaping Challenge blog. We are currently having our Lawnscaping Challenge No. 114 "One Layer Cards", sponsored by Lawn Fawn. If you haven't enter it, you can do it HERE
To inspire you to participate, I had created couple of one layer cards, one for fall and one for Christmas. One layers cards are great for mailing, and also can be quickly made. So here are the cards that I made, I hope you'll enjoy them and enter this challenge, I can't wait to see all your creations

 For this card I sued the "into the woods" the leaves were from the "Happy harvest" and the banner from "bannerific" stamp sets by Lawn Fawn. I used a little bit of masking and I finished the card with some 4mm sequins. 

For this card I got inspired on a card that I made back in July, however it wasn't a one layer card nor a Christmas card, but the idea came from that card you can see the card here. For this card I used the "Baaah Humbug" stamp set, some masking, and some subtle ink blending. I used the stitched borders to emboss some decorative border along the left and bottom sides of the card, and finished with some sequins.

Masking is a great way to add dimensions to a one layer card. you can do a lot more complex masking, or you could make simple fast cards to send easily over the mail, the possibilities are endless. 

I hoped you enjoyed these cards and that you give them a try. I also hope that you enter the current Lawnscaping Challenge.
Have a wonderful week! 


Tuesday, July 28, 2015

Summer Friendship Card

Hi everyone! Roxanne here today with a step by step photo tutorial showing you how I created this fun summer friendship card using unexpected Lawn Fawn stamp sets. I love using my sets in fun ways that you may not think of pairing together. That's the beauty of creativity. So many possibilities.

LET'S GET STARTED!

I'm actually doing something totally different for me - I'm gathering my supplies BEFORE creating my card. I have an idea of what I'd like to create and then I gather the supplies and start crafting. I'm finding it's much easier (and faster) when I do this. I actually love it. I typically am a scrap as I go type person, pulling elements together while I'm in the midst of creating. But this is by far much easier. And it enables me to show you the process!

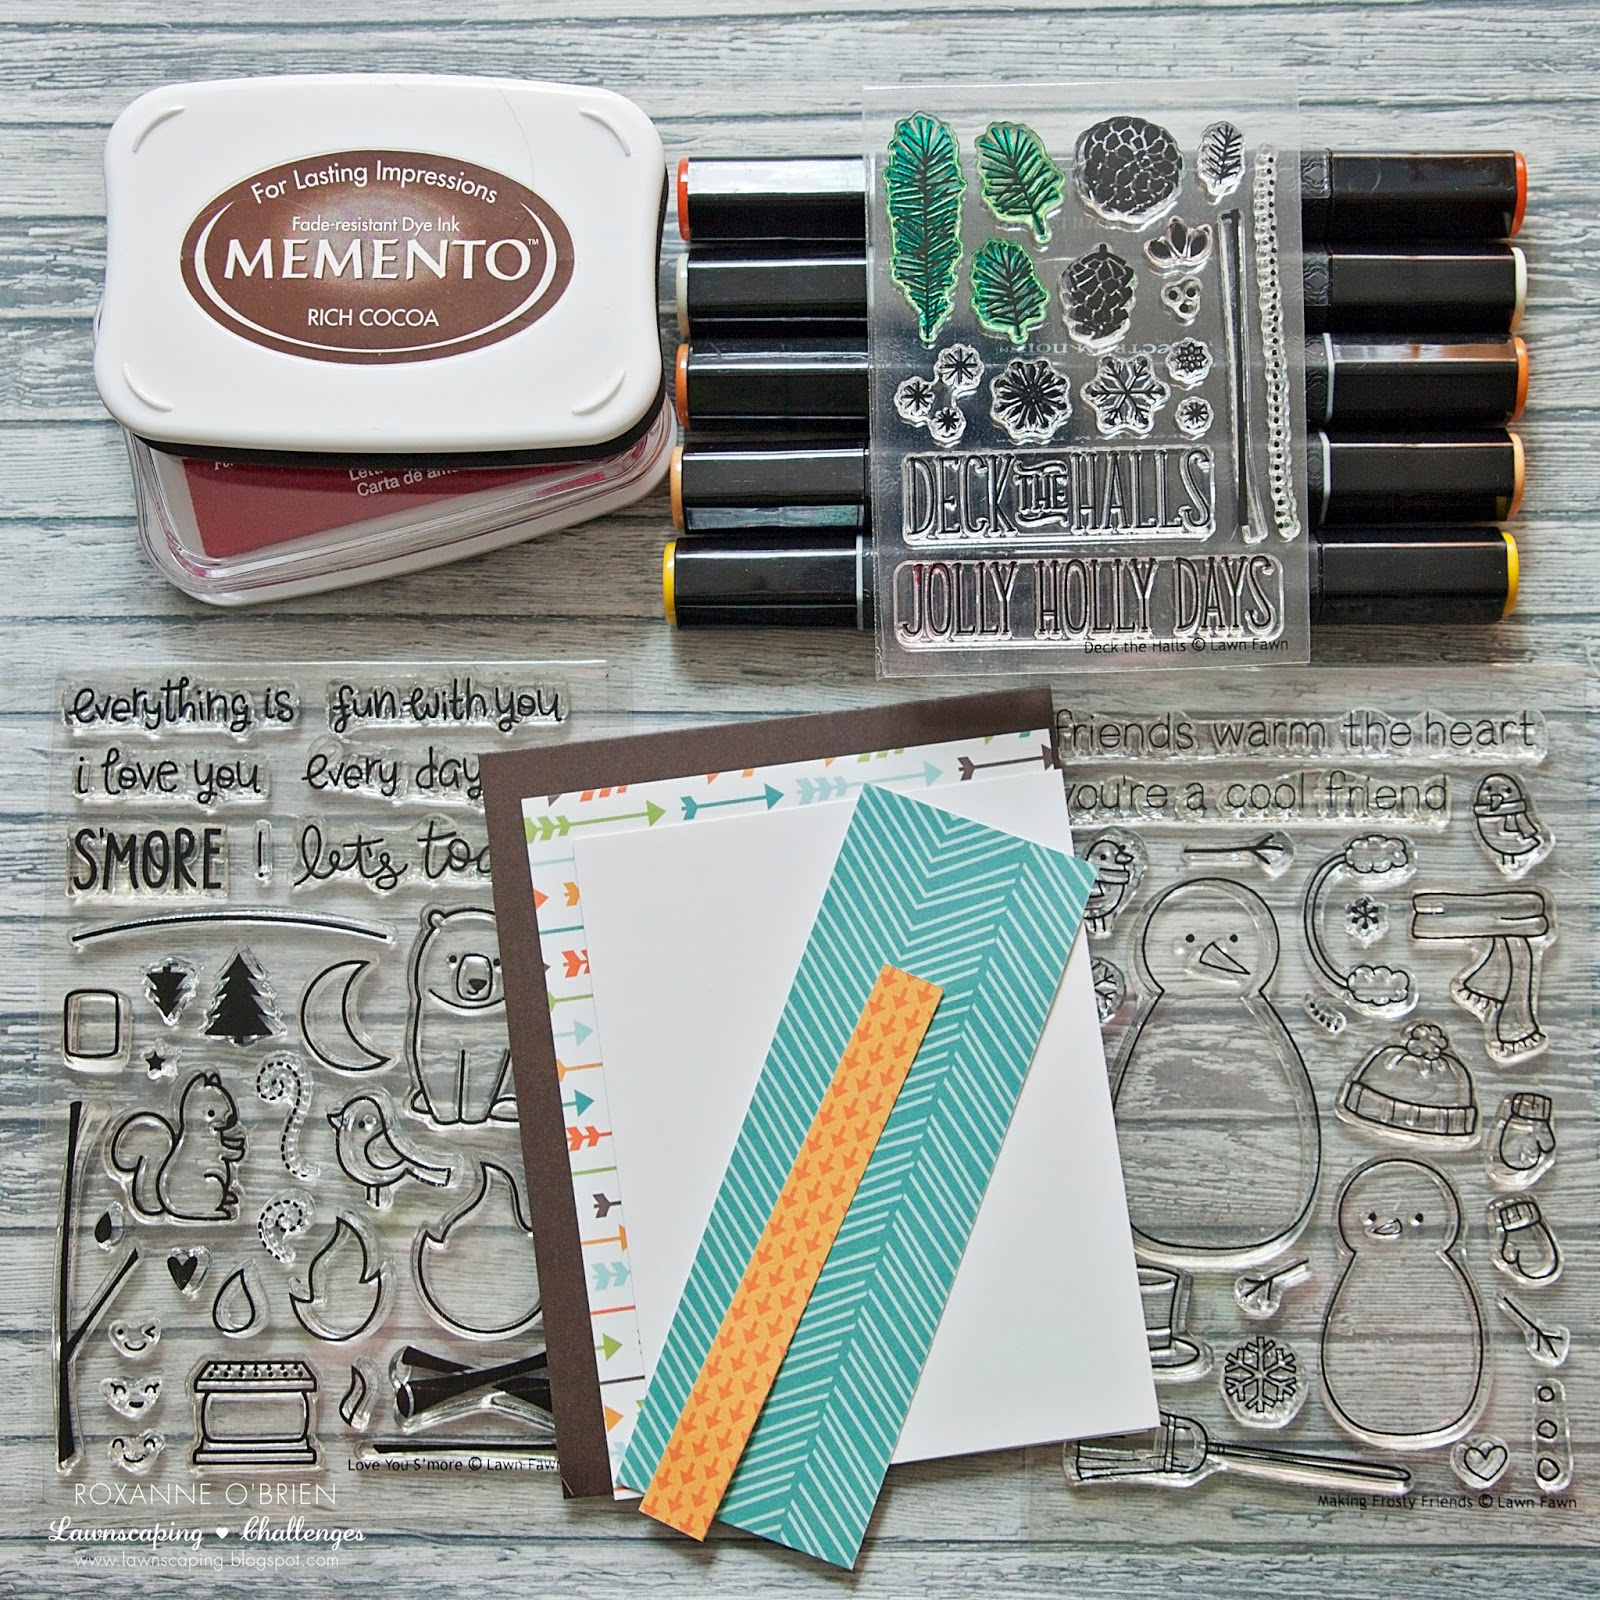
First, I gathered my supplies. Here is what I used to create this card:


I had actually trimmed everything out as well prior to starting. I cut my brown cardstock base from a piece I had in my stash (I keep pretty much every scrap!!) and scored/folded it to 4.25x5.5. I trimmed the arrow patterned paper to 4x5.25. I then cut a smaller piece of white cardstock which I was going to be stamping my scene on to. And then I simply trimmed the teal and orange patterned paper to various sizes. Nothing too specific. I hadn't really determined my final layout just yet. I did that as I went!

Next, I grabbed my piece of white cardstock and used the pine needles from the Deck the Halls set with my Pistachio ink and just stamped around the outer edges. I left a white space in the middle. I simply alternated the direction I stamped and I think it came out really cute so far!

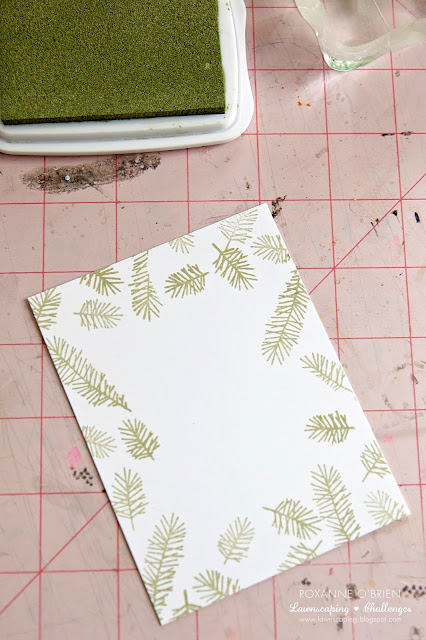
I realize my craft mat is quite, um, ugly, but it's well used and well loved! I'm sure you can relate. :) 

I took my small strip of orange/arrow paper and I stamped my sentiment for this card from the Making Frosty Friends set because it went perfectly with it! I inked that up with Memento in Rich Cocoa (I could have used the Luxe, but I grabbed my regular Memento instead because this text is a thin type font and I didn't want it to get "fat" from the juicier ink). I then stamped little red hearts next to it from the Love You S'More set, in Memento Luxe, Love Letter. Just a cute little touch. (You'll see that soon.)


In the white space I had left, I wanted to stamp in the wood from the Love You S'More set. I stamped that with my Rich Cocoa. I used Memento Luxe because it's a nice and juicy ink that really gets great coverage especially when using these solid image stamps! I stamped the wood a bit lower  because I will be adding elements above that area so I needed extra space. You'll see!


Next up, I inked up the marshmallow and fire from the Love You S'More set with my Memento in Rich Cocoa and stamped onto my white cardstock. I colored them in with my Spectrum Noir markers. I only used 5 markers total to color them in. Pretty easy peasy!


I fussy cut the fire and marshmallows out. I used foam adhesive to glue the fire to just on top of the logs I had stamped on the cardstock. It gives it a nice little bit of dimension. 


I knew I wanted to roast my marshmallows I had colored, so I inked up the branch from the Love You  S'More set and stamped that on the left side of the piece leaving enough room to add in my marshmallows to the branches. I used some foam adhesive again to give dimension.


Now after looking at my little campfire here with the toasting marshmallows, I knew I need to add the smiley face to the fire. It just makes it warmer, right? So cute!

Here is where I added in the red hearts stamped next to my sentiment. Brings in some nice color, too!


Now the fun part - ASSEMBLY! I played around with the layout a couple times before I glued anything down, but here is the final card with everything put together. 


I hope you enjoyed my little photo journey into my process of creating this card. I think this will be sweet to send to a friend that I've spent some time this summer with just to say thanks :) 

Monday, December 22, 2014

2015 Desktop Calendar

Hi everyone! It's Yuki here with my first blog post on the Lawnscaping blog :). One of my favorite things about the end of the year is buying new calendars for the following year. This year instead of buying a calendar, I decided to make my own desktop calendar to give as a gift.


I reused an old CD calendar case I had from a previous year as my calendar stand. For the dates, I used a calendar stamp set I had purchased specifically with this project in mind. However, you could also use calendar stickers, printables or even write the dates by hand. I found the stamp to be the most versatile and convenient since you can stamp it in different colors and even heat emboss it. I decided to make each month unique and tried to  highlight key dates such as holidays and even my friend's birthday.

Since I used a TON of different products (too many to list), I listed the Lawn Fawn products used for each month under the photo captions.

Winter Penguin; Yeti, Set, Go.

Science of Love, #awesome

Critters in the Forest, Hats Off To You, Grassy Border

Hello Baby, Milo's ABCs, Hello Sunshine

Critters at the Dog Park, Sweater Weather, Stitched Hillside Borders

Critters in the Burbs, Grassy Border

Life is Good, Let's Polka

Critters on the Savanna, Grassy Border

Into the Woods, Sweater Weather

Spooktacular, Stitched Hillside Borders, Forest Border

Finley's ABCs, Stitched Leaves, Violet's ABCs

Critters in the Arctic, Hats Off To You, Stitched Hillside Borders

Yay you made it to the end of the post! I know that was a lot of scrolling LOL, however I hope you enjoyed today's post. Although this project was a little more time consuming than most and did require some extra planning, it was super fun to make and I'm really happy with the end result. I hope my friend likes her handmade gift as much as I do!

Thanks again for stopping by and be sure to visit the Lawnscaping Challenges Facebook page for even more awesome inspiration. And also, don't forget to check out the latest Lawnscaping Challenge: Merry Christmas, you have until Wednesday to play along!

Happy Holidays! ♥


Thursday, November 27, 2014

Happy Thanksgiving

Hey everyone, Samantha here with a festive Thanksgiving card using some of my favorite Lawn Fawn supplies. Today is a wonderful chance to reflect on what you are most thankful for, whether it is your family, friends, or anything else special in your life.

Materials Used:
Cole's ABCs
Gold Sparkle Single Cord
Happy Feast
Into the Woods Petite Paper Pack
So Thankful
Stitched Journaling Card
Turkey Day

Thank you so much for stopping by. I hope you have a wonderful Thanksgiving!