Showing posts with label memento. Show all posts

Tuesday, December 27, 2016

Joy Ride

Good morning everyone! Roxanne here. I've got a little holiday card up today that I created. It's simple, but I really like the watercolor look.


Makes me think of snow. I just love the scene here with the little car pulling a cute trailer with a festive tree on top heading home to decorate it. Hey, I have an active imagination ;)


Thanks for stopping by. I hope you enjoyed my little card and that you have a happy holiday season. If you missed the announcement about the final Lawnscaping Challenge, please go here.

SUPPLIES USED:
  • Lawn Fawn Happy Trails
  • Lawn Fawn Merry Messages
  • Memento, Tuxedo Black
  • Crafter's Companion Ultra Smooth Premium White Cardstock
  • Spectrum Noir Alcohol Markers
  • Spectrum Noir Watercolor Cardstock
  • Spectrum Aqua Markers
  • Versafine, Onyx Black
  • Memento Luxe, Love Letter
  • Radiant Neon, Electric Green

Tuesday, May 24, 2016

Happy Birthday Muggle!

Good morning! Roxanne here today with a card that will make all you Harry Potter fans out there swoon. I must admit, this project knocked off my own socks.

Anyone who knows me knows I LOVE, LOVE, LOOOOOOOVE Harry Potter. I'd turn my room into a Hogwarts dream if I could. No joke.

So I was sitting wondering what type of project I was going to make for my post this month and I grabbed the owl from the Lawn Fawn Winter Owl and knew exactly what I wanted to do. I mean, he's wearing a scarf, so that right there screams HP to me. I cannot be the only one ;)

Once I started coloring him, the idea to put him on a broom came to mind. Then it was like a domino effect and I came up with this...


I made him into Harry Potter playing Quidditch. I thought this is perfect to give to the Harry Potter fan in my life, or just keep for myself to display. Either way! 

For the background, I used Distress Inks in Dusty Concord and Tumbled Glass and Memento in Nautical Blue with craft sponges and I made this magical looking sky. 


I then took some yellow patterend paper I had and cut a skinny strip for the stand and then two dies to make the opening of the Quidditch goal. I glued that down to the sky scene. For the sentiment, I took the happy birthday from the Lawn Fawn Party Animal set and stacked them. Under that, I used Milo's ABC's for spelling out MUGGLE! I gave the Muggle a bit of a shadow with some white ink behind it. 


I used the broom from the Lawn Fawn Critters in Costume, colored in with my Spetrum Noir Alcohol Markers and fussy cut it out. I used trimmed down foam adhesive behind it to give it dimension. 
Then I colored in Harry. I used a fine tip marker to draw on the scar to give it that special touch! Harry sports his scar, so this is no different! I placed him on the broom with some more foam adhesive. 


For the stars, I used some small rhinestones I had to make it sparkle a bit and bring some more life to this card. 

I hope you enjoyed my project today as much as I enjoyed making it! Thanks for stopping by. 

PRODUCTS USED:
  • Lawn Fawn Milo's ABC's
  • Lawn Fawn Winter Owl
  • Lawn Fawn Critters in Costume
  • Lawn Fawn Party Animal
  • Distress Ink: Dusty Concord and Tumbled Glass
  • Memento Ink: Tuxedo Black and Nautical Blue
  • Spectrum Noir Alcohol Markers: GB1, GB5, DR7, TN1, TN3, TN5, TN8, EB4, EB8, OR2, CR8

Tuesday, April 26, 2016

Jellyfish Greetings

Good morning! Roxanne here today with honestly one of my favorite cards I've created recently. I don't say that often, but I just love this one. I just bought this set and I couldn't wait to use it. I love the little jellyfish so much. Let's get started!

I knew I wanted to use my jellyfish image from the So Jelly set, so I started off by creating my blue water background. I used several inks and sponges and blended it until it was the color I desired. Seriously, my blue fingers and thumb for a day were totally worth the result!


Now, I actually made a bit of a mistake which turned out to be a neat look since this is a water scene after all. My ink that I had blended wasn't quite dry when I stamped on the bubbles from the same set in Versamark. I applied my white embossing powder and some of the powder around the bubbles actually stuck to the damp ink blended background as you can see. I didn't bother trying to wipe it off because I loved the way that looked! I heat embossed away and as you can see, it looks like some smaller bubbles. I like when a mistake turns out to look intentional! Just a tip...make sure your ink blended background is dry BEFORE you apply your embossing powder. Or, use that look to your advantage like I did.


For my jellyfish, I stamped 3 of them onto my premium white cardstock (all products used listed at the bottom of the blog post) in Tuxedo Black ink and I colored them each a slightly different color using my Spectrum Noir Markers and trimmed them out by hand. I added a light gray outline around them and left just a hair of white around that when trimming them out.

The sentiment is from the Love You A Latte set and I stamped that onto white cardstock I cut using the Stitched Labels Lawn Cuts. I added a simple rhinestone pearl to the dot of the "i".


To make that blue background I worked so hard to blend pop off the card, I decided to use an embossed black panel behind it. The panel looks like bubbles reminiscent of the water bubbles, so I thought it was perfect.

I have a simple white cardstock card base trimmed and scored to 4.25x5.5. I then adhered the embossed blak panel to the card base.


I stuck the jellyfish on with some more foam adhesive, leaving one off the edge of the blended panel. I flicked on some white Mister Huey's Color Mist all over to look like more bubbles under the water. I grabbed some white and turquoise twine and wrapped that around the bottom of the card three times and stuck my sentiment label on top of that off to the left with some foam adhesive. Then I used more foam adhesive to adhere my water background to the black.


And there you have it! A sweet little card filled with adorable little jellyfish! Thanks for checkout my project this month and I'll see you again next month. Happy crafting.

PRODUCTS:
  • Lawn Fawn So Jelly
  • Lawn Fawn Stitched Labels
  • Lawn Fawn Love You A Latte
  • Memento: Tuxedo Black, Nautical Blue and Summer Sky
  • Radiant Neon Ink: Electric Blue
  • Distress Ink: Tumbled Glass
  • Versafine: Onyx Black (for sentiment)
  • Versamark
  • White Embossing Powder
  • Cuttlebug Bubbles Embossing Folder
  • Mister Huey's Color Mist, Opaque White
  • Crafter's Companion Ultra Smooth Premium White Cardstock
  • Spectrum Noir Markers: FS5, FS8, PP2, PP6, CR3, CR7, CR11, BP5, BP7

Tuesday, March 22, 2016

Olive You

Good morning everyone! It's Roxanne up today with a cute little card for that special someone and what better way to make someone smile than with a pizza card?! Another set I've been wanting since I saw it, so I bought it and I couldn't wait to use it.


Ahhhhh! I can't stand the cuteness. Really. This set is so clever and has the funniest sentiments to use. Okay, so let's see more details of this card. I kept the layout simple to really showcase the cutie little pizza and sentiment/speech bubble.

I personally LOVE black olives on my pizzas, so that's why I used the OLIVE YOU sentiment and added some of those tasty black olives to my pizza. 


I used the Post-It technique to stamp the box "behind" the acutal pizza image. Totally simple technique but very effective. I use the cheapy Post-It notes I get in the Target or Michael's dollar bins. Then I don't feel bad using them for this! (Let's be real, genuine Post-It brand notes are EXPENSIVE!)


I hope you enjoyed by little pizza inspired love card! There are lots of toppings to choose from for your projects. No matter how you slice it, it's cute. (I'm here all day!) Happy crafting.

PRODUCTS USED:

Tuesday, February 23, 2016

Hello Baby Card

Good morning! It's Roxanne here on the blog today with a really sweet baby card that I created. I love to have cards in my stash that I can easily grab and send off when I need to instead of running to the store. Plus, a handmade card is special. Especially for someone with a new baby. They'll definitely appreciate the time and effort that you put into it! And this particular card is really simple.


I took a kraft paper base, scored it and folded to 4.25x5.5. I took the baby rattle and open heart stamp from the Lawn Fawn Hello Baby stamp set and inked them up with Memento Luxe in Wedding Dress and stamped it randomly to create a simple little background that peeks out. Fun little touch.


I then took some premium white cardstock and used the Lawn Fawn Let's Bokeh Lawn Cuts and cut out 3 circles. I inked up the larger bunny, sentiment hello baby, and the baby bunny from the set with some Memento in Tuxedo Black and stamped those into the circles I diecut. I used a Wink of Stella Brush pen to color over the sentiment and added a simple little twine bow above it. Then I colored the bunnies with my Spectrum Noir Markers (colors listed at the end). I tried using realistic coloring and shading for the bunnies especially the top bunny. I love how she came out!

For some color, I used a pretty floral piece of patterned paper from my stash and glued strips to either side of the brown and white graph paper. I rounded the two corners and adhered to my card base. I then used some foam adhesive to glue down the 3 circles in the center of that. And just for an elegant touch, I used some small self adhesive pearls on the grid lines of the graph paper.


Very simple yet soft and elegant card perfect for a new baby! I hope you're inspired to create a soft and simple card just like this. Thanks for stopping by and happy crafting.

SUPPLIES USED:

Tuesday, October 27, 2015

Happy Haunting Card

Good morning, Roxanne here today with a cute Halloween-themed card for you! I had a lot of fun creating this cute little card, so sit down and take a scroll with me through the process. I've listed all the supplies I've used at the end of this post.


My first step was to create my card base. I used a plain black cardstock that I cut, scored and folded to 4.25x5.5. I grabbed a piece of my patterned paper that I was going to adhere to the front of my card and diecut out a larger circle. I traced that diecut onto the card base so I knew where I was going to need to stamp/create my sky.

I used several star stamps from the Booyah and Party Animal sets with some Delicata in Golden Glitz and heat embossed them with clear embossing powder. I then took a sponge and my Dandelion ink pad and swirled on the hazy sky on a portion of the circle.


My next step is to stamp and create my little critters that I wanted as part of my Halloween scene. I was quite giddy when I realized that the hat and Frankenstein hair/stitches fit PERFECTLY onto the animals from the Party Animals set. I just wanted to use something cute, other than a ghost! 

I stamped these onto some quality coloring cardstock with Tuxedo Black (Memento). I masked the top hat and hair before stamping the bear onto the cardstock. I simply stamped the hat and hair image onto a sticky note, fussy cut that out carefully, and stuck that down over my stamped images of the hat and hair. This allows you to stamp over that with the bear stamp so that once the mask is lifted, it looks like it was all one image! 


Next, I colored and cut out my bears. Now as you can see, even though I'm really careful about trimming around the edges, you always end up with a very slight white edge. What I do is take a black marker (I used my Spectrum Noir True Black) and lightly go around the edge of the image so that it looks like you cut it perfectly and have clean black edges. Just a little tip I do. You'll see in the image above that I touched up the brown bear. 


Here are all my elements for my card. Let's assemble!


A little close up of the details!

I hope you liked my little Halloween card. Thanks for checking out my project! Happy crafting.


SUPPLIES USED:

Tuesday, July 28, 2015

Summer Friendship Card

Hi everyone! Roxanne here today with a step by step photo tutorial showing you how I created this fun summer friendship card using unexpected Lawn Fawn stamp sets. I love using my sets in fun ways that you may not think of pairing together. That's the beauty of creativity. So many possibilities.

LET'S GET STARTED!

I'm actually doing something totally different for me - I'm gathering my supplies BEFORE creating my card. I have an idea of what I'd like to create and then I gather the supplies and start crafting. I'm finding it's much easier (and faster) when I do this. I actually love it. I typically am a scrap as I go type person, pulling elements together while I'm in the midst of creating. But this is by far much easier. And it enables me to show you the process!

First, I gathered my supplies. Here is what I used to create this card:


I had actually trimmed everything out as well prior to starting. I cut my brown cardstock base from a piece I had in my stash (I keep pretty much every scrap!!) and scored/folded it to 4.25x5.5. I trimmed the arrow patterned paper to 4x5.25. I then cut a smaller piece of white cardstock which I was going to be stamping my scene on to. And then I simply trimmed the teal and orange patterned paper to various sizes. Nothing too specific. I hadn't really determined my final layout just yet. I did that as I went!

Next, I grabbed my piece of white cardstock and used the pine needles from the Deck the Halls set with my Pistachio ink and just stamped around the outer edges. I left a white space in the middle. I simply alternated the direction I stamped and I think it came out really cute so far!


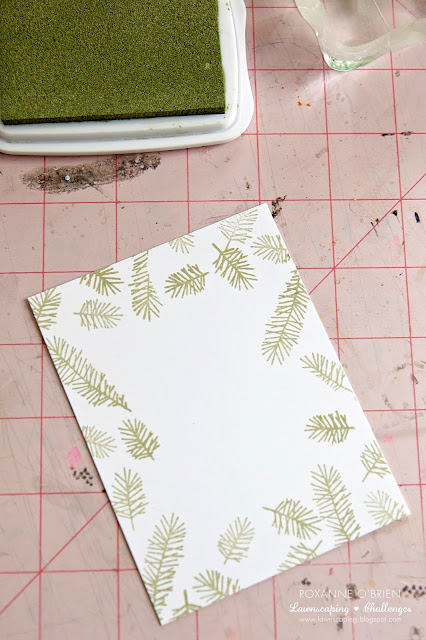
I realize my craft mat is quite, um, ugly, but it's well used and well loved! I'm sure you can relate. :) 

I took my small strip of orange/arrow paper and I stamped my sentiment for this card from the Making Frosty Friends set because it went perfectly with it! I inked that up with Memento in Rich Cocoa (I could have used the Luxe, but I grabbed my regular Memento instead because this text is a thin type font and I didn't want it to get "fat" from the juicier ink). I then stamped little red hearts next to it from the Love You S'More set, in Memento Luxe, Love Letter. Just a cute little touch. (You'll see that soon.)


In the white space I had left, I wanted to stamp in the wood from the Love You S'More set. I stamped that with my Rich Cocoa. I used Memento Luxe because it's a nice and juicy ink that really gets great coverage especially when using these solid image stamps! I stamped the wood a bit lower  because I will be adding elements above that area so I needed extra space. You'll see!


Next up, I inked up the marshmallow and fire from the Love You S'More set with my Memento in Rich Cocoa and stamped onto my white cardstock. I colored them in with my Spectrum Noir markers. I only used 5 markers total to color them in. Pretty easy peasy!


I fussy cut the fire and marshmallows out. I used foam adhesive to glue the fire to just on top of the logs I had stamped on the cardstock. It gives it a nice little bit of dimension. 


I knew I wanted to roast my marshmallows I had colored, so I inked up the branch from the Love You  S'More set and stamped that on the left side of the piece leaving enough room to add in my marshmallows to the branches. I used some foam adhesive again to give dimension.


Now after looking at my little campfire here with the toasting marshmallows, I knew I need to add the smiley face to the fire. It just makes it warmer, right? So cute!

Here is where I added in the red hearts stamped next to my sentiment. Brings in some nice color, too!


Now the fun part - ASSEMBLY! I played around with the layout a couple times before I glued anything down, but here is the final card with everything put together. 


I hope you enjoyed my little photo journey into my process of creating this card. I think this will be sweet to send to a friend that I've spent some time this summer with just to say thanks :) 

Tuesday, June 23, 2015

Rainy Day Hello Card

Good morning! Roxanne here with a card that I thought was fitting for the rain we've been having here in Chicago. Seems to have rained quite a bit so far this spring/beginning of summer. I decided to make a bright little card today that is inspired by the rain.

I recently bought this Lawn Fawn, Hello Baby set and I have been wanting to use it. I also wanted the main image to really be the only thing in color, so it really stands out.

I went with a white card base, scored and folded to 4.25x5.5. Then I cut two smaller panels, both 4x5.25. I glued one down to the base. The other, I used an embossing folder with little dots on it and ran that through my machine. I then took a die I have in my supplies and die cut out the shape in the center of the card. For this panel, I did use a watercolor cardstock for texture and because I was going to be coloring in my little scene with my watercolor markers.


With the diecut piece, I started with my little scene. First, I stamped the duck from the Lawn Fawn Hello Baby set. I then stamped that again on a sticky note to create my mask. I cut out around that from the sticky note and stuck it over my stamped image on the watercolor cardstock. This will allow you to stamp over that and create a fun look that makes it look like he's holding the umbrella. I next stamped the umbrella and then the grass below his feet. For the grass, I just used the grass image from the Hello Baby set with some Memento Luxe in Pistachio and stamped that randomly to make it look like he's standing in the tall grass in a field.

I colored in my little ducky with my Spectrum Aqua markers (colors listed at the end), and the umbrella as well.

I made another mask with the umbrella and clouds by using the same sticky note technique above. This way, you can layer stamped images and it allows you to give so much dimension to your scenes! I used the mask for the clouds for the rain as well. I used the triple dotted lined image from the same set and stamped that with Memento ink in Summer Sky (how appropriate!) to give it some movement. I added several sequins from Lawn Trimmings I had on hand.

Next, I actually adhered the embossed panel down first over the plain panel I had glued down previously to line them up. I used a thick foam circle adhesive for this to pop it further off the card. For the stamped/colored scene, I used a thinner foam circle adhesive to give it a tiny bit of pop, but to leave room between that and the embossed panel I stuck down. I just then snuck that into the opening and pressed down to adhere.

In my stash, I had this little Basic Grey chipboard tag and stamped the hello from that same set in Memento in Tuxedo Black. I tied a simple bow around the end of the tag with some Lawn Trimmings cord, and then glued that down underneath the diecut panel.

I just love all the white and pop of color in the center from my little stamped scene. I hope you enjoyed my project today! Thanks for stopping by. :)


Supplies:
Lawn Fawn Hello Baby!
Lawn Fawn Lawn Trimmings - Triple Cord, Natural  and Fall Sequins
Memento, Tuxedo Black & Summer Sky
Memento Luxe, Pistachio
Basic Grey Chipboard Elements, Hey You Collection
Cuttlebug Embossing A2 Folder, Swiss Dots
Spectrum Noir Watercolour Cardstock
Spectrum Aqua Markers - Kingfisher, Charcoal (clouds); Sunflower, Sunset, Jasmine (duck); Red Violet, Sea Green (umbrella); Moss (grass)
Papertrey Ink - Mat Stack 3 Die

Tuesday, April 21, 2015

I'm So Thankful for You!

Good morning! Roxanne here today to show you a colorful project that I created for a Mother's Day card. I'll be making a few more for those special women in my life.

I love using bright colored images with black. It really makes your bright images pop off the page or card.

I chose a simple white base for my card. I always use a folded 4.25x5.5 card. It fits perfectly into an A2 envelope. You can get fun colored envelopes if you'd like, too! Adds a fun touch to someone's mailbox :)


I used a 4x5.25 piece of shimmering cardstock (Crafter's Companion, Silver Starlight) and a dotted stencil (Heidi Swapp) with some embossing paste (Dreamweaver Stencils, Embossing Paste). This was my first time using it and I'm definitely using this more often! It was really quite easy and fun, just took a little time to dry. After it was dry, I rubbed on some Versamagic ink in Thatched Straw just in one section. I love the look of this in person!

For the focal point, I used the Lawn Fawn Tag You're It dies to cut out the tag and hole. For the tag, I used Memento Luxe in Wedding Dress with various images from the Lawn Fawn Flutter By. I just am loving the chalkboard look lately. The hole for the tag was cut out on the yellow striped paper from the Lawn Fawn 6x6 Let's Polka Petite Paper Pack. Little touches make an impact I think.

The butterfly, rose, and leaves were stamped onto white cardstock with Memento in Tuxedo Black. I then colored them in with my Spectrum Noir Blendable Colored Pencils. I used the paper stumps and blending solution to blend my coloring. I cut them out leaving a slight white border. Using foam adhesive, I glued them to the tag I created. I love the punch of color!! The cord at the top of the tag is a little piece of cord from Lawn Fawn's Lawn Trimmings, Pink Lemonade. It matched the pink in the rose I colored.

The sentiment blocks were stamped on white cardstock with Memento in Tuxedo Black and I simply cut around them in a rectangle shape. These are from the Lawn Fawn Happy Feast set.


I used foam adhesive to glue down the tag and sentiment blocks to the embossed piece. There you go!  A beautiful Mother's Day card. I hope you're inspired to create some beautiful, and simple, cards for those special women in your life for Mother's Day :)

Thursday, February 26, 2015

i ruff you

Good morning, Roxanne here today! I created this cute little card today that I'd love to share with you.

Here is my project - a totally cute little card for that special someone!


For this card, I used a simple mossy colored card base. It's a linen paper, so it's already nice and textured! I then took a sheet of the green pattered paper from the 6x6 Snow Day Petite Paper Pack and cut it into strips. They're roughly 1" wide. I then glued them on an angle on the card base. I love when you can use a holiday paper on a non-holiday card! I thought it went perfectly with this card. 

For the image, I stamped the frame from the Say Cheese set with Memento, Tuxedo Black onto a white card stock. I then cut out the frame leaving a thing white border all the way around. I did this because I knew that I was going to be cutting out the other images and leaving a white border as well. This way, it all goes together :) 


I used the paw print from the Critters at the Dog Park set and stamped them in Versamagic, Sugarcane. It's a pretty, soft taupe color. Very subtle. I simply stuck Post-It notes over the border of the frame to make sure the paw prints didn't go over that border. 

I used the grass image from the same set with Radiant Neon in Electric Green. I stamped several rows of this and layered them up so the grass looked fuller. Who doesn't love full, lush grass??

I could not resist the French bulldog from the Critters at the Dog Park set either!! I love him. I colored him in brown tones with my Spectrum Noir Markers. I cut him out, leaving the thin white border around the edges. I then took the bow tie image and stamped that onto a piece of the blue polka dot paper from the 6x6 Let's Polka Petite Paper Pack. His little nose was colored in using a black Spica pen, so it's just a touch sparkly in person. Reminiscent of a wet dog nose!

The card still needed something else, so I grabbed the large tree from the Critters in the Burbs


I glued that down with some adhesive, hanging it over the edge of the frame, and I just cut the bottom of the tree to stop at the bottom of the inner frame. For the bulldog, I popped him up with some foam adhesive. 

The sentiment, i ruff you, was stamped in Memento Luxe, Love Letters. It's the perfect color for love!

I hope you enjoyed my card I created today!