Showing posts with label spectrum noir markers. Show all posts

Tuesday, December 27, 2016

Joy Ride

Good morning everyone! Roxanne here. I've got a little holiday card up today that I created. It's simple, but I really like the watercolor look.


Makes me think of snow. I just love the scene here with the little car pulling a cute trailer with a festive tree on top heading home to decorate it. Hey, I have an active imagination ;)


Thanks for stopping by. I hope you enjoyed my little card and that you have a happy holiday season. If you missed the announcement about the final Lawnscaping Challenge, please go here.

SUPPLIES USED:
  • Lawn Fawn Happy Trails
  • Lawn Fawn Merry Messages
  • Memento, Tuxedo Black
  • Crafter's Companion Ultra Smooth Premium White Cardstock
  • Spectrum Noir Alcohol Markers
  • Spectrum Noir Watercolor Cardstock
  • Spectrum Aqua Markers
  • Versafine, Onyx Black
  • Memento Luxe, Love Letter
  • Radiant Neon, Electric Green

Tuesday, April 26, 2016

Jellyfish Greetings

Good morning! Roxanne here today with honestly one of my favorite cards I've created recently. I don't say that often, but I just love this one. I just bought this set and I couldn't wait to use it. I love the little jellyfish so much. Let's get started!

I knew I wanted to use my jellyfish image from the So Jelly set, so I started off by creating my blue water background. I used several inks and sponges and blended it until it was the color I desired. Seriously, my blue fingers and thumb for a day were totally worth the result!


Now, I actually made a bit of a mistake which turned out to be a neat look since this is a water scene after all. My ink that I had blended wasn't quite dry when I stamped on the bubbles from the same set in Versamark. I applied my white embossing powder and some of the powder around the bubbles actually stuck to the damp ink blended background as you can see. I didn't bother trying to wipe it off because I loved the way that looked! I heat embossed away and as you can see, it looks like some smaller bubbles. I like when a mistake turns out to look intentional! Just a tip...make sure your ink blended background is dry BEFORE you apply your embossing powder. Or, use that look to your advantage like I did.


For my jellyfish, I stamped 3 of them onto my premium white cardstock (all products used listed at the bottom of the blog post) in Tuxedo Black ink and I colored them each a slightly different color using my Spectrum Noir Markers and trimmed them out by hand. I added a light gray outline around them and left just a hair of white around that when trimming them out.

The sentiment is from the Love You A Latte set and I stamped that onto white cardstock I cut using the Stitched Labels Lawn Cuts. I added a simple rhinestone pearl to the dot of the "i".


To make that blue background I worked so hard to blend pop off the card, I decided to use an embossed black panel behind it. The panel looks like bubbles reminiscent of the water bubbles, so I thought it was perfect.

I have a simple white cardstock card base trimmed and scored to 4.25x5.5. I then adhered the embossed blak panel to the card base.


I stuck the jellyfish on with some more foam adhesive, leaving one off the edge of the blended panel. I flicked on some white Mister Huey's Color Mist all over to look like more bubbles under the water. I grabbed some white and turquoise twine and wrapped that around the bottom of the card three times and stuck my sentiment label on top of that off to the left with some foam adhesive. Then I used more foam adhesive to adhere my water background to the black.


And there you have it! A sweet little card filled with adorable little jellyfish! Thanks for checkout my project this month and I'll see you again next month. Happy crafting.

PRODUCTS:
  • Lawn Fawn So Jelly
  • Lawn Fawn Stitched Labels
  • Lawn Fawn Love You A Latte
  • Memento: Tuxedo Black, Nautical Blue and Summer Sky
  • Radiant Neon Ink: Electric Blue
  • Distress Ink: Tumbled Glass
  • Versafine: Onyx Black (for sentiment)
  • Versamark
  • White Embossing Powder
  • Cuttlebug Bubbles Embossing Folder
  • Mister Huey's Color Mist, Opaque White
  • Crafter's Companion Ultra Smooth Premium White Cardstock
  • Spectrum Noir Markers: FS5, FS8, PP2, PP6, CR3, CR7, CR11, BP5, BP7

Tuesday, March 22, 2016

Olive You

Good morning everyone! It's Roxanne up today with a cute little card for that special someone and what better way to make someone smile than with a pizza card?! Another set I've been wanting since I saw it, so I bought it and I couldn't wait to use it.


Ahhhhh! I can't stand the cuteness. Really. This set is so clever and has the funniest sentiments to use. Okay, so let's see more details of this card. I kept the layout simple to really showcase the cutie little pizza and sentiment/speech bubble.

I personally LOVE black olives on my pizzas, so that's why I used the OLIVE YOU sentiment and added some of those tasty black olives to my pizza. 


I used the Post-It technique to stamp the box "behind" the acutal pizza image. Totally simple technique but very effective. I use the cheapy Post-It notes I get in the Target or Michael's dollar bins. Then I don't feel bad using them for this! (Let's be real, genuine Post-It brand notes are EXPENSIVE!)


I hope you enjoyed by little pizza inspired love card! There are lots of toppings to choose from for your projects. No matter how you slice it, it's cute. (I'm here all day!) Happy crafting.

PRODUCTS USED:

Tuesday, December 22, 2015

Holiday Joy Card

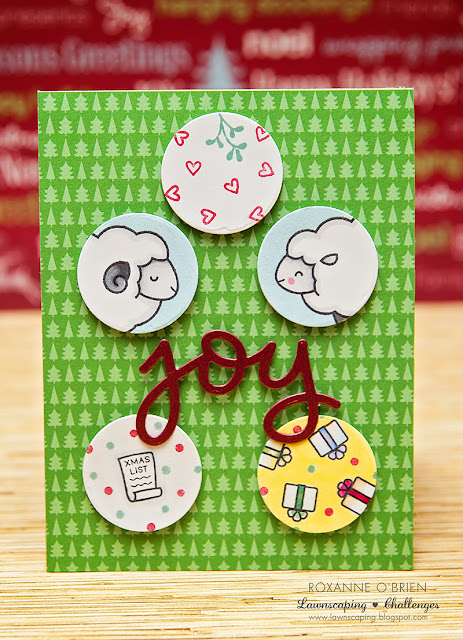
Good morning! Roxanne here today with a holiday themed card I created. Let's check it out! My supplies are listed at the end as well.


I wanted to make something really bright and cheery for a holiday card. I used the green tree paper from the 6x6 Snow Day Paper Pack and cut to my card size (4.25x5.25) and adhered to the card base. That green is the perfect color for the other elements I used. It makes them really pop off the page. Okay, foam adhesive helped there too ;)


I diecut the "joy" from the Scripty Joy Lawn Cuts out of some beautiful shimmering cardstock in Candy Red (what a perfect name). I trimmed some foam adhesive down to fit onto the back because I really wanted dimension to this card.


For the circle elements, I used the Let's Bokeh Lawn Cuts and cut out 5 circles out of the largest die out of my white cardstock I used for coloring. I stamped my little elements in there using the Baaah Humbug set. I colored them all in with my Spectrum Noir Markers and added some sheen in there with my Spectrum Noir Sparkle Pens. I wish you could see the sparkle it adds!


I arranged the circles and joy diecut on my card and used foam adhesive for everything to pop it up off that bright green tree paper. I hope you enjoyed my project. There is still a little time to create some adorable holiday cards, or even a quick gift of thank you notes, matching envelopes and a pretty pen for giving. Happy Holidays!

SUPPLIES USED:
  • Let's Bokeh Lawn Cuts
  • Scripty Joy Lawn Cuts
  • Baaah Humbug
  • Crafter's Companion Shimming Cardstock, Candy Red
  • Distress Ink, Evergreen Bough
  • Memento Luxe, Love Letter
  • Spectrum Noir Markers: IG1, IG4, IG7, GG1, JG1, JG3, DG1, DG3, TB2, TB4, IB1, LG1, LY3, TN3, CR5, IG2, Blender
  • Spectrum Noir Sparkle Pens: Moonstone, Crystal Clear, Moonlight