Showing posts with label So Jelly. Show all posts

Tuesday, April 26, 2016

Jellyfish Greetings

Good morning! Roxanne here today with honestly one of my favorite cards I've created recently. I don't say that often, but I just love this one. I just bought this set and I couldn't wait to use it. I love the little jellyfish so much. Let's get started!

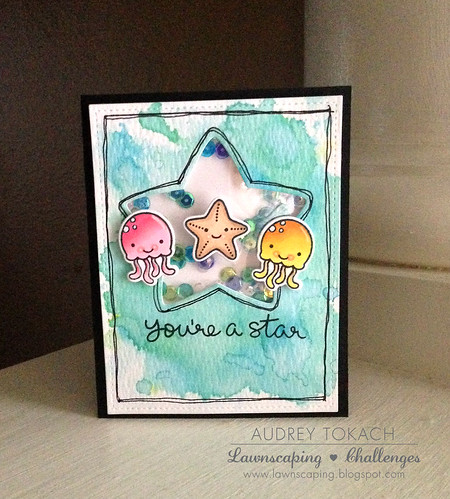
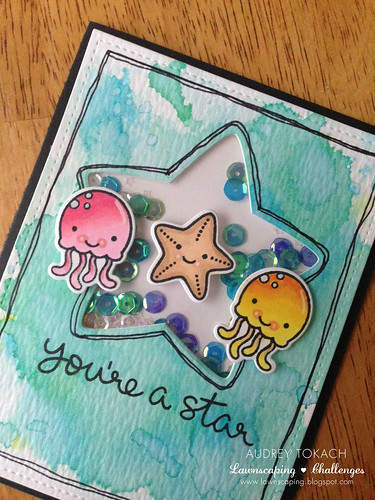
I knew I wanted to use my jellyfish image from the So Jelly set, so I started off by creating my blue water background. I used several inks and sponges and blended it until it was the color I desired. Seriously, my blue fingers and thumb for a day were totally worth the result!


Now, I actually made a bit of a mistake which turned out to be a neat look since this is a water scene after all. My ink that I had blended wasn't quite dry when I stamped on the bubbles from the same set in Versamark. I applied my white embossing powder and some of the powder around the bubbles actually stuck to the damp ink blended background as you can see. I didn't bother trying to wipe it off because I loved the way that looked! I heat embossed away and as you can see, it looks like some smaller bubbles. I like when a mistake turns out to look intentional! Just a tip...make sure your ink blended background is dry BEFORE you apply your embossing powder. Or, use that look to your advantage like I did.


For my jellyfish, I stamped 3 of them onto my premium white cardstock (all products used listed at the bottom of the blog post) in Tuxedo Black ink and I colored them each a slightly different color using my Spectrum Noir Markers and trimmed them out by hand. I added a light gray outline around them and left just a hair of white around that when trimming them out.

The sentiment is from the Love You A Latte set and I stamped that onto white cardstock I cut using the Stitched Labels Lawn Cuts. I added a simple rhinestone pearl to the dot of the "i".


To make that blue background I worked so hard to blend pop off the card, I decided to use an embossed black panel behind it. The panel looks like bubbles reminiscent of the water bubbles, so I thought it was perfect.

I have a simple white cardstock card base trimmed and scored to 4.25x5.5. I then adhered the embossed blak panel to the card base.


I stuck the jellyfish on with some more foam adhesive, leaving one off the edge of the blended panel. I flicked on some white Mister Huey's Color Mist all over to look like more bubbles under the water. I grabbed some white and turquoise twine and wrapped that around the bottom of the card three times and stuck my sentiment label on top of that off to the left with some foam adhesive. Then I used more foam adhesive to adhere my water background to the black.


And there you have it! A sweet little card filled with adorable little jellyfish! Thanks for checkout my project this month and I'll see you again next month. Happy crafting.

PRODUCTS:
  • Lawn Fawn So Jelly
  • Lawn Fawn Stitched Labels
  • Lawn Fawn Love You A Latte
  • Memento: Tuxedo Black, Nautical Blue and Summer Sky
  • Radiant Neon Ink: Electric Blue
  • Distress Ink: Tumbled Glass
  • Versafine: Onyx Black (for sentiment)
  • Versamark
  • White Embossing Powder
  • Cuttlebug Bubbles Embossing Folder
  • Mister Huey's Color Mist, Opaque White
  • Crafter's Companion Ultra Smooth Premium White Cardstock
  • Spectrum Noir Markers: FS5, FS8, PP2, PP6, CR3, CR7, CR11, BP5, BP7

Tuesday, August 18, 2015

You're a Star Shaker Card!

Hello there!  Audrey here! :)

I want to apologize in advance if these pictures aren't the greatest.... it's rainy season in Florida, and with daily rain, my window for picture taking isn't a very long one.  LOL!

Today, I have an under the sea shaker to share with you!  I started off by watercoloring a piece of  watercolor paper with Distress inks.  When it was dry, I diecut it with the largest die from the Small Stitched Rectangles Stackables die set.  From that, I also diecut a star shaped window using the Puffy Star Stackables die set.  Before filling my shaker, I stamped a sentiment from the So Jelly stamp set, and then added my shaker contents.  I popped up some Copic colored Jelly fish and a cute little starfish, also from the So Jelly Stamp set, up on the front of the shaker window with foam tape. After seeing it all put together, the black sentiment seemed to really stand out, and not in a good way.  LOL!  So I added some doodled lines to frame the star window the the entire panel, and then popped everything onto a black card base to balance things out a bit better.


You're a Star!

Here you can see the shaker a little closer:


You're a Star!

Hope you like it!  Thanks for stopping by! :)

Supplies:
Stamps: Lawn Fawn So Jelly
Dies: Lawn Fawn So Jelly, Small Stitched Rectangles, Puffy Star Stackables
Other: Distress Ink, White Gel Pen, Copic Multiliner, Copic Markers, Foam Tape

Thursday, August 13, 2015

Hugs and fishes


Hello.
I have a fun exploding card for you today. 
 I used a tutorial from Balzer designs blog , it popped up on my Pinterest feed and I knew exactly what I wanted to do with it.
At first glance you might think this is a simple card. 
Well that's the plan so that once its opened you get a surprise  when it folds out.


You get some idea of the exploding part from the above picture.


This is almost fully opened but it wouldn't stay down for me to get a picture.
Its a one layer wonder inside so that it fold easily.


Another view. It really is very simple to make.
The actual folding part is very quick to do and how long you spend making it would depend completely on how detailed you wanted to make the design inside or out.


The instructions.

To start i cut some white card to 8 1/4 inches square and followed the folding described in the tutorial.
Then I die cut the scripty hugs from a post it note and placed on the card.
I used the mask rather than a die cut to keep the bulk down and to only have one layer.
Next I stamped all of my images from so jelly, and critters in the sea with black archival ink.
The longest step is the next one, fussy cutting the masks.
Once they were all in place I used distress inks to make the background.
Finally you can unmask and colour the images.

I used a mixture of Prisma color pencils, copics and  covered all the images with some wink of stella.
Extra details in white were done with white souffle pen and white signo uni-ball pen. 
You can add as much detail or keep it as cas as you like.
I hope I've inspired you to give this a try, it makes a really fun card.

Thanks for looking.


Monday, August 10, 2015

Layering Clear Embossing Over Distress Ink for a Subtle Background

You're a Star Card by Jess Gerstner featuring Lawn Fawn Starry Backdrops Word Dies So Jelly and Stitched Borders

Hello crafty friends! It's Jess and today I have a card featuring some fun ink blending with embossing layered on top and the Lawn Fawn stitched borders for added interest. I really like how the stitched border can add a layer of texture to make the white space on a card more interesting. For more on how I achieved this look check out my video.


As discussed in the video I added some distress ink after masking off the stitched area with some tape. I love how the Starry Backdrops looked layered on the blending and how it gave me another way to use that fun scripty sentiment from So Jelly. This would be fun to create with any of the backdrops and word dies you happen to own.

You're a Star Card by Jess Gerstner featuring Lawn Fawn Starry Backdrops Word Dies So Jelly and Stitched Borders

I hope you enjoyed my card and video! Don't forget to participate in the latest challenge Back to School!

You're a Star Card by Jess Gerstner featuring Lawn Fawn Starry Backdrops Word Dies So Jelly and Stitched Borders

Monday, July 13, 2015

Ink Smooshing to Create an Ocean Background featuring So Jelly

Distress Ink Smooshing to Create an Ocean Background and Color Lawn Fawn Stamps by Jess Gerstner for Lawnscaping

Hello crafty friends! It's Jess and today I have a card featuring the fun ink smooshing technique. I think it creates a cool background for the animals to 'swim' in but I also used it to color the animals before die cutting them. For more on how I achieved this look check out my video.


As discussed in the video I added some distress ink to a clear block spritzed it with water and smooshed it down to get this watercolor look. I even added some sequins at the end to tie in the Sparkle and Shine from Challenge 109. There are so many great ocean animal sets from Lawn Fawn that would be perfect for this technique. 

Distress Ink Smooshing to Create an Ocean Background and Color Lawn Fawn Stamps by Jess Gerstner for Lawnscaping

I hope you enjoyed my card and video! Don't forget to participate in the latest challenge Sparkle and Shine!