Showing posts with label Joy to the Woods. Show all posts

Tuesday, December 13, 2016

Merry Christmas!

Hi! Chrissie here! I wanted to share a card I created for Christmas.  I know we are all in the thick of making Christmas cards, so I wanted to inspire!


I used Cheery Christmas and Joy To The Woods.  Everything was colored in using Spectrum Noir markers.

Thanks for stopping by!
-Chrissie

Monday, August 8, 2016

Getting in the holiday spirit!

Good morning, Jess here!  I'm telling you...I am SO over hot, humid weather...I made several cards this weekend and realized they all featured snow!  On the plus side it's building my stockpile of Christmas cards! :)
lsaugsolo
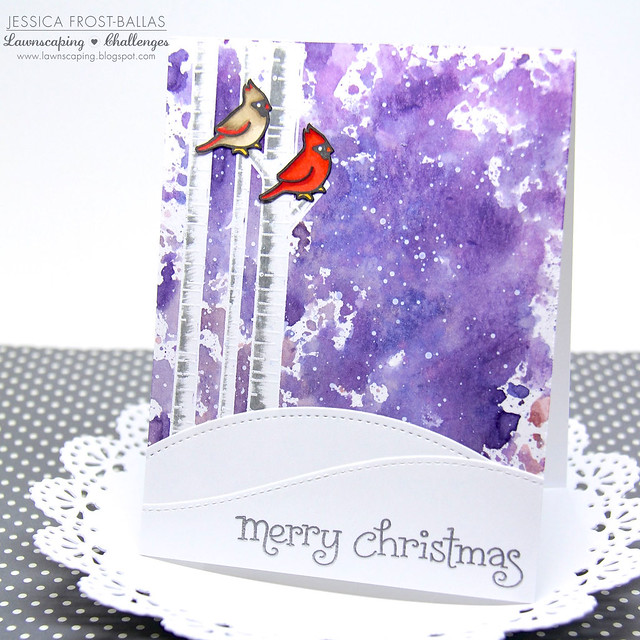
To start I stamped the trees from Joy to the Woods with versamark onto watercolor paper and heat-embossed it with white embossing powder.  Then I covered it with frisket and let it dry before I worked on the rest of the background.  I smooshed Seedless Preserves, Chipped Sapphire, and Victorian Velvet distress ink onto a craft mat and then spritzed it with water.  I used my finger to blend the colors around a little and then picked up the ink with a piece of acetate.  I brought the ink to my watercolor paper and smooshed it on.  I repeated the process a few times until I was happy with the coverage and then let it dry.  Once it was totally dry I flicked white paint across the background and let it dry.

Next I rubbed the frisket off of the trees and used Hickory Smoke distress ink and a dry paint brush to add some shading to the trees.  I die-cut two hills from white cardstock using the Simple Stitched Hillside Borders and the Stitched Hillside Borders dies.  I stamped the sentiment from Joy to the Woods with versamark on one hill and heat-embossed it with silver embossing powder. 

Finally I stamped the two cardinals from Joy to the Woods, colored them with copic markers, fussy cut them, and adhered them to the card with foam mounting tape.  And now I'll go back to dreaming about the first snow we'll get this winter!!  Thanks so much for visiting and have a fabulous day!

-Jess

Thursday, January 28, 2016

Wintertime in the Woods

Hey everyone! Samantha here with a fun winter themed card for you. I created a critter filled scene in a woodsy setting. I really wanted to create a scene filled with dimension and different textures. I started my card off by glueing my pattern paper to the base of my card. I colored, cut, and adhered the trees to the pattern paper. The snowy ground was cut from a piece of white cardstock. I colored my little critters and layered them on top of the snow. Glittery snow was layered on top of the animals to create depth. Wood veneer snowflakes were added in the sky. Layered on top of each wood snowflake is a smaller white snowflake and a clear rhinestone. Glittery Gold single cord was wrapped around the card and tied into a bow to add the last layer.  


Materials Used:
Critters in the Arctic
Gold Sparkle Single Cord
Into the Woods
Joy to the Woods
Snowflake Wood Veneer

Thank you so much for stopping by. I hope you have a wonderful day!

Monday, October 12, 2015

Using Small Stamps to Create a Focal Point featuring Blue Skies and Joy to the Woods

Christmas Cards by Jess Gerstner using Lawn Fawn Joy to the Woods and Blue Skies

Hello crafty friends! It's Jess and today I have a card set featuring Lawn Fawn's Peace Joy Love papers, Blue Skies stamps and Joy to the Woods stamps and dies. Since the current challenge is all about focusing on the sentiment I decided to use the arrows from Blue Skies to draw attention to my sentiment. For more on how I achieved this look check out my video.


As discussed in the video I used Hero Arts Ombre Inks to get the gradation in color with the arrows. There are some background sets out there that use arrows in a similar way but isn't it nice to be able to use what you have and customize? Of course you could use any sentiment and papers but I wanted to make some Christmas cards for the Caring Hearts Card Drive.

Christmas Cards by Jess Gerstner using Lawn Fawn Joy to the Woods and Blue Skies

I hope you enjoyed my cards and video! Don't forget to participate in the latest challenge to use sentiments!

Christmas Cards by Jess Gerstner using Lawn Fawn Joy to the Woods and Blue Skies

Tuesday, December 9, 2014

Joyful Wishes Shaker - featuring Winter Bunny

Hi Friends!  Kari back with you to share a fun project.  Shaker cards are all the rage right now in the card making corner of the world, and I have one to share with you.  I've made a few shaker cards since I've started my card making days.  They can be challenging, and definitely time consuming, but I think it is all worth it for the final result.


For my shaker today, I used Winter Bunny and its coordinating die.  I started out by stamping him out onto a piece of smooth white card stock, and then I die cut him out.  I then added a bit of color to him with a few Copic Markers.  I used R22, R24 and R29 for his scarf, R20 for the rosy in his cheeks, a little of C1 for shading around his body and E37 and E39 for his sleigh.   I set him aside and die cut my red card stock frame out of some PTI Pure Poppy Card Stock using a frame from AE, and one of my circle dies from Sizzix.  I also used the circle dies one size larger to cut out my background from Lawn Fawn's Snow Day 6x6 pad.  I also die cut a piece of white card stock using the same circle die and the Curved Edge die from Simon Says Stamp. for my snow drift.  I adhered a piece of acetate to the back of my red card stock for the window and added my bunny die cut to the front for a bit of dimension.  I stamped my sentiment from Joy to the Woods in VersaFine Onyx Black ink, and then I started to put my shaker together.  I added some sequins and silver confetti pieces from Pretty Pink Posh in the middle of my background and even adhered a few permanently so they all wouldn't shake to the bottom.  I added two layers of foam tape to my frame and adhered that to my white card base. Here is a close up for you.


I think it turned out pretty cute.  The one thing to remember when making shaker cards, is to have patience!!  Thank you all for stopping in!!  Merry Christmas and Happy Holidays to everyone!!

See you soon!
Kari

Tuesday, October 14, 2014

Die Cut Negatives as a DIY Stencil

Hi Friends!  Kari from the Inspiration Team with you today to share with you on how you can stretch out your die cuts - particularly the negatives.  Now I recently purchased some Modeling Creme by Viva Decor in Mother of Pearl ( I am gearing up for Christmas Cards, can't you tell? ) so I wanted to see what would happen when I used the birch tree dies from Joy to the Woods, and use the negative and use it as a stencil.

First - Here is my completed card.


Overall, I think my experiment didn't turn out too bad.  The longest part of this whole process was drying time of the modeling creme.  So - it literally took me several hours to complete this card from start to finish - so its not one to duplicate I don't think.  
I die cut out the trees from white card stock, and I applied my DIY Stencil to my Smoke card stock panel, and applied the Modeling Creme, and I wanted a thin layer as possible. I removed my DIY stencil and allowed this to air dry for well over an hour...maybe even two.  I knew I wanted to add some snow, so I took another stencil I have - the falling snow stencil and I used it to apply more modeling creme.  I will use a line I have heard from the awesome Jennifer McGuire - we make handmade cards, not HallMark, so with that said when I went to remove my falling snow Stencil, it messed up my trees toward the top.  I check it and it was dry - or so I thought, so I had to allow the snow to dry before fixing my trees.  I reapplied my DIY stencil, and fixed as best as I could, my trees. They didn't turn out as smooth as I wanted, but I didn't want to scrap it after all the time it took to come as far as I did.  So - I just set it aside again to dry.  In the meantime, I stamped and die cut the Cardinal from this set - so pretty, and I die cut my sentiment "Joy" from the Lawn Fawn Die.  I die cut a red layer and three white layers.


Below I wanted to share with you my DIY stencil.  When going into this I knew that I would not be reusing this stencil, which is fine with me.


I hope this inspires you to look at your dies in a new way to use them as a stencil to see what cool creations you can make!

See you all again soon!
Kari