Showing posts with label Science of Love. Show all posts

Tuesday, January 19, 2016

Great Chemistry by Audrey!

Hello there!  Audrey here with a fun watercolor card to share with you!  Our current Lawnscaping Challenge is all about Watercoloring, and I couldn't resist making another card, because watercolor is my favorite!

To make my card today, I pulled out a bunch of distress inks.  I tapped Picked Raspberry, Mermaid Lagoon and Squeezed Lemonade onto a large acrylic block.  Then, I added water to each color with a paint brush.  I made a small puddle of distress ink and water on my watercolor paper, and then simply blew air through a straw, turning the paper to send the ink in the direction I wanted it to go.  I repeated this with different colors, letting sprays of color mix to create new colors.  Then, I loaded my paintbrush with Picked Raspberry and a good amount of water, and tapped the paint brush to get splatters.

When my watercolor piece was dry, I diecut it with the largest die from the Small Stitched Rectangles Stackables, and then I stamped, colored and diecut the little beakers from the Science of Love stamp set.  I felt like they were getting lost on the background, so I used the middle heart from the Stitched Heart Stackables to cut a vellum heart.  Adding the vellum mutes out the background enough to show off the beakers better.  I popped them up with foam tape, and then heat embossed a sentiment from the same stamp set on to a strip of black cardstock using white embossing powder.  
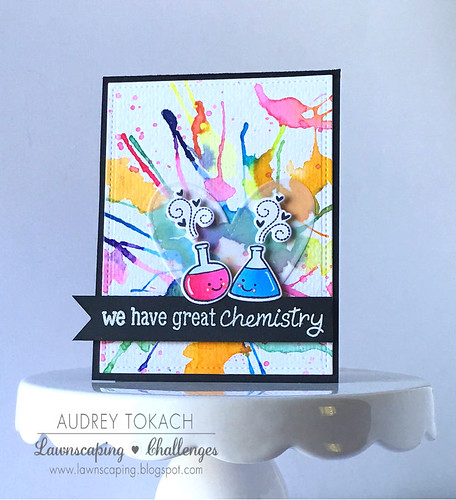
Great Chemistry

That's all for me today!  Thanks for stopping by! :)

Thursday, April 9, 2015

Watercolouring With Gold Embossed Images

Hi everyone! It's Marina! The Lawnscaping Challenge for this week is to add dimension/texture to your cards, so I thought I'd share with you a pretty straight forward way to use watercolour and make it look more "texture-y". I hope it will make sense later.


I wanted to use hearts, so I took two stamp sets, Bugs & Kisses and Science of Love. I took those solid & outlined hearts from these sets.


I've stamped them randomly and heat embossed it with gold embossing powder. I think I used Ranger Gold Embossing powder. I had painters tape to the sides because I wanted to have a clean white border around it. 


To add some shimmer to my watercolours, I used my Winsor & Newton Iridescent Medium and dabbed it to my stamping block. I'll then add more watercolours to it and mixed them.


This gives a nice shimmering finish. This is my alternative to the Wink of Stella. I find that this is more cost effective because I paid more or less the same about if I were to buy one Wink of Stella. I highly recommend for you to get this.


I started to just add my watercolours to the card base. You can go as light or as dark as you want. I just wanted a mixed of both orange and pink. I dried the piece when I wanted to add more colours and make it look darker.

I added my sentiment and some strings to the back of my die cut piece with some gold sequins from Pretty Pink Posh to match and that's it! You can do this with any images you heart desires :)


Thanks for stopping by! I would love to see your take on this.

Monday, December 22, 2014

2015 Desktop Calendar

Hi everyone! It's Yuki here with my first blog post on the Lawnscaping blog :). One of my favorite things about the end of the year is buying new calendars for the following year. This year instead of buying a calendar, I decided to make my own desktop calendar to give as a gift.


I reused an old CD calendar case I had from a previous year as my calendar stand. For the dates, I used a calendar stamp set I had purchased specifically with this project in mind. However, you could also use calendar stickers, printables or even write the dates by hand. I found the stamp to be the most versatile and convenient since you can stamp it in different colors and even heat emboss it. I decided to make each month unique and tried to  highlight key dates such as holidays and even my friend's birthday.

Since I used a TON of different products (too many to list), I listed the Lawn Fawn products used for each month under the photo captions.

Winter Penguin; Yeti, Set, Go.

Science of Love, #awesome

Critters in the Forest, Hats Off To You, Grassy Border

Hello Baby, Milo's ABCs, Hello Sunshine

Critters at the Dog Park, Sweater Weather, Stitched Hillside Borders

Critters in the Burbs, Grassy Border

Life is Good, Let's Polka

Critters on the Savanna, Grassy Border

Into the Woods, Sweater Weather

Spooktacular, Stitched Hillside Borders, Forest Border

Finley's ABCs, Stitched Leaves, Violet's ABCs

Critters in the Arctic, Hats Off To You, Stitched Hillside Borders

Yay you made it to the end of the post! I know that was a lot of scrolling LOL, however I hope you enjoyed today's post. Although this project was a little more time consuming than most and did require some extra planning, it was super fun to make and I'm really happy with the end result. I hope my friend likes her handmade gift as much as I do!

Thanks again for stopping by and be sure to visit the Lawnscaping Challenges Facebook page for even more awesome inspiration. And also, don't forget to check out the latest Lawnscaping Challenge: Merry Christmas, you have until Wednesday to play along!

Happy Holidays! ♥


Thursday, August 14, 2014

Watercolouring Card Set

Hey Lawnscapers from all over the world! Marina here and this is my very first post for Lawnscaping as part of the Facebook Inspiration Team.

For my first post, I thought I would share with you a simple card set that you can re-create for any occasion. I'll start by showing you a few steps I took to make it.

I started by die cutting a frame using the Stitched Journalling Card die and tracing the frame area on the card panel so that I know where to put my colours. 

Go crazy and have fun with whatever colour to play with. For this I used some red, orange and yellow watercolours to create this fun background. 

For the die cut panel, I added some white dots around it because who doesn't love polka dots right? :) And pop that up with some dimensional stickers. I simply took some of my favourite sentiments and heated it with some white embossing powders. 

The first card below, I used sentiments from Science of Love

The sentiments on the card in the middle is also from Science of Love and the one on the right is from Flutter By.


I would love to hear what you think of these cards. Hope that you've been inspired to dig out all those sentiments and make your own card set! :) 

Don't forget to subscribe to Lawnscaping blog to be inspired by the rest of the team. You can catch more of me on my blog and see you! 

Tuesday, April 8, 2014

Post-it Note Holders using Plastic Frames

Hello everyone!  Kari from the Inspiration Team back with you to share a fun project!  You can get really creative with making these Post-it notes holders.


These are made from inexpensive plastic frames that you just slip a picture in on the side.  Instead of using the frame of how it was intended when standing up, the base of the frame is at the top when laid flat.


One is a 4x6 frame and the other is a 3.5x5 frame.  I just cut my pattern paper to size and slip it inside the frame like I would a picture. And, then the fun begins with decorating it how ever you choose.  I chose for my 4x6 frame papers from the Dewey Decimal 6x6 paper pad.  I also chose the stamp set Science of Love.  
I adhered my Post-it notes to my frame with regular adhesive( I use PLUS adhesive).  I, then cut down a piece of Audrey Blue card stock from SSS and I used the Scalloped Stitched Border Dies, to give my card stock a bit of decoration.  I, then stamped out my sentiment from the same stamp set in HA Cup O' Joe ink. I also added some Coral Lawn Trimmings.

For my smaller frame - I did basically the same thing, except for my papers I used the Hello Sunshine 6x6 paper pad, and I used the Speech Bubble Border die as well as the Scripty Hello die.  I added some shimmer using the Wink of Stella Clear Brush Marker, and added faux stitching around the speech bubble die cut to make it stand out.


These would make fun gifts for teachers, friends, co-workers, or just because for anyone! They are easy to make and you could get your kids in on the fun!!

Thanks for stopping by today, and hope you are able to join us for our newest challenge going on now :)

See you soon!
Kari