Showing posts with label Party animal. Show all posts

Friday, September 9, 2016

Make Your Own Planner Stickers!

Hi! Suzanne here with some inspiration to add Lawn Fawn stamps to your planner pages! I made some mini circle stickers with some of the smaller images in several of my Lawn Fawn sets. Here's a look at the stickers on a page in my planner:


I stamped a bunch of smaller images on some label paper the first time around. It didn't work as well as I had hoped because once I punched the final versions from the paper, it was very hard to remove the backing so they would stick to the planner pages. The images on this sheet are from "Critters at the Dog Park", "Party Animal" and "Love You A Latte".

I recommend using some light weight card stock instead of the sticker paper (unless you have some sticky paper with easy-to-remove backing) and run the punched pieces through a sticker maker. 


I also stamped some of the faces from the "Sweet Smiles" stamp set to make emoji-type stickers. Unfortunately, I don't have Lawn Fawn's planner sets yet, so I used the sets I already have. (The planner sets would be perfect for this project, though, and I hope to make more stickers when I get those sets!)


I made my own circle template so I could pick images that would fit in a 1/2" sized circle punch. It also came in handy when I colored the images. The template is just a strip of kraft cardstock with a circle punched in one end.


I hope I've inspired you to take another look at your well-loved Lawn Fawn sets and make some stickers of your own!

Don't forget to join the current texture-themed Lawnscaping Challenge! There are a few more days left to link your entry for your chance to win a gift certificate to Ellen Hutson! (Don't forget to read the challenge rules in the sidebar to make sure your entry is eligible for the prize!)

Thanks so much for stopping by today! I hope your weekend is off to a great start!


Tuesday, May 24, 2016

Happy Birthday Muggle!

Good morning! Roxanne here today with a card that will make all you Harry Potter fans out there swoon. I must admit, this project knocked off my own socks.

Anyone who knows me knows I LOVE, LOVE, LOOOOOOOVE Harry Potter. I'd turn my room into a Hogwarts dream if I could. No joke.

So I was sitting wondering what type of project I was going to make for my post this month and I grabbed the owl from the Lawn Fawn Winter Owl and knew exactly what I wanted to do. I mean, he's wearing a scarf, so that right there screams HP to me. I cannot be the only one ;)

Once I started coloring him, the idea to put him on a broom came to mind. Then it was like a domino effect and I came up with this...


I made him into Harry Potter playing Quidditch. I thought this is perfect to give to the Harry Potter fan in my life, or just keep for myself to display. Either way! 

For the background, I used Distress Inks in Dusty Concord and Tumbled Glass and Memento in Nautical Blue with craft sponges and I made this magical looking sky. 


I then took some yellow patterend paper I had and cut a skinny strip for the stand and then two dies to make the opening of the Quidditch goal. I glued that down to the sky scene. For the sentiment, I took the happy birthday from the Lawn Fawn Party Animal set and stacked them. Under that, I used Milo's ABC's for spelling out MUGGLE! I gave the Muggle a bit of a shadow with some white ink behind it. 


I used the broom from the Lawn Fawn Critters in Costume, colored in with my Spetrum Noir Alcohol Markers and fussy cut it out. I used trimmed down foam adhesive behind it to give it dimension. 
Then I colored in Harry. I used a fine tip marker to draw on the scar to give it that special touch! Harry sports his scar, so this is no different! I placed him on the broom with some more foam adhesive. 


For the stars, I used some small rhinestones I had to make it sparkle a bit and bring some more life to this card. 

I hope you enjoyed my project today as much as I enjoyed making it! Thanks for stopping by. 

PRODUCTS USED:
  • Lawn Fawn Milo's ABC's
  • Lawn Fawn Winter Owl
  • Lawn Fawn Critters in Costume
  • Lawn Fawn Party Animal
  • Distress Ink: Dusty Concord and Tumbled Glass
  • Memento Ink: Tuxedo Black and Nautical Blue
  • Spectrum Noir Alcohol Markers: GB1, GB5, DR7, TN1, TN3, TN5, TN8, EB4, EB8, OR2, CR8

Tuesday, April 19, 2016

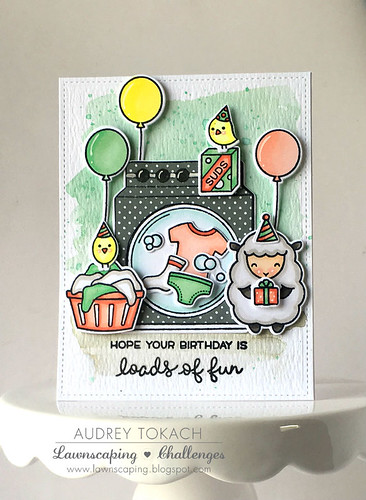
Loads of Birthday Fun!


Hello there!  Audrey here! Today I have a fun card to share with you that mixes and matches a bunch of my favorite Lawn Fawn stamp sets!

To start my card, I diecut a piece of Tim Holtz Distress Watercolor paper with the largest die in the Large Stitched Rectangles Stackables die set. I challenged myself to use a color combo that seems to be everywhere lately - Mint and Coral.  Truth by told, I don't love these colors (I'm probably the only one on the planet that feels this way LOL!), which is why I challenged myself.  I watercolored a background with Cracked Pistachio and Pumice Stone distress inks.  A while back, I saw a polka dot washer and dryer on Pinterest, and I couldn't wait to recreate it by paper piecing the washer from the Loads of Fun stamp set with some Lawn Fawn patterned paper!  I stamped and colored a bunch of other images from that set and die cut them with the coordinating dies.  Inspired by one of the sentiments in the stamp set, I decided to create a birthday card, and pulled out my Party Animal stamp set, and I will never turn down the opportunity to use the Baaah Humbug sheep.  He's the cutest!  I played around with placement, and adhered some pieces with a glue pen, and others popped up with foam tape.  Finally, I glued the panel to a white card base.

Loads of Birthday Fun!

I am quite happy with how this turned out.  I sure to love mixing and matching my Lawn Fawn stamps, especially when it's an unlikely combination.  Stretching your stamps = more bang for your buck!

Hope you like!  That's all for me today!  Thanks for stopping by! :)

Supplies:

All listed and linked above ;)

Friday, January 8, 2016

Warm Winter Critters

Hi, everybody! Suzanne here, and I'm sharing a new card inspired by the current "Winter Wonderland" challenge! With a little bit of masking and a few extra lines, I dressed up the critters from Lawn Fawn's "Party Animal" and "Holiday Party Animal" sets in some festive sweaters:


I mainly masked off the bellies of the fox and the raccoon. The bear didn't have any belly lines, so I just drew some cuffs, a collar and the sweater bottom. I picked different mini icons from my other Lawn Fawn sets and stamped them so that each sweater would have a different design.

I made the background with Let's Bokeh in the Snow and cut some glitter paper from my stash with the Stitched Hillside Borders Lawn Cuts to create some sparkly snow. 

Don't forget, you have until Wednesday, January 13 to join us and link up your entry in the current Lawnscaping challenge! One lucky winner will receive a gift certificate from Ellen Hutson!


You can find the full list of supplies I used on this card at my blog. Thanks so much for stopping by today!

Tuesday, October 27, 2015

Happy Haunting Card

Good morning, Roxanne here today with a cute Halloween-themed card for you! I had a lot of fun creating this cute little card, so sit down and take a scroll with me through the process. I've listed all the supplies I've used at the end of this post.


My first step was to create my card base. I used a plain black cardstock that I cut, scored and folded to 4.25x5.5. I grabbed a piece of my patterned paper that I was going to adhere to the front of my card and diecut out a larger circle. I traced that diecut onto the card base so I knew where I was going to need to stamp/create my sky.

I used several star stamps from the Booyah and Party Animal sets with some Delicata in Golden Glitz and heat embossed them with clear embossing powder. I then took a sponge and my Dandelion ink pad and swirled on the hazy sky on a portion of the circle.


My next step is to stamp and create my little critters that I wanted as part of my Halloween scene. I was quite giddy when I realized that the hat and Frankenstein hair/stitches fit PERFECTLY onto the animals from the Party Animals set. I just wanted to use something cute, other than a ghost! 

I stamped these onto some quality coloring cardstock with Tuxedo Black (Memento). I masked the top hat and hair before stamping the bear onto the cardstock. I simply stamped the hat and hair image onto a sticky note, fussy cut that out carefully, and stuck that down over my stamped images of the hat and hair. This allows you to stamp over that with the bear stamp so that once the mask is lifted, it looks like it was all one image! 


Next, I colored and cut out my bears. Now as you can see, even though I'm really careful about trimming around the edges, you always end up with a very slight white edge. What I do is take a black marker (I used my Spectrum Noir True Black) and lightly go around the edge of the image so that it looks like you cut it perfectly and have clean black edges. Just a little tip I do. You'll see in the image above that I touched up the brown bear. 


Here are all my elements for my card. Let's assemble!


A little close up of the details!

I hope you liked my little Halloween card. Thanks for checking out my project! Happy crafting.


SUPPLIES USED:

Saturday, September 5, 2015

Happy Birthday ... let's party!

Hi Lawnscaping friends!! 

It's Lenny from the FIT here with you today!! I hope you're having a great Saturday, so far!! 

For this month's special post, I would like to share a birthday card & matching treat "box" with you. 
I used lots of Lawn Fawn products, of course. :) 
For a complete list of supplies: click HERE!

Okay ... back to my birthday project ... . Here are some photos! 


Thanks so much for dropping by today!! 
Stay tuned for another fantabulous Lawnscaping Challenge on Monday!! 

Happy weekend!

lenny