Showing posts with label water coloring. Show all posts

Wednesday, June 22, 2016

Watercolor Waving Hello with Christy

Hey crafty friends! Good morning! It's Christy here with another card for our current challenge: Distress Mania! I created by background by blending on a whole bunch of Distress Inks, Antique Linen, Gathered Twigs, Tumbled Glass, Peacock Feathers, Salty Ocean, Evergreen Baugh, and a little Pine Needles. Then I took a paintbrush and flicked some water over top and blotted it away with a paper towel for an even more distressed look.

Then I watercolored my images from Mermaid For You with Zig Clean Color Real Brush Pens, popping some of them up with foam tape and gluing others flat to the card to create the look of dimension. I thought I was done, but while snapping the photos, the mermaid's tail was just crying for some glitter, so I added some Stickles for a fun pop of sparkle here and there.

I hope you enjoy it! You still have a week to play along in our Distress Mania challenge. Hope to see your projects there!


SaveSave

Friday, June 3, 2016

Waving Hello from Under the Sea

Hi!
Samantha here, and today I'm sharing an adorable little card featuring one of the mermaids from the new Mermaid for You stamp set! 


Oh I just love how it came out!
I colored the images with Distress Markers and then fussy cut them out! I added some dot details by dotting in areas with the marker I had watercolored with, as well as a shade darker and a white gel pen! I have to say, I'm totally smitten with that for underwater critters - it looks like they're shimmering under the water!!! I may have colored about...50 other water images like this...ha!


I created the backgound with Ken Oliver Color Bursts and then sprayed water along the edges of the color, so it would really soften them up - totally in LOVE with that look! 

I finished the card with a little Spectrum Noir glitter pen in clear on the crown and sea horse fins! :)

Thanks for stopping by and sharing part of your day with me!
Hope this card made you smile and inspired you to get watercoloring!

Tuesday, May 17, 2016

I Wheelie Like You

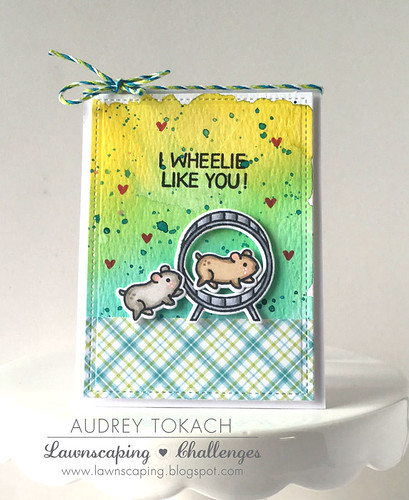
Hi there!  Audrey here with a fun watercolor card for you!  I love making mini card sometimes, because the change in "canvas size" is refreshing to me.  I often make mini cards when I want a smaller stamp set to be the star of the show.

For this card, I started off by creating a watercolor background for my little scene.  When it was dry, I diecut it with one of the Small Stitched Rectangles Stackables die set.  I stamped, colored and diecut the cute little hamster and wheel from the Wheelie Like You stamp set.  I wanted a pair of hamsters, so I stamped and colored two of them.  I used a snippet of Perfectly Plaid patterned paper to ground my scene, and then popped the hamsters and wheel up using foam tape.  I stamped the sentiment from the stamp set just above the images, then mounted the panel on a white card base, and added a twine bow to the top of the card to finish it off.

I Wheelie Like You

That's all for me today!  Thanks so much for stopping by! :)


Friday, May 6, 2016

Best Fishes to You!

Hello!
Samantha M here today, sharing a cute little card with some under the sea critters!


I started by stamping and watercoloring the images with Distress Markers.
Once the images were dry, I fussy cut them out and pieced them together in the fish bowl!


On the card base, I used a stencil and some white embossing paste to add a little texture to the background. I stamped the sentiment from the Fintastic Friends stamp set to finish the card off! :)


Be sure to play along with the current Lawnscaping Challenge - Calling all Critters - something I think Lawn Fawn is exceptionally good at!! Ha!! :)
~Samantha M

Tuesday, April 19, 2016

Loads of Birthday Fun!


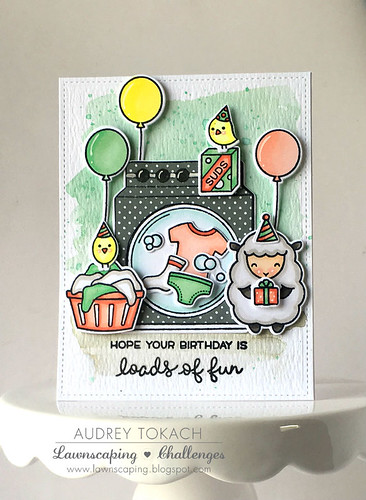
Hello there!  Audrey here! Today I have a fun card to share with you that mixes and matches a bunch of my favorite Lawn Fawn stamp sets!

To start my card, I diecut a piece of Tim Holtz Distress Watercolor paper with the largest die in the Large Stitched Rectangles Stackables die set. I challenged myself to use a color combo that seems to be everywhere lately - Mint and Coral.  Truth by told, I don't love these colors (I'm probably the only one on the planet that feels this way LOL!), which is why I challenged myself.  I watercolored a background with Cracked Pistachio and Pumice Stone distress inks.  A while back, I saw a polka dot washer and dryer on Pinterest, and I couldn't wait to recreate it by paper piecing the washer from the Loads of Fun stamp set with some Lawn Fawn patterned paper!  I stamped and colored a bunch of other images from that set and die cut them with the coordinating dies.  Inspired by one of the sentiments in the stamp set, I decided to create a birthday card, and pulled out my Party Animal stamp set, and I will never turn down the opportunity to use the Baaah Humbug sheep.  He's the cutest!  I played around with placement, and adhered some pieces with a glue pen, and others popped up with foam tape.  Finally, I glued the panel to a white card base.

Loads of Birthday Fun!

I am quite happy with how this turned out.  I sure to love mixing and matching my Lawn Fawn stamps, especially when it's an unlikely combination.  Stretching your stamps = more bang for your buck!

Hope you like!  That's all for me today!  Thanks for stopping by! :)

Supplies:

All listed and linked above ;)

Friday, April 1, 2016

Donut Disturb!

Hello!
Samantha here with you again, and today I'm sharing a cute little card in the theme of the challenge that just ended! It was all about sweets! And this card popped in my brain and I just HAD to make it! Have you ever had an idea hit you like that? I just couldn't rest until I made it! :)

So let's get on to the card!


I colored the images from Donut Worry, Starry Backdrops and Life is Good with copics and then fussy cut them out!
The background was easy to create! All I used was some Distress Inks, mist and a old, recycled piece of packaging! I smooshed the ink pad directly onto the piece of packaging, spritzed it with water, and then pressed the packaging piece onto the cardstock!


Isn't this so cute!! I think it's the perfect little card to send to someone! Either just because (my specialty!!) or maybe you have someone watching your house/pets while you're on vacation! :)

Be sure to check back here on Monday for the brand new Lawnscaping Challenge that will start! Can't wait to see you there!
~Samantha

Friday, March 4, 2016

What's Kraken?

Hello and good morning!
Samantha here and today I'm sharing a Fun card that is really fun!! Ha!

I just LOVE the new Lovable Legends stamp set, don't you? All of those mythical (Nessie is REAL!! Ha!) creatures are just SO cute, and the phrases crack me up!!!


I watercolored the images with Distress Markers and then fussy cut them out. I also added some sparkle with my Spectrum Noir Glitter Pen to the sails and 'blush' of the creature! :)


For the background, first I colored some vellum with copcis and then spritzed it with some rubbing alcohol for a watercolor effect - it's beautiful in real life! Lol! Then I heat embossed the OTHER side of the vellum with the Woodgrain Backdrops to look like waves!! So fun!
I even cut out some of the woodgrain to look like waves! Then I popped up the images and stamped the sentiment!

I hope this makes you smile, and be sure to come right back here on Monday morning when the NEW Lawnscaping Challenge will be live! I think you're really going to like it!! :)

Thanks again for spending some of your day with me! :)
~Samantha

Friday, February 5, 2016

Diecuts - foiled!

Hello!
Samantha M here today, and I'm sharing a super sweet and fun card!
I made this card with the current challenge theme in mind: Love and Hearts! awwww!!


I colored that ADORABLE little light bulb from Turn Me On with copics and then fussy cut him out and popped him up!
I due cut the sentiment from the Scripty Love Die about 4 times. For the top layer, I new I wanted to have part of it foiled in that pretty gold! I used my Minc Toner Pen and colored on a piece of white cardstock. Then I ran it through my laminator and lined up the die and cut it from the (freshly!) foiled paper !


I LOVE how that foil looks! For the background, I simply used some Squeezed Lemonade Distress Ink and watercolored it on the background. Once it was dry, I added a little bit of embossing paste through a polka dotted stencil and adhered everything on!

I hope this card got you inspired to play along with the current Lawnscaping Challenge!
Thanks again for joining me!
~Samantha M

Wednesday, January 27, 2016

I Wheelie Like You By Christy

Hey everyone, it's Christy here with another card for our current challenge: Watercoloring! I was super excited that my feature fell during this one, because I adore watercoloring, and I just can't seem to get enough of it. Especially when there are so many awesome mediums out there to try. Today I wanted to play with my Zig Clean Color Real Brush Pens. I've had them less than a month, so I'm still learning their unique properties and just having fun experimenting with them. And since I'm still in the middle of my 2016 Valentine Card Series on YouTube, I knew I wanted it to be a valentine card as well. So I pulled out the adorable Wheelie Like You stamp set by Lawn Fawn, and this little cutie was the result. I colored him to look like our guinea pig Cosmo, who passed away of old age last year. But I couldn't leave out his brother Sprocket, who is still thankfully with us, so at the end of the video I show you an additional card  that was colored to look like him. I hope you enjoy it.


If you're feeling inspired to create a card for our Watercoloring Challenge, you still have today to play along! I hope to see your project there! Have an awesome day!

Tuesday, January 19, 2016

Great Chemistry by Audrey!

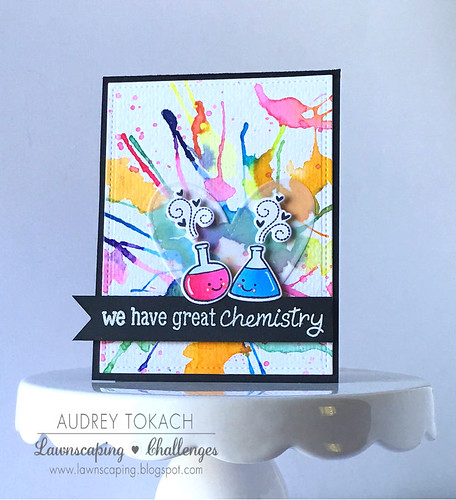
Hello there!  Audrey here with a fun watercolor card to share with you!  Our current Lawnscaping Challenge is all about Watercoloring, and I couldn't resist making another card, because watercolor is my favorite!

To make my card today, I pulled out a bunch of distress inks.  I tapped Picked Raspberry, Mermaid Lagoon and Squeezed Lemonade onto a large acrylic block.  Then, I added water to each color with a paint brush.  I made a small puddle of distress ink and water on my watercolor paper, and then simply blew air through a straw, turning the paper to send the ink in the direction I wanted it to go.  I repeated this with different colors, letting sprays of color mix to create new colors.  Then, I loaded my paintbrush with Picked Raspberry and a good amount of water, and tapped the paint brush to get splatters.

When my watercolor piece was dry, I diecut it with the largest die from the Small Stitched Rectangles Stackables, and then I stamped, colored and diecut the little beakers from the Science of Love stamp set.  I felt like they were getting lost on the background, so I used the middle heart from the Stitched Heart Stackables to cut a vellum heart.  Adding the vellum mutes out the background enough to show off the beakers better.  I popped them up with foam tape, and then heat embossed a sentiment from the same stamp set on to a strip of black cardstock using white embossing powder.  

Great Chemistry

That's all for me today!  Thanks for stopping by! :)

Tuesday, December 15, 2015

I Chews You Valentine with Audrey!

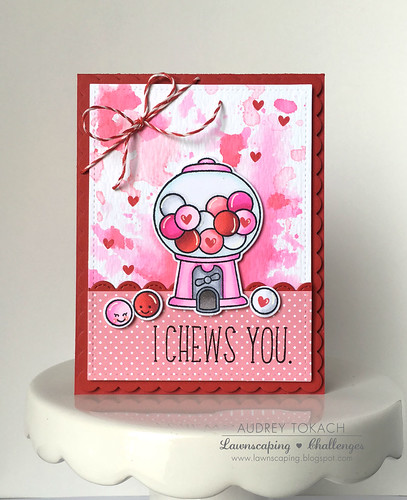
Hello there!  Audrey here today with a punny watercolor card!  I actually used Lawn Fawn inks in Lobster and the new Plastic Flamingo (which happens to be the most perfect shade of pink!) to watercolor my background using the ink smooshing technique.  I tapped the ink pad on a piece of clear acetate, spritzed it with water, and pressed it into my watercolor paper, moving it around until I was happy with the ink distribution.  I started with Plastic Flamingo, and then dried that layer before adding small amounts of Lobster ink.  I stamped, colored and diecut the gumball machine and gumballs from the Sweet Smiles stamp set, and then added a piece of polkadot patterned paper from the Let's Polka Mon Amie 6x6 paper pad, topped with a Stitched Scalloped Border.  I created a custom sentiment using Violet's ABCs, and then matted the panel on a Scalloped Rectangle cut from red cardstock.  Before adding it to a red card base, I tied a bit of Peppermint Lawn Trimmings in a bow in the top right corner.


I Chews You

That's all for me today!  All supplies are listed and linked above!

Thanks so much for stopping by!! :)


Saturday, October 3, 2015

Halloween decoration!

Hi friends!! 

It's Lenny from the FIT here with you today!! I hope you're all having a great Saturday!! 
It's October already ... I just can't believe it!! I'm not really into Fall & Winter, so I'm sad
that Summer's over. :) 
Fall ... that means Halloween, the color "orange", fallen leaves, pumpkins, ...!! 

For this post I made some Halloween decoration!
I used the "Milk carton" die ... but for decoration purposes only!! These are not meant to be
treat bags! :) (no candy inside) LOL 

Here are some photos . . .


For the complete supply list: click HERE!!!

Thanks so much for dropping by today!! 
Stay tuned for another awesome Lawnscaping challenge on Monday!
Hope you'll join us in the fun and play along!

hugs . . .

lenny

Thursday, October 1, 2015

I Love Fall!

Good morning!  Jessica here sharing a card celebrating my favorite season of the year, fall!  I combined a bunch of my favorite fall-themed Lawn Fawn sets and did a little no-line watercoloring!
I stamped the fox from Into the Woods, the pumpkins from So Thankful, and the foliage from Blissful Botanicals onto watercolor paper with a second generation stamping of antique linen distress ink.  Using a second generation stamping provides a very faint line to help with watercoloring.  Next I scribbled various zig clean color real brush markers onto my acrylic block and watercolored the images with a #2 paintbrush.  After they dried completely I fussy cut each image and set them aside while I worked on the rest of the card.  

For the background I inked up the woodgrain stamp with perfect medium and stamped it onto kraft cardstock.  Then I sprinkled on a couple metallic shades of perfect pearls powder and swirled them onto the stamp with a soft brush before buffing them off with a swiffer cloth.  Finally to seal the perfect pearls I spritzed it with water and dried it with my heat gun.  I stamped the sentiment onto the card and heat-embossed it with gold embossing powder.  Then I colored the heart with a red marker, went over it with clear wink of stella glitter, and applied a layer of glossy accents.  
Next I started assembling my card...I trimmed down the kraft cardstock and mounted it to a chocolate brown card base.  Then I added my watercolored images.  The foliage, fox, and large pumpkin were adhered with my ATG gun and the small pumpkin was adhered with foam mounting tape for a little added dimension.  I went over the pumpkins, the foliage, and the pinks of the fox's ears with clear wink of stella glitter, and finished the card with a handful of metallic gold sequins!  

For a complete supply list, please click here.  Thanks so much for visiting!  I hope you enjoyed my card!! 

-Jessica

Monday, September 14, 2015

Using Color Burst to set the Scene for Critters in the Sea


Hello crafty friends! It's Jess and today I have a card featuring Ken Oliver Color Burst and Lawn Fawn's Critters in the Sea. I love coming up with new ways to set the background for these fun critters. It is one of the older Lawn Fawn sets but I find myself reaching for it all the time. For more on how I achieved this look check out my video.


As discussed in the video I used some spray adhesive to attached my stencil and layer on some Color Burst. I also used the Color Burst to make the paper I cut the animals out of. The cute whimsical nature of Lawn Fawn stamps make them perfect for playful artsy backdrops. This would be fun to create with any critters and stencils you happen to own.


I hope you enjoyed my cards and video! Don't forget to participate in the latest challenge to add texture!


Tuesday, August 18, 2015

You're a Star Shaker Card!

Hello there!  Audrey here! :)

I want to apologize in advance if these pictures aren't the greatest.... it's rainy season in Florida, and with daily rain, my window for picture taking isn't a very long one.  LOL!

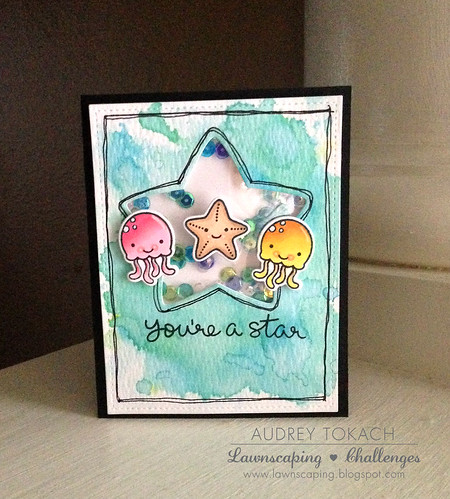
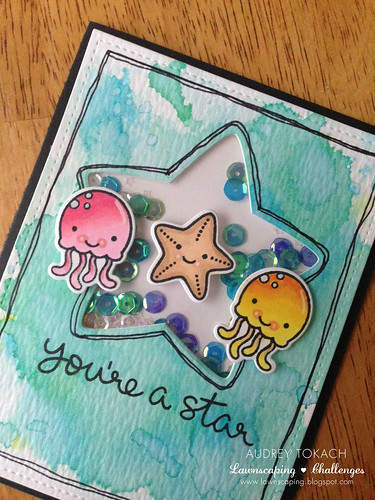
Today, I have an under the sea shaker to share with you!  I started off by watercoloring a piece of  watercolor paper with Distress inks.  When it was dry, I diecut it with the largest die from the Small Stitched Rectangles Stackables die set.  From that, I also diecut a star shaped window using the Puffy Star Stackables die set.  Before filling my shaker, I stamped a sentiment from the So Jelly stamp set, and then added my shaker contents.  I popped up some Copic colored Jelly fish and a cute little starfish, also from the So Jelly Stamp set, up on the front of the shaker window with foam tape. After seeing it all put together, the black sentiment seemed to really stand out, and not in a good way.  LOL!  So I added some doodled lines to frame the star window the the entire panel, and then popped everything onto a black card base to balance things out a bit better.


You're a Star!

Here you can see the shaker a little closer:


You're a Star!

Hope you like it!  Thanks for stopping by! :)

Supplies:
Stamps: Lawn Fawn So Jelly
Dies: Lawn Fawn So Jelly, Small Stitched Rectangles, Puffy Star Stackables
Other: Distress Ink, White Gel Pen, Copic Multiliner, Copic Markers, Foam Tape

Saturday, August 1, 2015

Watercolored thank you card ...

Hi Friends!!

It's the first Saturday of the month ... and it's Lenny from the FIT here with you today!
Hope you're having a great Saturday!! 
I'm still enjoying my summer break ... relaxing!! 

For my post today, I did some watercoloring again! I must say; I totally looooove my new
Winsor and Newton watercolors! Those colors are so vibrant!!! 

I was inspired by these photos (from Pinterest) 


Here's my card . . .


First, I stamped out my images with VersaFine ink and
then I colored them with my new watercolors.
After everything was dry, I added lots of water and a tiny bit of blue
for the background. 


For a complete list of supplies: click HERE!!

Thanks so much for dropping by today!!
And .... be sure to check out the blog on Monday ... for another fun and fab new
challenge!! 

Happy Saturday! 

hugs . . .

lenny

Thursday, July 16, 2015

Scripty watercolour


Hello. 
I am  thrilled to be here with my first post. 
I wanted to combine two of my favourite things.....
Watercolour and scripty fonts.
I have 3 very different looks featuring both to show you.


First up I have gone all out rainbow ...another favourite thing :)
To start i simply heat embossed the scripty "thank you" from scripty sayings stamp set repeatedly in white. 
I staggered them so that they were not all on top of one another.
Then to add the colour i used some watercolour markers.
I drew on the colour then loosened it with  a very wet water brush.
Once that was all dry i die cut the scripty thanks and left the background white, although id like to try with black as i think there would be a better contrast.


Again have have stamped the scripty sentiment more than once however this time i used archival ink in black.
I changed the colours to and love how different it looks compared to the first rainbow of colours.


And finally very clean and simple with minimal watercolour.
The sentiment is again stamped in black archival ink as I'm using watercolours.
I used the long tail from the sentiment as somewhere to place the little flower from Gleeful gardens.
The flower was coloured with the same watercolour markers and once dried i added some wink of stella and glossy accents to it. 
All three cards are finished simply with some clear sequins.
Thanks do much for looking.


Thursday, April 9, 2015

Watercolouring With Gold Embossed Images

Hi everyone! It's Marina! The Lawnscaping Challenge for this week is to add dimension/texture to your cards, so I thought I'd share with you a pretty straight forward way to use watercolour and make it look more "texture-y". I hope it will make sense later.


I wanted to use hearts, so I took two stamp sets, Bugs & Kisses and Science of Love. I took those solid & outlined hearts from these sets.


I've stamped them randomly and heat embossed it with gold embossing powder. I think I used Ranger Gold Embossing powder. I had painters tape to the sides because I wanted to have a clean white border around it. 


To add some shimmer to my watercolours, I used my Winsor & Newton Iridescent Medium and dabbed it to my stamping block. I'll then add more watercolours to it and mixed them.


This gives a nice shimmering finish. This is my alternative to the Wink of Stella. I find that this is more cost effective because I paid more or less the same about if I were to buy one Wink of Stella. I highly recommend for you to get this.


I started to just add my watercolours to the card base. You can go as light or as dark as you want. I just wanted a mixed of both orange and pink. I dried the piece when I wanted to add more colours and make it look darker.

I added my sentiment and some strings to the back of my die cut piece with some gold sequins from Pretty Pink Posh to match and that's it! You can do this with any images you heart desires :)


Thanks for stopping by! I would love to see your take on this.

Tuesday, February 17, 2015

You Color My World

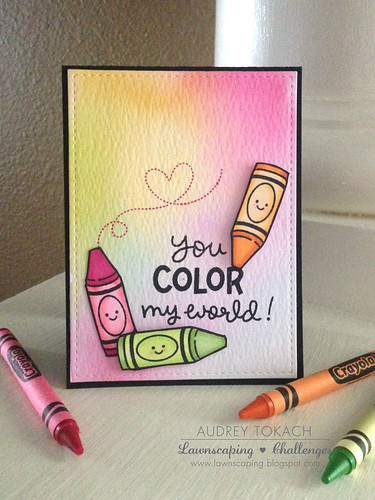
Hello there!  Happy Tuesday to you!  Audrey here! Today I have a fun card to share with you using the limited edition You Color My World stamp set that was offered a few months ago with a purchase from the Lawn Fawn store.  I used a watercolor "smooshing" technique that I've fallen in love with!


You Color My World

 I smooched several colors of ink onto a sheet of acetate and spritzed it heavily with water and pressed some watercolor paper into the ink puddles.  Then I let it air dry and die cut the panel with the Stitched Rectangles dies.  I stamped the sentiment where I wanted it first, and then stamped, colored and cut out the cute little crayons.  Once I added them to the card, there was still something missing, so I pulled out my Bugs and Kisses stamp set and used the heart flight trail to add a bit more to my card. I mounted the panel on a black card base.

This is such a fun technique... I'll be doing it lots more I'm sure.  Hope you like!!  Thanks so much for stopping by today! :)

Thursday, August 14, 2014

Watercolouring Card Set

Hey Lawnscapers from all over the world! Marina here and this is my very first post for Lawnscaping as part of the Facebook Inspiration Team.

For my first post, I thought I would share with you a simple card set that you can re-create for any occasion. I'll start by showing you a few steps I took to make it.

I started by die cutting a frame using the Stitched Journalling Card die and tracing the frame area on the card panel so that I know where to put my colours. 

Go crazy and have fun with whatever colour to play with. For this I used some red, orange and yellow watercolours to create this fun background. 

For the die cut panel, I added some white dots around it because who doesn't love polka dots right? :) And pop that up with some dimensional stickers. I simply took some of my favourite sentiments and heated it with some white embossing powders. 

The first card below, I used sentiments from Science of Love

The sentiments on the card in the middle is also from Science of Love and the one on the right is from Flutter By.


I would love to hear what you think of these cards. Hope that you've been inspired to dig out all those sentiments and make your own card set! :) 

Don't forget to subscribe to Lawnscaping blog to be inspired by the rest of the team. You can catch more of me on my blog and see you!