Showing posts with label Watercolor. Show all posts

Friday, December 2, 2016

Peace and Joy

Hello!
Samantha here, and today I'm sharing a sweet holiday scene with you!


I am totally in LOVE with houses right now! Especially around the holidays, it just seems like houses and snow falling are so warm and cozy!
I used the bird houses from Home Sweet Home stamp set and just made them people houses instead! Ha!


I watercolored all of the images with Distress Markers, and then lined them up in a circular pattern around that watercolor 'sunset' I created!

I used Seedless Preserves, Worn Lipstick and Dried Marigold Distress Inks to create the sweet sunset and then flicked some white acrylic paint on it to add the snow!
I heat embossed the sentiment from Snowy Backdrops stamp set!

Be sure to check back here on Monday for the start of an ALL NEW challenge! Yay! :)
~Samantha

Friday, October 7, 2016

Treat-filled Days are the Best Days!

Hello, and happy Friday!
Samantha M here today, and I'm sharing a fun halloween card with you!


I know, it's adorable, right?! Ha! I dressed up the clam!!!!! I can't even stand it! Ha! Ok, I'm getting ahead of myself, let me start over! Ha!

Ok, I stamped and watercolored images from Mermaid for You, Booyah and Year Six! I used Distress Markers to color and then also used them to create the water-y background! I scribbled Peacock Feathers and Cracked Pistachio onto a scrap piece of plastic packaging, and then mixed them together with some water. Then, I just splatted the whole plastic sheet onto my card front! Once it was dry, I splattered on some white acrylic paint and then used Transliscent Embossing Paste and a wave stencil to add some subtle texture!


The sentiment is from the new Happy Howloween set! So fun!! 
I hope you enjoued this card, and that you're getting into the mood for fall and halloween! Be sure to play along with the current Lawnscaping Challenge, too!! 


Enjoy!
And thanks for spending part of your day with me!
~Samantha M

Tuesday, September 27, 2016

Accio Bookmarks

Good morning, everyone! I can never resist anything related to Harry Potter. So when I tried thinking of a fun project to share with you all this month, I naturally put on my sorting hat and got to getting creative.

My oldest wanted some bookmarks, and I obliged by making a set of Harry Potter inspired ones for him. It's pretty fitting since we are finally on Half Blood Prince. It's great to reread those books with him because I get to relive it. And I'm trying reallllly hard to get my youngest interested so I can eventually read them to him as well.

I used a lot of different sets for these which is the fun part. I mean, just imagine all the uses each of these sets have seen from everyone using them! I've listed all the supplies I've used at the bottom to create these. They are double sided in case you're wondering. Each of the bookmarks are 2"x6" for those wanting to make some of your own. These would also be fab stocking stuffers or sent with a gift of a book for someone using whatever they're interested in as the theme. I already have ideas for more!


ACCIO BOOKMARKS!


Here they all are:
1. Quidditch brooms and a golden snitch
2. Gryffindor scarf and Harry's little face complete with lightning bolt scar
3. Mandrakes and earmuffs
4. Hedwig wearing Gryffindor colors on her scarf and letters


I hope you enjoyed my project today and you're inspired to take a good look at your stamps and create something for yourself, or a loved one, teacher, daycare provider, or whoever would love a custom set of fun bookmarks themed with something they adore. Thanks for checking them out! 

PRODUCTS USED:
  • Lawn Fawn Baaah Humbug
  • Lawn Fawn Winter Owl
  • Lawn Fawn Sweet Smiles
  • Lawn Fawn Making Frosty Friends
  • Lawn Fawn Dream
  • Lawn Fawn Let's Bokeh Lawn Cuts
  • Lawn Fawn Bugs & Kisses
  • Lawn Fawn Trim the Tree
  • Lawn Fawn Happy Trails
  • Lawn Fawn You've Got Mail
  • Spectrum Aqua Markers
  • Spectrum Aqua Watercolor Cardstock
  • Spectrum Sparkle Pens
  • Memento Luxe, Rich Cocoa
  • Versafine, Onyx Black


Friday, September 2, 2016

Beep beep!

hello!

Samantha M here, and today I'm sharing the first of my (many to come!) Christmas cards! lol!
So let's get to it:


Aw, love that ADORABLE cute, car from the new Home for the Holidays stamp set! I colored all of the images with Zig Clean Color Real Brush Markers and fussy cut it out!


The background of the insta-scene was created with Distress Inks and water and lots of watercoloring! The snow was created with a stencil and some embossing paste! I used the #awesome die set to create that fun scene, all on the SUPER COOL white woodgrain paper!

I heat embossed the sentiment from the new Merry Messages stamp set! Love those sayings on that set!!
This card has a little bit of a hint as to what the new challenge that starts on Monday will be...can you guess?

Thanks again for checking out my card!
~Samantha M
Monday, August 8, 2016

Getting in the holiday spirit!

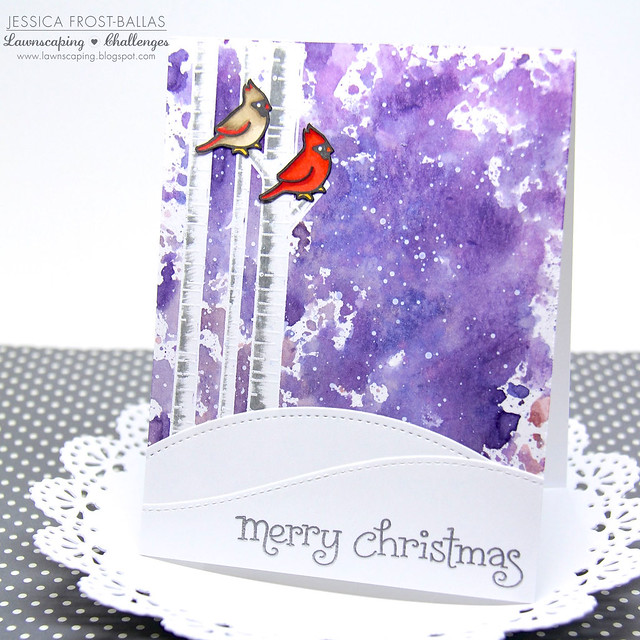
Good morning, Jess here!  I'm telling you...I am SO over hot, humid weather...I made several cards this weekend and realized they all featured snow!  On the plus side it's building my stockpile of Christmas cards! :)
lsaugsolo
To start I stamped the trees from Joy to the Woods with versamark onto watercolor paper and heat-embossed it with white embossing powder.  Then I covered it with frisket and let it dry before I worked on the rest of the background.  I smooshed Seedless Preserves, Chipped Sapphire, and Victorian Velvet distress ink onto a craft mat and then spritzed it with water.  I used my finger to blend the colors around a little and then picked up the ink with a piece of acetate.  I brought the ink to my watercolor paper and smooshed it on.  I repeated the process a few times until I was happy with the coverage and then let it dry.  Once it was totally dry I flicked white paint across the background and let it dry.

Next I rubbed the frisket off of the trees and used Hickory Smoke distress ink and a dry paint brush to add some shading to the trees.  I die-cut two hills from white cardstock using the Simple Stitched Hillside Borders and the Stitched Hillside Borders dies.  I stamped the sentiment from Joy to the Woods with versamark on one hill and heat-embossed it with silver embossing powder. 

Finally I stamped the two cardinals from Joy to the Woods, colored them with copic markers, fussy cut them, and adhered them to the card with foam mounting tape.  And now I'll go back to dreaming about the first snow we'll get this winter!!  Thanks so much for visiting and have a fabulous day!

-Jess

Friday, August 5, 2016

Waving Hello!

Hi there, and happy Friday!
Samantha here, sharing a fun little mermaid card!

I created this card and it actually, also, fits the current challenge going on: Pattern-palooza!!


ok, so maybe the pattern isn't 'palooza-y'...but there is a pattern!! I created the 'ocean' background and then added a small polka dotted pattern with a stencil! :)
The 'ocean' was created with Distress Inks in Peacock Feathers and Chipped Sapphire blending!


I used the adorable Mermaid for You stamp set! I watercolored those cute as can be mermaids with Distress Markers!
And I heat embossed the sentiment in white on some black cardstock, which adds some fun contrast to the card!

Be sure to check out the current challenge with your favorite patterns: stencils/paper/you name it!
Thanks again!
~Samantha

Wednesday, July 27, 2016

You're Fintastic, Best Fishes

Hey everyone! Christy here. I'm super excited to be featured on the blog today with another card for our Rainbow Challenge! A friend from my writer's group is moving away, so I decided to make a tri-fold card with a peek-a-boo window, depicting a fish transitioning from a tank into the ocean.


I combined images from Lawn Fawn's Fantastic Friends with a few from Mermaid For You for a little more variety. These sets play so nicely together. I created my background by drawing waves on some Bristol Smooth Surface paper using my Zig Clean Color Real Brush Pens, then watercolored right over top and flicked on additional clean water for a bubble effect. I also watercolored my images in a rainbow of colors to fit our challenge.


I then glued my Bristol to the second panel of my tri-fold card and stamped a sentiment on the center panel, leaving plenty of white space for the entire group to write their messages. It was a big hit at her Going Away Party this week, and she said she's going to keep it up on her desk in her new home to remember us all by.


Our challenge ends this evening, so still have a few hours to enter if you haven't had a chance yet. I can't wait to see all your gorgeous rainbow colored projects! The winner will receive a FREE stamp set of their choice from Lawn Fawn! Definitely a great incentive.


Thanks so much for stopping by today!

SaveSave

You're Fintastic, Best Fishes

Hey everyone! Christy here. I'm super excited to be featured on the blog today with another card for our Rainbow Challenge! A friend from my writer's group is moving away, so I decided to make a tri-fold card with a peek-a-boo window, depicting a fish transitioning from a tank into the ocean.


I combined images from Lawn Fawn's Fantastic Friends with a few from Mermaid For You for a little more variety. These sets play so nicely together. I created my background by drawing waves on some Bristol Smooth Surface paper using my Zig Clean Color Real Brush Pens, then watercolored right over top and flicked on additional clean water for a bubble effect. I also watercolored my images in a rainbow of colors to fit our challenge.


I then glued my Bristol to the second panel of my tri-fold card and stamped a sentiment on the center panel, leaving plenty of white space for the entire group to write their messages. It was a big hit at her Going Away Party this week, and she said she's going to keep it up on her desk in her new home to remember us all by.


Our challenge ends this evening, so still have a few hours to enter if you haven't had a chance yet. I can't wait to see all your gorgeous rainbow colored projects! The winner will receive a FREE stamp set of their choice from Lawn Fawn! Definitely a great incentive.


Thanks so much for stopping by today!

SaveSave

Tuesday, July 26, 2016

Flamingo Love

Good morning! It's Roxanne here this morning to show you a summery card full of love. Who doesn't just love crafting with summer colors?? Let's get to it.

I got this little Lawn Fawn set called Flamingo Together. I tell ya, the sentiments are brilliant and simple, but oh so cute. Especially this one. I'll just show ya!


Right?! Isn't that funny and cute and full o' love? Told you. 

For the background, I used some watercolor cardstock (I may be slightly addicted to using it), used distress inks and watercolor markers for the sky and sand with a lot of water and then distressed the edges. I wanted a simple beachy looking scene to place the palm trees in the background. I colored the flamingos, fussy cut them (you can certainly purchase the coordinating dies) as well as the little heart in between them and adhered them down using some foam adhesive to give it dimension. 


I stamped the sentiment in the upper right top corner and added a pearl to the dot of the "i" in flamin-go. Totally simple but adorable.  


Thanks for stopping by and happy crafting! 

PRODUCTS USED:
  • Lawn Fawn Flamingo Together
  • Memento Inks, Tuxedo Black and Rich Cocoa
  • Distress Inks, Tea Dye, Pumice Stone, Scattered Straw, Evergreen Bough
  • Radiant Neon Ink, Electric Green
  • Versafine Ink, Onyx Black
  • Spectrum Aqua Markers
  • Spectrum Noir Watercolor Cardstock

Friday, July 1, 2016

Just Waving Hello!

Hi there!

Samantha M here with you today, and I'm sharing a cute little card featuring the ADORABLE narwhal from the Mermaid for You stamp set!


I really LOVE this cute, clean and simple card! I tried to focus all of my attention on the adddddooooorrraaaable narwhal (did I say that? Ha!).
I watercolored the little guy with Distress Markers and then added some dots with a white gel pen and also Distress Markers (I just didn't blend those parts out with water!).


the waves were made with Distress Inks and little light handed blending! They are actually the 'wrong' part of the Ocean Wave Border Dies! SO FUN!!!
I popped up the top wave, and then added a little gold mist drops for some sun! I really think this card is so sweet, and I really hope you did too!

Be sure to come back on Monday, to see what the new challenge will be! Hint: I LOVE IT! Ha! :)
Thanks again for spending part of your day with me!
~Samantha

Tuesday, June 28, 2016

Donut Worry!

Good morning! Roxanne here today with a technique I love. I actually learned this from Chrissie ;) She inspired me to just finally give it a go and once I did, I was hooked. So I had to use it on this card I created today.

I have a weakness. Okay, not just one, but this is a major one. DONUTS. Alllll kinds, but my most favorite are the ones with the pink icing. My youngest calls them lava donuts. I call them heavenly. I could honestly sit and eat an entire dozen. By myself. No joke. But I opted today for the no fat version instead - a card!


Lawn Fawn's Donut Worry set is one I wanted as soon as I saw it. I'm a little obsessed. If I could maintain a figure I could be proud of living on coffee and donuts, that would be amazing. Who's with me?!

So I asked my son what color I should color in my donuts and he looks over and goes, well, pink of course! And that's just what I did. I made this little background, leaving a bit of white space for the sentiment, and colored each of them in with different shades of pink icing. I changed up the color of the sprinkles, too.


Are you craving donuts now?! Sorry, not sorry :)

One more pic just to get you feeling hungry...no, creative. Yes, creative!


Thanks for stopping by to check out the card I made this month! See ya next month. 

PRODUCTS USED:
  • Lawn Fawn Donut Worry
  • Lawn Fawn Sequins
  • Spectrum Noir Watercolor Cardstock
  • Spectrum Aqua Markers
  • Memento Ink, Rich Cocoa
  • Radiant Neon Ink, Electric Pink
  • Memento Luxe Ink, Wedding Dress & Sweet Plum
  • Distress Ink, Tea Dye
  • Versafine Ink, Onyx Black

Wednesday, June 22, 2016

Watercolor Waving Hello with Christy

Hey crafty friends! Good morning! It's Christy here with another card for our current challenge: Distress Mania! I created by background by blending on a whole bunch of Distress Inks, Antique Linen, Gathered Twigs, Tumbled Glass, Peacock Feathers, Salty Ocean, Evergreen Baugh, and a little Pine Needles. Then I took a paintbrush and flicked some water over top and blotted it away with a paper towel for an even more distressed look.

Then I watercolored my images from Mermaid For You with Zig Clean Color Real Brush Pens, popping some of them up with foam tape and gluing others flat to the card to create the look of dimension. I thought I was done, but while snapping the photos, the mermaid's tail was just crying for some glitter, so I added some Stickles for a fun pop of sparkle here and there.

I hope you enjoy it! You still have a week to play along in our Distress Mania challenge. Hope to see your projects there!


SaveSave

Tuesday, June 21, 2016

Waving Hello with Audrey!

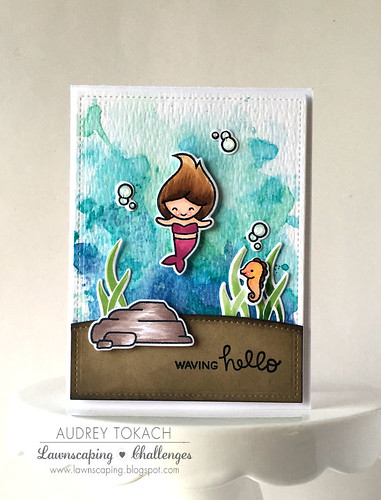
Hello there!  Audrey here!  Today I have a card to share with you that goes along with our current challenge... Distress Mania!  I used Distress Inks to "ink smoosh" my underwater background!  If you are not familiar with "ink smooshing", it's very easy to do and the results are so fun!  You will never get the same effect twice!  All you need are Distress Inks and a piece of acetate or old plastic packaging.  You can even use a sandwich bag.  You just press the ink pad onto the plastic, add a few squirts of water, and press the wet ink on to your paper.  I prefer to dry each layer before moving onto the next, but you don't have to if you prefer not to.  The colors will just mix together more.

Once my background was completely dry, I added a stitched edge with the largest die in the Small Stitched Rectangles Stackables die set.  I cut a second stitched rectangle from kraft cardstock, and used the Simple Stitched Hillside Borders to add a slope to my sand.  For added dimension, I added some Walnut Stain Distress ink to the edges with an ink blending tool.  I stamped and colored a mermaid, rock, seaweed and the cute little seahorse from the Mermaid for You stamp set and then diecut them using coordinating dies.  I adhered some pieces flat with a glue pen, and some with foam tape, and added a sentiment from the same stamp set.  Then I mounted the panel to a white card base using more foam tape.

Waving Hello

That's all for me today!!  Thanks for stopping by! :)