Showing posts with label memento luxe. Show all posts

Tuesday, December 27, 2016

Joy Ride

Good morning everyone! Roxanne here. I've got a little holiday card up today that I created. It's simple, but I really like the watercolor look.


Makes me think of snow. I just love the scene here with the little car pulling a cute trailer with a festive tree on top heading home to decorate it. Hey, I have an active imagination ;)


Thanks for stopping by. I hope you enjoyed my little card and that you have a happy holiday season. If you missed the announcement about the final Lawnscaping Challenge, please go here.

SUPPLIES USED:
  • Lawn Fawn Happy Trails
  • Lawn Fawn Merry Messages
  • Memento, Tuxedo Black
  • Crafter's Companion Ultra Smooth Premium White Cardstock
  • Spectrum Noir Alcohol Markers
  • Spectrum Noir Watercolor Cardstock
  • Spectrum Aqua Markers
  • Versafine, Onyx Black
  • Memento Luxe, Love Letter
  • Radiant Neon, Electric Green

Tuesday, March 22, 2016

Olive You

Good morning everyone! It's Roxanne up today with a cute little card for that special someone and what better way to make someone smile than with a pizza card?! Another set I've been wanting since I saw it, so I bought it and I couldn't wait to use it.


Ahhhhh! I can't stand the cuteness. Really. This set is so clever and has the funniest sentiments to use. Okay, so let's see more details of this card. I kept the layout simple to really showcase the cutie little pizza and sentiment/speech bubble.

I personally LOVE black olives on my pizzas, so that's why I used the OLIVE YOU sentiment and added some of those tasty black olives to my pizza. 


I used the Post-It technique to stamp the box "behind" the acutal pizza image. Totally simple technique but very effective. I use the cheapy Post-It notes I get in the Target or Michael's dollar bins. Then I don't feel bad using them for this! (Let's be real, genuine Post-It brand notes are EXPENSIVE!)


I hope you enjoyed by little pizza inspired love card! There are lots of toppings to choose from for your projects. No matter how you slice it, it's cute. (I'm here all day!) Happy crafting.

PRODUCTS USED:

Tuesday, February 23, 2016

Hello Baby Card

Good morning! It's Roxanne here on the blog today with a really sweet baby card that I created. I love to have cards in my stash that I can easily grab and send off when I need to instead of running to the store. Plus, a handmade card is special. Especially for someone with a new baby. They'll definitely appreciate the time and effort that you put into it! And this particular card is really simple.


I took a kraft paper base, scored it and folded to 4.25x5.5. I took the baby rattle and open heart stamp from the Lawn Fawn Hello Baby stamp set and inked them up with Memento Luxe in Wedding Dress and stamped it randomly to create a simple little background that peeks out. Fun little touch.


I then took some premium white cardstock and used the Lawn Fawn Let's Bokeh Lawn Cuts and cut out 3 circles. I inked up the larger bunny, sentiment hello baby, and the baby bunny from the set with some Memento in Tuxedo Black and stamped those into the circles I diecut. I used a Wink of Stella Brush pen to color over the sentiment and added a simple little twine bow above it. Then I colored the bunnies with my Spectrum Noir Markers (colors listed at the end). I tried using realistic coloring and shading for the bunnies especially the top bunny. I love how she came out!

For some color, I used a pretty floral piece of patterned paper from my stash and glued strips to either side of the brown and white graph paper. I rounded the two corners and adhered to my card base. I then used some foam adhesive to glue down the 3 circles in the center of that. And just for an elegant touch, I used some small self adhesive pearls on the grid lines of the graph paper.


Very simple yet soft and elegant card perfect for a new baby! I hope you're inspired to create a soft and simple card just like this. Thanks for stopping by and happy crafting.

SUPPLIES USED:

Tuesday, December 22, 2015

Holiday Joy Card

Good morning! Roxanne here today with a holiday themed card I created. Let's check it out! My supplies are listed at the end as well.


I wanted to make something really bright and cheery for a holiday card. I used the green tree paper from the 6x6 Snow Day Paper Pack and cut to my card size (4.25x5.25) and adhered to the card base. That green is the perfect color for the other elements I used. It makes them really pop off the page. Okay, foam adhesive helped there too ;)


I diecut the "joy" from the Scripty Joy Lawn Cuts out of some beautiful shimmering cardstock in Candy Red (what a perfect name). I trimmed some foam adhesive down to fit onto the back because I really wanted dimension to this card.


For the circle elements, I used the Let's Bokeh Lawn Cuts and cut out 5 circles out of the largest die out of my white cardstock I used for coloring. I stamped my little elements in there using the Baaah Humbug set. I colored them all in with my Spectrum Noir Markers and added some sheen in there with my Spectrum Noir Sparkle Pens. I wish you could see the sparkle it adds!


I arranged the circles and joy diecut on my card and used foam adhesive for everything to pop it up off that bright green tree paper. I hope you enjoyed my project. There is still a little time to create some adorable holiday cards, or even a quick gift of thank you notes, matching envelopes and a pretty pen for giving. Happy Holidays!

SUPPLIES USED:
  • Let's Bokeh Lawn Cuts
  • Scripty Joy Lawn Cuts
  • Baaah Humbug
  • Crafter's Companion Shimming Cardstock, Candy Red
  • Distress Ink, Evergreen Bough
  • Memento Luxe, Love Letter
  • Spectrum Noir Markers: IG1, IG4, IG7, GG1, JG1, JG3, DG1, DG3, TB2, TB4, IB1, LG1, LY3, TN3, CR5, IG2, Blender
  • Spectrum Noir Sparkle Pens: Moonstone, Crystal Clear, Moonlight


Tuesday, October 27, 2015

Happy Haunting Card

Good morning, Roxanne here today with a cute Halloween-themed card for you! I had a lot of fun creating this cute little card, so sit down and take a scroll with me through the process. I've listed all the supplies I've used at the end of this post.


My first step was to create my card base. I used a plain black cardstock that I cut, scored and folded to 4.25x5.5. I grabbed a piece of my patterned paper that I was going to adhere to the front of my card and diecut out a larger circle. I traced that diecut onto the card base so I knew where I was going to need to stamp/create my sky.

I used several star stamps from the Booyah and Party Animal sets with some Delicata in Golden Glitz and heat embossed them with clear embossing powder. I then took a sponge and my Dandelion ink pad and swirled on the hazy sky on a portion of the circle.


My next step is to stamp and create my little critters that I wanted as part of my Halloween scene. I was quite giddy when I realized that the hat and Frankenstein hair/stitches fit PERFECTLY onto the animals from the Party Animals set. I just wanted to use something cute, other than a ghost! 

I stamped these onto some quality coloring cardstock with Tuxedo Black (Memento). I masked the top hat and hair before stamping the bear onto the cardstock. I simply stamped the hat and hair image onto a sticky note, fussy cut that out carefully, and stuck that down over my stamped images of the hat and hair. This allows you to stamp over that with the bear stamp so that once the mask is lifted, it looks like it was all one image! 


Next, I colored and cut out my bears. Now as you can see, even though I'm really careful about trimming around the edges, you always end up with a very slight white edge. What I do is take a black marker (I used my Spectrum Noir True Black) and lightly go around the edge of the image so that it looks like you cut it perfectly and have clean black edges. Just a little tip I do. You'll see in the image above that I touched up the brown bear. 


Here are all my elements for my card. Let's assemble!


A little close up of the details!

I hope you liked my little Halloween card. Thanks for checking out my project! Happy crafting.


SUPPLIES USED:

Tuesday, July 28, 2015

Summer Friendship Card

Hi everyone! Roxanne here today with a step by step photo tutorial showing you how I created this fun summer friendship card using unexpected Lawn Fawn stamp sets. I love using my sets in fun ways that you may not think of pairing together. That's the beauty of creativity. So many possibilities.

LET'S GET STARTED!

I'm actually doing something totally different for me - I'm gathering my supplies BEFORE creating my card. I have an idea of what I'd like to create and then I gather the supplies and start crafting. I'm finding it's much easier (and faster) when I do this. I actually love it. I typically am a scrap as I go type person, pulling elements together while I'm in the midst of creating. But this is by far much easier. And it enables me to show you the process!

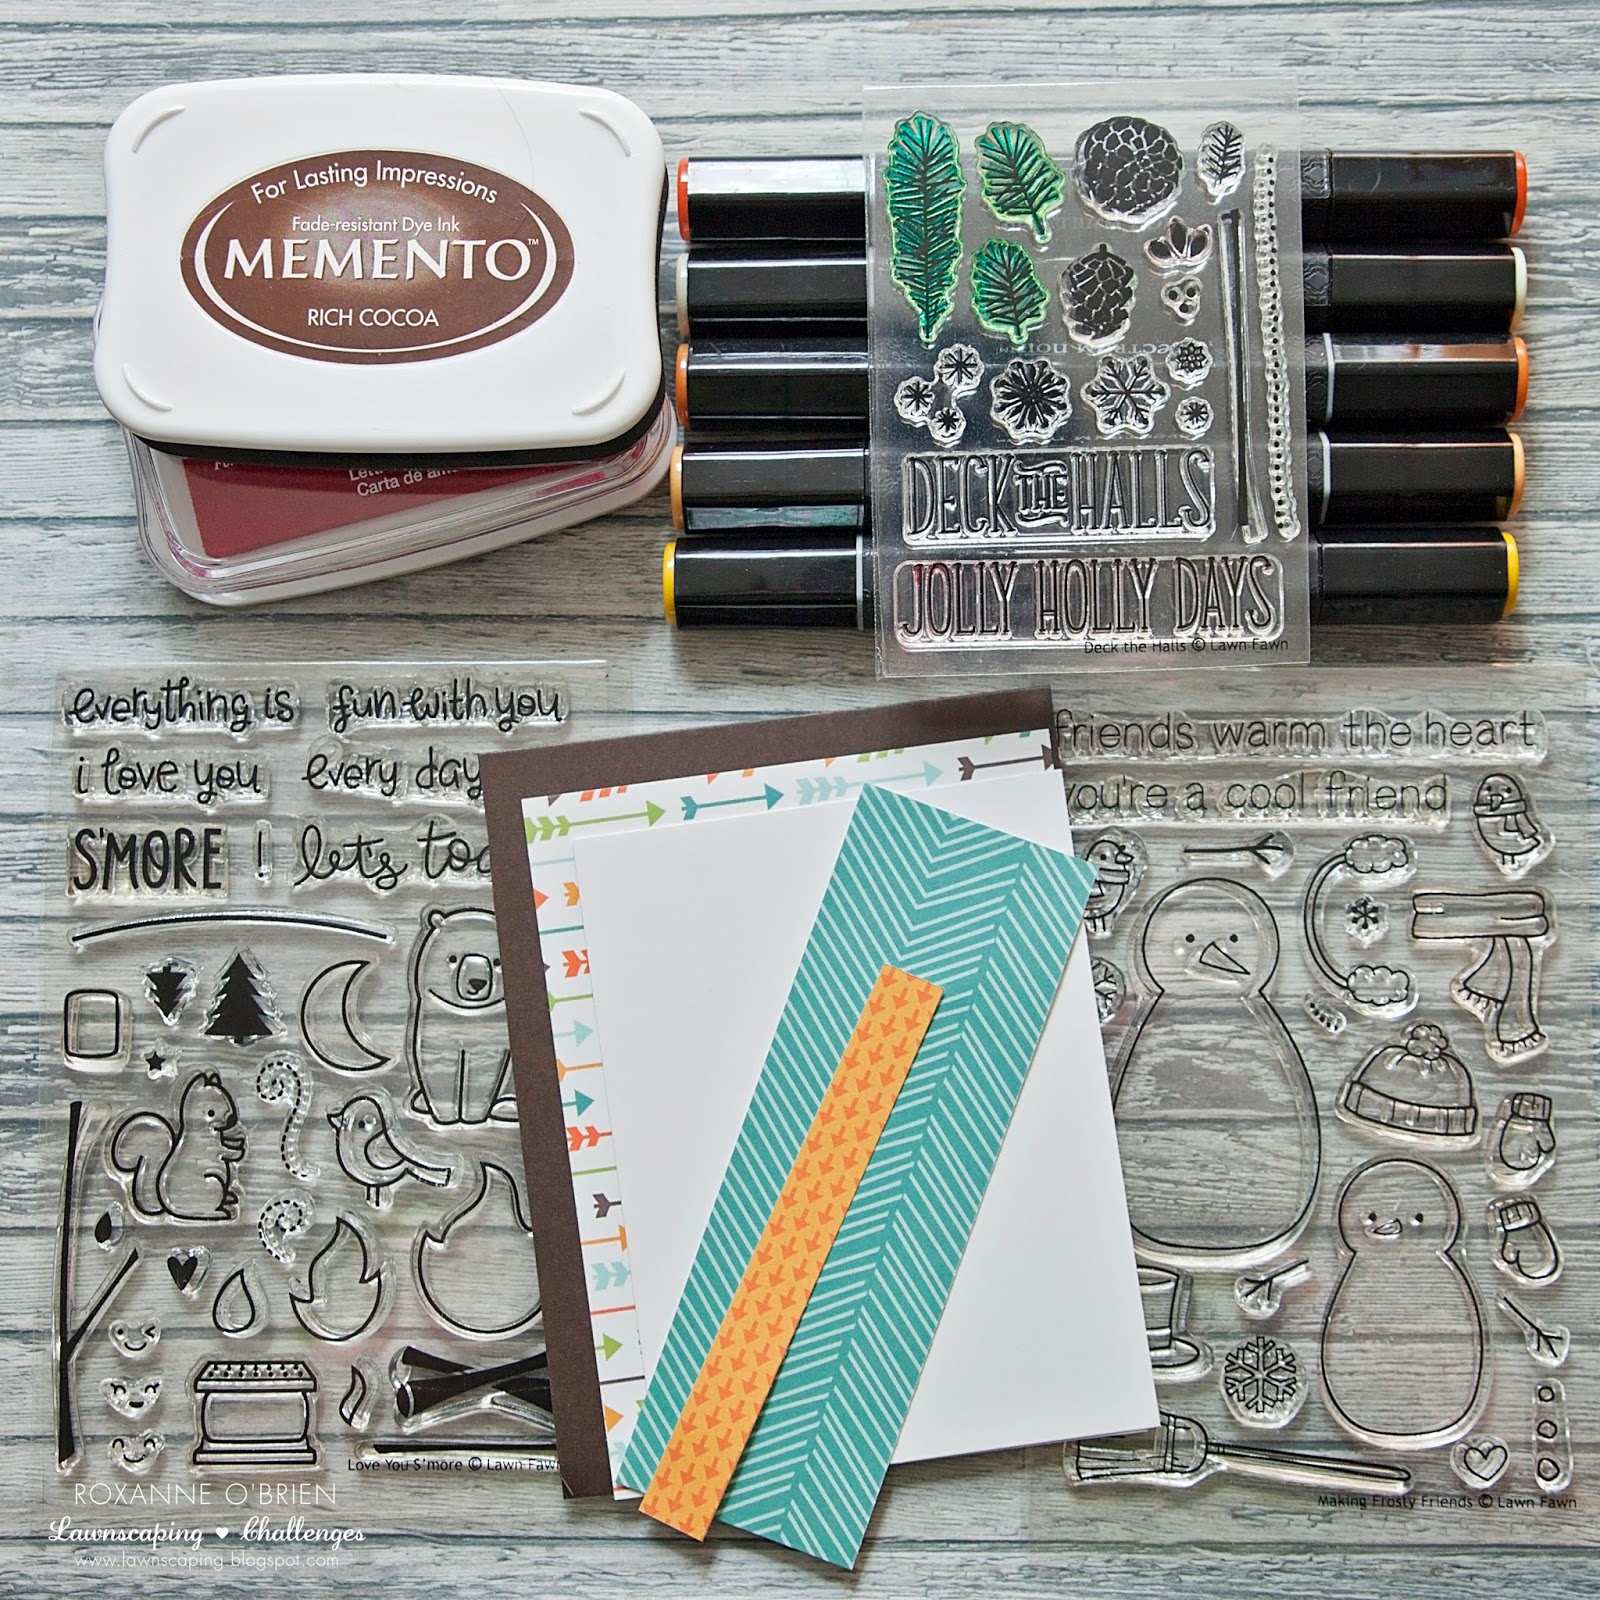
First, I gathered my supplies. Here is what I used to create this card:


I had actually trimmed everything out as well prior to starting. I cut my brown cardstock base from a piece I had in my stash (I keep pretty much every scrap!!) and scored/folded it to 4.25x5.5. I trimmed the arrow patterned paper to 4x5.25. I then cut a smaller piece of white cardstock which I was going to be stamping my scene on to. And then I simply trimmed the teal and orange patterned paper to various sizes. Nothing too specific. I hadn't really determined my final layout just yet. I did that as I went!

Next, I grabbed my piece of white cardstock and used the pine needles from the Deck the Halls set with my Pistachio ink and just stamped around the outer edges. I left a white space in the middle. I simply alternated the direction I stamped and I think it came out really cute so far!

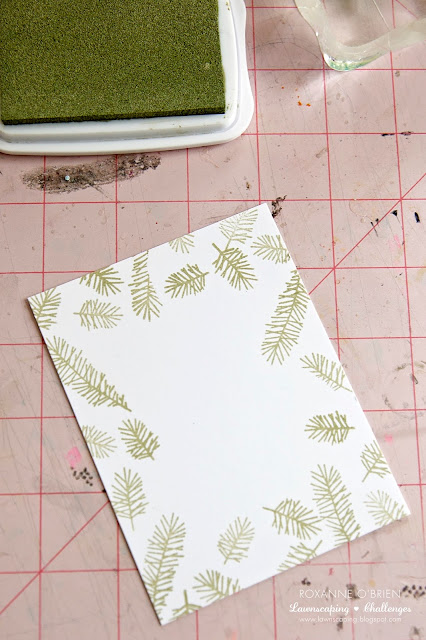
I realize my craft mat is quite, um, ugly, but it's well used and well loved! I'm sure you can relate. :) 

I took my small strip of orange/arrow paper and I stamped my sentiment for this card from the Making Frosty Friends set because it went perfectly with it! I inked that up with Memento in Rich Cocoa (I could have used the Luxe, but I grabbed my regular Memento instead because this text is a thin type font and I didn't want it to get "fat" from the juicier ink). I then stamped little red hearts next to it from the Love You S'More set, in Memento Luxe, Love Letter. Just a cute little touch. (You'll see that soon.)


In the white space I had left, I wanted to stamp in the wood from the Love You S'More set. I stamped that with my Rich Cocoa. I used Memento Luxe because it's a nice and juicy ink that really gets great coverage especially when using these solid image stamps! I stamped the wood a bit lower  because I will be adding elements above that area so I needed extra space. You'll see!


Next up, I inked up the marshmallow and fire from the Love You S'More set with my Memento in Rich Cocoa and stamped onto my white cardstock. I colored them in with my Spectrum Noir markers. I only used 5 markers total to color them in. Pretty easy peasy!


I fussy cut the fire and marshmallows out. I used foam adhesive to glue the fire to just on top of the logs I had stamped on the cardstock. It gives it a nice little bit of dimension. 


I knew I wanted to roast my marshmallows I had colored, so I inked up the branch from the Love You  S'More set and stamped that on the left side of the piece leaving enough room to add in my marshmallows to the branches. I used some foam adhesive again to give dimension.


Now after looking at my little campfire here with the toasting marshmallows, I knew I need to add the smiley face to the fire. It just makes it warmer, right? So cute!

Here is where I added in the red hearts stamped next to my sentiment. Brings in some nice color, too!


Now the fun part - ASSEMBLY! I played around with the layout a couple times before I glued anything down, but here is the final card with everything put together. 


I hope you enjoyed my little photo journey into my process of creating this card. I think this will be sweet to send to a friend that I've spent some time this summer with just to say thanks :) 

Tuesday, June 23, 2015

Rainy Day Hello Card

Good morning! Roxanne here with a card that I thought was fitting for the rain we've been having here in Chicago. Seems to have rained quite a bit so far this spring/beginning of summer. I decided to make a bright little card today that is inspired by the rain.

I recently bought this Lawn Fawn, Hello Baby set and I have been wanting to use it. I also wanted the main image to really be the only thing in color, so it really stands out.

I went with a white card base, scored and folded to 4.25x5.5. Then I cut two smaller panels, both 4x5.25. I glued one down to the base. The other, I used an embossing folder with little dots on it and ran that through my machine. I then took a die I have in my supplies and die cut out the shape in the center of the card. For this panel, I did use a watercolor cardstock for texture and because I was going to be coloring in my little scene with my watercolor markers.


With the diecut piece, I started with my little scene. First, I stamped the duck from the Lawn Fawn Hello Baby set. I then stamped that again on a sticky note to create my mask. I cut out around that from the sticky note and stuck it over my stamped image on the watercolor cardstock. This will allow you to stamp over that and create a fun look that makes it look like he's holding the umbrella. I next stamped the umbrella and then the grass below his feet. For the grass, I just used the grass image from the Hello Baby set with some Memento Luxe in Pistachio and stamped that randomly to make it look like he's standing in the tall grass in a field.

I colored in my little ducky with my Spectrum Aqua markers (colors listed at the end), and the umbrella as well.

I made another mask with the umbrella and clouds by using the same sticky note technique above. This way, you can layer stamped images and it allows you to give so much dimension to your scenes! I used the mask for the clouds for the rain as well. I used the triple dotted lined image from the same set and stamped that with Memento ink in Summer Sky (how appropriate!) to give it some movement. I added several sequins from Lawn Trimmings I had on hand.

Next, I actually adhered the embossed panel down first over the plain panel I had glued down previously to line them up. I used a thick foam circle adhesive for this to pop it further off the card. For the stamped/colored scene, I used a thinner foam circle adhesive to give it a tiny bit of pop, but to leave room between that and the embossed panel I stuck down. I just then snuck that into the opening and pressed down to adhere.

In my stash, I had this little Basic Grey chipboard tag and stamped the hello from that same set in Memento in Tuxedo Black. I tied a simple bow around the end of the tag with some Lawn Trimmings cord, and then glued that down underneath the diecut panel.

I just love all the white and pop of color in the center from my little stamped scene. I hope you enjoyed my project today! Thanks for stopping by. :)


Supplies:
Lawn Fawn Hello Baby!
Lawn Fawn Lawn Trimmings - Triple Cord, Natural  and Fall Sequins
Memento, Tuxedo Black & Summer Sky
Memento Luxe, Pistachio
Basic Grey Chipboard Elements, Hey You Collection
Cuttlebug Embossing A2 Folder, Swiss Dots
Spectrum Noir Watercolour Cardstock
Spectrum Aqua Markers - Kingfisher, Charcoal (clouds); Sunflower, Sunset, Jasmine (duck); Red Violet, Sea Green (umbrella); Moss (grass)
Papertrey Ink - Mat Stack 3 Die

Tuesday, April 21, 2015

I'm So Thankful for You!

Good morning! Roxanne here today to show you a colorful project that I created for a Mother's Day card. I'll be making a few more for those special women in my life.

I love using bright colored images with black. It really makes your bright images pop off the page or card.

I chose a simple white base for my card. I always use a folded 4.25x5.5 card. It fits perfectly into an A2 envelope. You can get fun colored envelopes if you'd like, too! Adds a fun touch to someone's mailbox :)


I used a 4x5.25 piece of shimmering cardstock (Crafter's Companion, Silver Starlight) and a dotted stencil (Heidi Swapp) with some embossing paste (Dreamweaver Stencils, Embossing Paste). This was my first time using it and I'm definitely using this more often! It was really quite easy and fun, just took a little time to dry. After it was dry, I rubbed on some Versamagic ink in Thatched Straw just in one section. I love the look of this in person!

For the focal point, I used the Lawn Fawn Tag You're It dies to cut out the tag and hole. For the tag, I used Memento Luxe in Wedding Dress with various images from the Lawn Fawn Flutter By. I just am loving the chalkboard look lately. The hole for the tag was cut out on the yellow striped paper from the Lawn Fawn 6x6 Let's Polka Petite Paper Pack. Little touches make an impact I think.

The butterfly, rose, and leaves were stamped onto white cardstock with Memento in Tuxedo Black. I then colored them in with my Spectrum Noir Blendable Colored Pencils. I used the paper stumps and blending solution to blend my coloring. I cut them out leaving a slight white border. Using foam adhesive, I glued them to the tag I created. I love the punch of color!! The cord at the top of the tag is a little piece of cord from Lawn Fawn's Lawn Trimmings, Pink Lemonade. It matched the pink in the rose I colored.

The sentiment blocks were stamped on white cardstock with Memento in Tuxedo Black and I simply cut around them in a rectangle shape. These are from the Lawn Fawn Happy Feast set.


I used foam adhesive to glue down the tag and sentiment blocks to the embossed piece. There you go!  A beautiful Mother's Day card. I hope you're inspired to create some beautiful, and simple, cards for those special women in your life for Mother's Day :)

Thursday, February 26, 2015

i ruff you

Good morning, Roxanne here today! I created this cute little card today that I'd love to share with you.

Here is my project - a totally cute little card for that special someone!


For this card, I used a simple mossy colored card base. It's a linen paper, so it's already nice and textured! I then took a sheet of the green pattered paper from the 6x6 Snow Day Petite Paper Pack and cut it into strips. They're roughly 1" wide. I then glued them on an angle on the card base. I love when you can use a holiday paper on a non-holiday card! I thought it went perfectly with this card. 

For the image, I stamped the frame from the Say Cheese set with Memento, Tuxedo Black onto a white card stock. I then cut out the frame leaving a thing white border all the way around. I did this because I knew that I was going to be cutting out the other images and leaving a white border as well. This way, it all goes together :) 


I used the paw print from the Critters at the Dog Park set and stamped them in Versamagic, Sugarcane. It's a pretty, soft taupe color. Very subtle. I simply stuck Post-It notes over the border of the frame to make sure the paw prints didn't go over that border. 

I used the grass image from the same set with Radiant Neon in Electric Green. I stamped several rows of this and layered them up so the grass looked fuller. Who doesn't love full, lush grass??

I could not resist the French bulldog from the Critters at the Dog Park set either!! I love him. I colored him in brown tones with my Spectrum Noir Markers. I cut him out, leaving the thin white border around the edges. I then took the bow tie image and stamped that onto a piece of the blue polka dot paper from the 6x6 Let's Polka Petite Paper Pack. His little nose was colored in using a black Spica pen, so it's just a touch sparkly in person. Reminiscent of a wet dog nose!

The card still needed something else, so I grabbed the large tree from the Critters in the Burbs. 


I glued that down with some adhesive, hanging it over the edge of the frame, and I just cut the bottom of the tree to stop at the bottom of the inner frame. For the bulldog, I popped him up with some foam adhesive. 

The sentiment, i ruff you, was stamped in Memento Luxe, Love Letters. It's the perfect color for love!

I hope you enjoyed my card I created today! 


Thursday, January 22, 2015

Let's Toast!

Hi everyone! Roxanne here with a cute little card today to show you. My son and I are going on a 2-night "camping" trip (I put that in quotes because hubby says if I'm in a cabin, I'm not camping!) and I really wanted to make a fun card that had a camping feel to it.


I used Radiant Neon Electric Blue ink for the sky. I sponged it on and faded it to white/light blue. I cut out the treelike using the Lawn Fawn Forest Border Lawn Cuts with a sheet of pretty green paper with tiny white dots from the Lawn Fawn 6x6 Snow Day Paper Pack. I thought it was perfect for grass with a little snow falling down.

The moon was stamped onto a shimmery yellow cardstock in Memento, Tuxedo Black. I cut it out and used foam adhesive to pop it up off the sky in the upper right corner. I glued the tree/grass area onto my sky and used foam adhesive to pop that up off my kraft card base.

I chose to use the yeti from the Lawn Fawn Yeti, Set, Go! and colored him in with my Spectrum Noir Markers and paper pieced his belly with a piece of grey striped paper from the Lawn Fawn 6x6 Let's Polka Paper Pack. It adds a fun little touch when you add small bits of paper piecing to your stamped and colored images!

I then took the wood stick from the Lawn Fawn Love You S'More set and stamped it onto kraft cardstock with Memento Luxe in Rich Cocoa and cut that out leaving a small border. The marshmallows are also from the Love You S'More set. I used watercolor paper to stamp those on just because of the texture it gives like a slightly charred marshmallow. I colored them in with my Spectrum Noir Markers and added a little pink dot for cheeks. It gives them life even though ultimately, Mr. Yeti will enjoy them! I also stamped the sentiment (let's toast) onto the watercolor paper for texture in Memento Luxe in Rich Cocoa and cut that out around it. Stuck all of the colored pieces and sentiment down with foam adhesive.

There you go! I hope you enjoyed my little winter camping card!