Showing posts with label clouds borders dies. Show all posts

Monday, February 8, 2016

You Brighten My Life

Good morning!  Jess here today with a lot of sparkles!  I just received a new wink of stella clear glitter brush marker in the mail and I was excited to use it!  I used my last one until it literally had no glitter left and I had forgotten just how sparkly a new marker would be!
lsfebsolo4
I started off by die-cutting the Puffy Cloud Borders using white cardstock, silver glitter cardstock, and vellum.  I also used the Rainbow die to die-cut colored cardstock and then heavily applied clear wink of stella glitter all over the rainbow.  It's so sparkly it practically blinds you when it catches the light!
lsfebsolo3

I stamped the sentiment from Life is Good onto one of the cloud layers and embossed it with silver embossing powder.  I adhered the starry patterned paper from the Pint-Sized Patterns: Beachside collection to an A2 card base and then arranged the clouds and rainbow over the background.  I used foam mounting tape for some of the pieces to give the scene a little dimension.  Finally I adhered a stitched frame around the edge of the card to cover up some of the uneven edges!

The current Lawnscaping Challenge is Sending Love, using hearts or love sentiments on your projects, and I created this card with the challenge in mind!  I hope this inspires you to play along with the challenge!  Thanks so much for visiting and have a fabulous Monday!

-Jess

Tuesday, November 17, 2015

Christmas Ever After with Audrey!

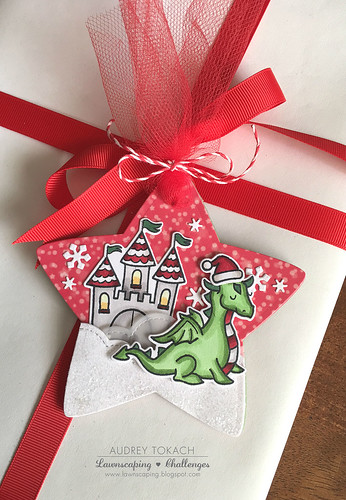
Hey there! Audrey here!  Today, I have a magical Christmas tag to share with you!  The theme of the current Lawnscaping Challenge is "out with the old"... so I dusted off some of  my older Lawn Fawn favorites to whip up this tag.

I started by by diecutting the largest star from the Puffy Star Stackables die set out of red cardstock and also out of the red and white bokeh paper from the Let's Bokeh in the Snow 6x6 paper pad.  I adhered the patterned paper to the cardstock to give the tag a little more stability.  I used the Puffy Clouds border dies to cut clouds for the bottom of my star, and also cut another layer of clouds from vellum.  It is a bit hard to see in the photo, but I used spray adhesive on the white cloud and dipped it in gorgeous crystal glitter.  I stamped and colored the castle and dragon from the Critters Ever After stamp set, and then die cut them with coordinating dies.  I wanted the castle to look a bit like it belonged at the North Pole.  I added the tiny Santa hat from the Baaah Humbug stamp set to the dragon, and finally, a scattering of snowflakes cut from white card stock using the Mini Snowflakes die.  To finish things off, I added a bit of red tulle and some Peppermint Lawn Trimmings.

Christmas Magic Tag

That's it for me today... Thanks for stopping by! :)

Supplies:
Stamps: Critters Every After, Baaah Humbug
Dies: Puffy Star Stackables, Puffy Cloud border, Critters Ever After Mini Snowflakes
Paper: Let's Bokeh 6x6 paper pad
Ink: Memento  Tuxedo Black
Other: Copic Markers, Peppermint Lawn Trimmings, red tulle, glitter, foam tape

Monday, July 27, 2015

You Color My World Rainbow Card

Hello everybody! Heidi here, I'm super excited to share with you my first post, as part of the Lawnscaping Challenge Facebook Inspiration Team!
We are currently having our Lawnscaping Challenge No. 110 "Color Inspired by the Rainbow" so I thought challenge was a perfect opportunity to play with sequins. back in July I made a card using a large number of affixed sequins, such as in this card, it is very fun and entertaining!
This challenge it's all about bright pretty colors, you still have time to enter, so get your favorite color markers, watercolors, or even sequins and join us! You can enter the challenge HERE

I created this card using the "Critters Ever After" the clouds border dies by Lawn Fawn and some awesome colorful sequins.

The sentiment for this card is from the "You color my world" mini stamp set by Lawn Fawn 

I did some simple coloring with Copic markers on the unicorn, not much blending at all. and I adhered the panel to a white note card created with heavy weight white cardstock.

I hope you've enjoyed this card, and that you got inspired to join us on our current challenge, have a wonderful day!