Showing posts with label Valentines Day. Show all posts

Tuesday, December 15, 2015

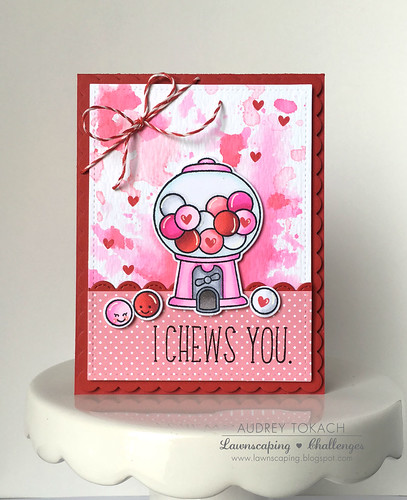
I Chews You Valentine with Audrey!

Hello there!  Audrey here today with a punny watercolor card!  I actually used Lawn Fawn inks in Lobster and the new Plastic Flamingo (which happens to be the most perfect shade of pink!) to watercolor my background using the ink smooshing technique.  I tapped the ink pad on a piece of clear acetate, spritzed it with water, and pressed it into my watercolor paper, moving it around until I was happy with the ink distribution.  I started with Plastic Flamingo, and then dried that layer before adding small amounts of Lobster ink.  I stamped, colored and diecut the gumball machine and gumballs from the Sweet Smiles stamp set, and then added a piece of polkadot patterned paper from the Let's Polka Mon Amie 6x6 paper pad, topped with a Stitched Scalloped Border.  I created a custom sentiment using Violet's ABCs, and then matted the panel on a Scalloped Rectangle cut from red cardstock.  Before adding it to a red card base, I tied a bit of Peppermint Lawn Trimmings in a bow in the top right corner.


I Chews You

That's all for me today!  All supplies are listed and linked above!

Thanks so much for stopping by!! :)


Tuesday, February 10, 2015

Valentine's Day DIY: Hershey Nugget Candy Packs + video!

Hi Lawnscaping Fans!!

Kari with you to share a fun DIY project just in time for Valentine's Day which is Sat!!  I was thinking there are a lot of projects out there that you can do that can be whipped up in a short amount of time, and this one is no exception.

I've taken some Hershey Nugget candies (5) and dressed them up a bit to make a cute little Valentine Gift that you can give to family, friends, co-workers, mail carrier ( that delivers our happy mail;) ) just about anyone.

I've also made a video showing you how I pulled this all together.


I've also showed you that you can get more out of your pattern papers, specifically the Snow Day 6x6 paper pad.  There are other patterns that are great even beyond the holiday season.  There is two patterns I picked out - the red one with a small dot pattern as well as the teal "bokeh" pattern ( or at least that is what I call it).  

I started out by taking the red pattern paper and cutting it down into 3" x 1" strips to cover up the candies.  Then, I cut down the teal pattern paper to 5" long X 2 1/4".  I took the red strips and some small glue dots and adhered two glue dots on one of the pattern paper and then wrapped the candy with the end to be on the bottom side of the candy.  Make sure you take your time, wrap them fairly snug and line up the ends of the pattern paper on the bottom side.  Once I was done wrapping up the candies - I worked on my candy base.  To make sure they fit properly, I just laid one of the candies in the middle of the pattern paper, and made a tic mark on either side of the candy, that way I knew it was centered, and then I took my scoring board tool and scored on those tic marks.  Then, I took my bone folder and really made a good crease in the paper and folded up the sides to make side flaps for the candy base.  Then, I took my Tombow Extreme Adhesive and applied adhesive all the way down in the middle of the base to adhere the candies to.  My tip is down apply pressure until you are sure you have the candies where you want them if you use this same adhesive, but it is VERY strong!  Then, I took a sandwich bag that has the fold over flap, and cut that flap off and wrapped up the whole thing and taped the bottom.  
You could leave it like this...or you could add a tag if you wanted to.  I thumbed through the pattern paper, and there are some small tags that you could use to adhere to the bottom for sentiment if you choose to present it this way.  I chose the one that say You Warm My Heart and cut it down to fit the bottom of the candy pack. And, you are done!! Now its time to give to someone that is special to you and treat them to some yummy chocolate!


I hope this gives you a fun idea for this Valentine's Day or anytime to give a fun treat!!
Below is the video is if you are interested!!  Remember we still have our Clean and Simple Challenge going on, and going strong!

See you soon!
Kari


Tuesday, January 20, 2015

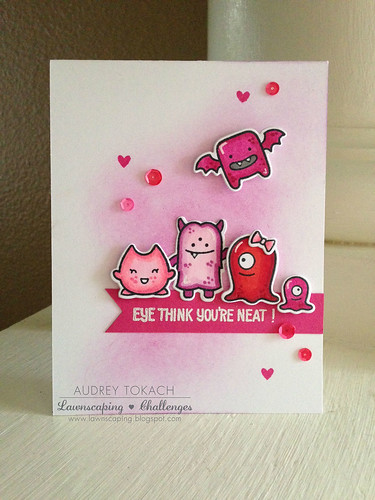
Love Monsters

Hi there!  Audrey here! So excited to be able to share some Lawn Fawn inspiration with you apart from our bi-monthly challenges.  I will be posting projects for you on the 3rd Tuesday of every month, and today is the day!

With Christmas now over, I've moved on to creating for my favorite holiday... Valentine's Day!  I pulled out one of my favorite Lawn Fawn sets, Monster Mash.  This stamp set was originally created with halloween in mind, but no one says they can't be love monsters too!  Using your stamps for other holidays is a great way to stretch your creativity and get more bang for your buck with your supplies!

I stamped and colored my monsters in shades of pink and red for Valentine's day, and then diecut them with the coordinating Monster Mash dies.  I added a very soft wash of color on a white card front using Picked Raspberry Distress Ink and an ink blending tool.  I wanted the sentiment to stand out, so I heat embossed it with white embossing powder on hot pink cardstock.  To finish things off, I stamped some tiny hearts using the small heart stamp in the set, and added a scattering of sequins.


Love Monsters - LS January 20

I hope my post today inspires you to look at your other holiday stamps when you go to create for Valentine's Day!  By the way, a new Lawnscaping Challenge started yesterday... be sure to join us for your chance to win an awesome prize!

Thanks for stopping by!  Have a great day! :)

Monday, January 12, 2015

Peek-A-Boo Bugs and Kisses Goodie Bags!

Hi, Lawnscapers! Suzanne here from the Facebook Inspiration Team to share some treat bags I made with Lawn Fawn's Goodie Bag Lawn Cuts die and the new Bugs and Kisses stamp set!

I modified the front of the bag to include a see-through window. I chose a heart die because it's a Valentine-themed bag, but you can customize the cut out to whatever occasion you're celebrating!


I cut both halves of the goodie bag from card stock, then cut a top layer for the bag front with the goodie bag die and some paper from the Let's Polka petite paper pad. Then, I tacked the die in place with some washi tape and added a small piece near the handle to keep both layers together as I ran them through my machine.


I used a piece of transparent film to make the layer for my bags, but I'm using vellum here so you can get a better look at how the layers come together. You'll adhere the clear piece between the paper and the card stock base, then adhere the patterned paper on top.


After you assemble both halves of the bag, you can add more decorations like I did and fill it with treats!  Here's another look at the finished bags:


Hope you are inspired to create your own peek-a-boo goodie bags for your next celebration! (For a full supply list, click HERE.)

And, there's still time to play along with our winter-themed mood board challenge, sponsored by Ellen Hutson! For all of the details on the challenge, and to link up your entry, just click HERE!

Thanks so much for stopping by today! -- Suzanne


Friday, February 14, 2014

Lawnscaping Inspiration Team Valentines Day Blog Hop!!!!

Hi there everyone!  For those that celebrate, Happy Valentines Day and welcome to the first ever Facebook Inspiration Team Blog hop!  These are an extraordinary group of talented designers that inspire us on the blog as well as our facebook page! They've come together today to inspire us all some more with a Valentines Day Blog hop! Now sit back and be prepared to have your socks knocked off......  But first, let's talk prizes!! The amazing folks at Spectrum Noir are sponsoring this hop with TWO prize packs....  Each prize pack will include TWO sets of markers and a set of brush nibs!  These markers are pretty awesome!!  Thank you Spectrum Noir peeps!!!


So let's get to hopping!!!!  A complete list of hoppers is below! Be sure to leave comments on each of the designer's blogs! The winners will be chosen at random from the comments...


Saturday, February 1, 2014

Early Valentine's Day treat box.

Goodmorning!!!

It's Lenny, from the Facebook Inspiration!!

It's the first Saturday of the month, so ... here I am with my "special" post! :) 

Today, I would like to share an early Valentine's Day project!
I made a little treat box!! 
Yep ... I used my favorite little dude again ... Winter owl!! 
He's so totally adorable, don't you think??

Here's my treatbox . . .


For a detailed list of supplies: click HERE!!

Lots of Valentine's Day inspiration is coming: The Facebook Inspiration
Team is hosting a Valentine's Day blog hop on Feb 14!!
Did you see the badge? :) I hope you're gonna hop with us!! 


Thanks for stopping by today!! 
Happy Saturday everyone!

hugs . . 

lenny