Showing posts with label Sweet Smiles. Show all posts

Tuesday, October 25, 2016

Halloween Punny Card

It's almost my favorite time of year...HALLOWEEN!!!! I enjoy this holiday sooooo much. It's so much fun, it's in my favorite season, my favorite scents and flavors are surrounding me. Ahhhhh. So I wanted to make a funny card to send to someone to make them laugh. I must admit, I was laughing the entire time I made this. Seriously, it doesn't take much to amuse me! ;)


Are you ready?! 

Don't wet your plants...


Are you dying yet?!?!?!  


I mean, the ghost himself is laughing. I couldn't help myself with this one.


Just one more time because it's THAT funny.


HA! I hope you laughed like I did, or at least smiled. ;) Happy Halloween!!!!

PRODUCTS USED:
  • Lawn Fawn Sweet Smiles
  • Lawn Fawn Pizza My Heart
  • Lawn Fawn Booyah
  • Lawn Fawn Milo's ABCs
  • Memento, Tuxedo Black
  • Versafine, Onyx Black
  • Spectrum Noir Alcohol Markers
  • Crafter's Companion Ultra Smooth Premium White Cardstock


Tuesday, September 27, 2016

Accio Bookmarks

Good morning, everyone! I can never resist anything related to Harry Potter. So when I tried thinking of a fun project to share with you all this month, I naturally put on my sorting hat and got to getting creative.

My oldest wanted some bookmarks, and I obliged by making a set of Harry Potter inspired ones for him. It's pretty fitting since we are finally on Half Blood Prince. It's great to reread those books with him because I get to relive it. And I'm trying reallllly hard to get my youngest interested so I can eventually read them to him as well.

I used a lot of different sets for these which is the fun part. I mean, just imagine all the uses each of these sets have seen from everyone using them! I've listed all the supplies I've used at the bottom to create these. They are double sided in case you're wondering. Each of the bookmarks are 2"x6" for those wanting to make some of your own. These would also be fab stocking stuffers or sent with a gift of a book for someone using whatever they're interested in as the theme. I already have ideas for more!


ACCIO BOOKMARKS!


Here they all are:
1. Quidditch brooms and a golden snitch
2. Gryffindor scarf and Harry's little face complete with lightning bolt scar
3. Mandrakes and earmuffs
4. Hedwig wearing Gryffindor colors on her scarf and letters


I hope you enjoyed my project today and you're inspired to take a good look at your stamps and create something for yourself, or a loved one, teacher, daycare provider, or whoever would love a custom set of fun bookmarks themed with something they adore. Thanks for checking them out! 

PRODUCTS USED:
  • Lawn Fawn Baaah Humbug
  • Lawn Fawn Winter Owl
  • Lawn Fawn Sweet Smiles
  • Lawn Fawn Making Frosty Friends
  • Lawn Fawn Dream
  • Lawn Fawn Let's Bokeh Lawn Cuts
  • Lawn Fawn Bugs & Kisses
  • Lawn Fawn Trim the Tree
  • Lawn Fawn Happy Trails
  • Lawn Fawn You've Got Mail
  • Spectrum Aqua Markers
  • Spectrum Aqua Watercolor Cardstock
  • Spectrum Sparkle Pens
  • Memento Luxe, Rich Cocoa
  • Versafine, Onyx Black


Friday, September 9, 2016

Make Your Own Planner Stickers!

Hi! Suzanne here with some inspiration to add Lawn Fawn stamps to your planner pages! I made some mini circle stickers with some of the smaller images in several of my Lawn Fawn sets. Here's a look at the stickers on a page in my planner:


I stamped a bunch of smaller images on some label paper the first time around. It didn't work as well as I had hoped because once I punched the final versions from the paper, it was very hard to remove the backing so they would stick to the planner pages. The images on this sheet are from "Critters at the Dog Park", "Party Animal" and "Love You A Latte".

I recommend using some light weight card stock instead of the sticker paper (unless you have some sticky paper with easy-to-remove backing) and run the punched pieces through a sticker maker. 


I also stamped some of the faces from the "Sweet Smiles" stamp set to make emoji-type stickers. Unfortunately, I don't have Lawn Fawn's planner sets yet, so I used the sets I already have. (The planner sets would be perfect for this project, though, and I hope to make more stickers when I get those sets!)


I made my own circle template so I could pick images that would fit in a 1/2" sized circle punch. It also came in handy when I colored the images. The template is just a strip of kraft cardstock with a circle punched in one end.


I hope I've inspired you to take another look at your well-loved Lawn Fawn sets and make some stickers of your own!

Don't forget to join the current texture-themed Lawnscaping Challenge! There are a few more days left to link your entry for your chance to win a gift certificate to Ellen Hutson! (Don't forget to read the challenge rules in the sidebar to make sure your entry is eligible for the prize!)

Thanks so much for stopping by today! I hope your weekend is off to a great start!


Friday, February 12, 2016

A pair of love-ly cards!

Hi, everybody! Suzanne here, and I was inspired by the upcoming Valentine's Day holiday on Sunday to make these two love-themed cards!


My first card features a scene that I put together with Lawn Fawn's retired "Good Fortune" stamp set. I used paper from the "Let's Polka in the Dark" petite paper pad to make a simple background for my card front.


My second card features a 3-D accent that I made with the "Sweet Smiles" stamp set. I used permanent solvent ink to stamp on a transparent sheet and layered some mini hearts that I punched from a few scraps of Lawn Fawn paper. 


I used foam tape between the layers to give the bubble gum machine some dimension. It's not a shaker element because all of the hearts are adhered to either the transparent sheet or the bottom layer.

Thanks so much for stopping by today! We'll have a new challenge on Monday, so make sure you join us!

Tuesday, January 12, 2016

Mini Kiddie Cards!

Hi!
Chrissie here today! I don't know about you, but once the holidays are over, the winter seems to drag on forever and it's, well, a drag! I live in the Chicagoland area, so not only does it seem like winter lasts too long, it's also pretty cold out there.  Even my kids start dreaming of bright and happy things. So, I know it's not the same, but I like to add a little happiness to their lunches.  :)

I used the new Pizza My Heart along with some sentiments from Lucky Stars and Sweet Smiles to create little notecards for lunches.  And keep in mind, you can do this for anyone, not just kids! My husband will probably do a face palm when he gets one of these, but I know it will make him smile.

To start, I cut some watercolor stock to 3x3.


Then, using a light Distress Ink color, I stamped a few of the pizza shapes.  I used Distress Ink because I knew it would fade away a little bit once water was added.  I wasn't going for a complete no-line look, but I didn't want a harsh black line.


Next came the sentiments.  I stamped them in VersaFine Onyx Black ink and heat embossed them with clear embossing powder.  I heat embossed it to protect the black ink from the water.  I didn't want it to run. I could have stamped the sentiments at the very end instead, but I also like the raised look of the embossing.  People that don't stamp always ask me how I get that look!


I used my Spectrum Aqua markers to "paint" in the color.  I scribbed the colors on an acrylic block and then used a water brush to pick up the color and water.


You can see I added some yellows for the cheese..


With some red along the edge to make it look all saucy underneath....


And, my last step watercoloring was adding some light colors to the background, just to soften up the harshness of the stark white stock.


To finish them up, I added some of the toppings.  I added mushrooms to the one pizza since my daughter and I are the only ones in our house that will eat them.  That card is for her.  Then I added hearts and stars to the other two cards.  :)


Here are a few shots of the finished pieces:


I also want to mention that I did all of these at the same time, in assembly line fashion. I stamped them, then colored, then added the final touches and adhered them to cardstock.  This is a great way to make Valentine's, Thank You's or any other cards you want to get done in mass quantities!

Thanks for stopping by today!


Tuesday, December 15, 2015

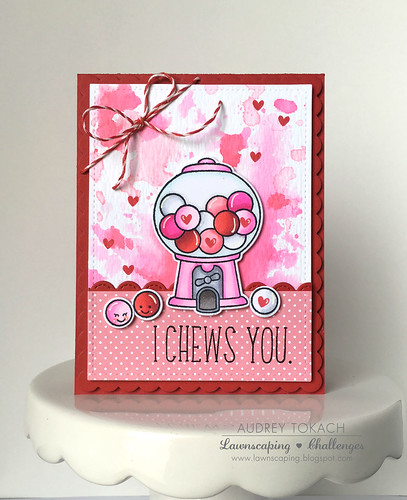
I Chews You Valentine with Audrey!

Hello there!  Audrey here today with a punny watercolor card!  I actually used Lawn Fawn inks in Lobster and the new Plastic Flamingo (which happens to be the most perfect shade of pink!) to watercolor my background using the ink smooshing technique.  I tapped the ink pad on a piece of clear acetate, spritzed it with water, and pressed it into my watercolor paper, moving it around until I was happy with the ink distribution.  I started with Plastic Flamingo, and then dried that layer before adding small amounts of Lobster ink.  I stamped, colored and diecut the gumball machine and gumballs from the Sweet Smiles stamp set, and then added a piece of polkadot patterned paper from the Let's Polka Mon Amie 6x6 paper pad, topped with a Stitched Scalloped Border.  I created a custom sentiment using Violet's ABCs, and then matted the panel on a Scalloped Rectangle cut from red cardstock.  Before adding it to a red card base, I tied a bit of Peppermint Lawn Trimmings in a bow in the top right corner.


I Chews You

That's all for me today!  All supplies are listed and linked above!
Thanks so much for stopping by!! :)


Monday, November 9, 2015

Watercolor Art Journaling with Altered Lawn Fawn Stamps


Hello crafty friends! It's Jess and today I have an art journal page featuring Lawn Fawn's Sweet Smiles and Color My World stamp sets. My art journal is a collection of quotes with accompanying art. I have a dedicated Pinterest board for quotes and for today's handletting I was inspired by this piece. For more on how I created this page and my thoughts on this quotes check out my video.


I've known I wanted to tackle this quote for awhile because it has layers of meaning for me but I wanted the overall effect to stay positive so I decided using adorable Lawn Fawn stamps and bright rainbow colors would help. I used a lot of masking to get these partial crayon bits and all the different faces from Sweet Smiles helped reinforce the thoughts behind this page. I've really enjoyed finding a way to make art journaling work for my style and with the stamps that I love. 


If you haven't already be sure to join in on out current Thinking of You challenge. 

Friday, November 6, 2015

Miss You - Stretching Your Stamps

Hi everyone! Marina here! For today's card, I wanted to use the theme for the current Lawnscaping Challenge and taking this opportunity to share with you an idea how another way of using the gumball machine from the Sweet Smiles set.


So, I started off by masking away the balls in the machine and used the Distress Ink in Antique Linen to stamp as I want the border to be as light as possible.


 I like using my copic markers when I want my images to turn our sharp and vibrant. In the final image, you will notice that I've covered the brown area with some gold stickles. I thought this would as some nice shimmering touch to the card.


I've coloured a white paper with pink copic markers before using the string of hearts die from the Stitched Journal Card die set.


As for the sentiment, I took it from the Chit Chat set and masked away the bubble around the words before stamping.


I hope it will inspire you to find more looks for your stamps! Cheers!

Tuesday, July 21, 2015

Combining Lawn Fawn Stamp Sets

Hi there! Audrey here!  I have a fun card to share with you using a bunch of Lawn Fawn goodies!  One of the things that I love most about Lawn Fawn Stamps are their versatility.  Because they are all a similar style, they can all be used together, which allows you to really stretch your stamps!

Did you ever have one of these as a kid?  I never did, but boy did I want one!


When I saw the Fintastic Friends and Sweet Smiles stamp sets, it was an idea that come to me immediately.  I wanted to create a Lawn Fawn gumball machine fish tank!  I started off stamping inking up the gumball machine from Sweet Smiles, but before I stamped it, I wipe the ink off of the gumballs in the image.  When I stamped, I was left with an empty gumball machine.  I stamped the waves from the Critters in the Sea stamp set, and the sand mound from the Life is Good stamp set, and then added some plants and rocks from the Fintastic Friends set.  I used copic markers to add little dots of color for rainbow gravel, and then stamped colored and  cut out the fish food container which I popped up on foam tape.  The goldfish is also popped up for added dimension.  I added a few details with a white gel pen, too.  For the area behind the fishtank, I used an ink blending tool and Tumbled Glass and Pumice Stone distress ink to add some color.


Gumball Machine Fish Tank

I hope you enjoyed my card today and I hope this inspires you to think out side the box with your stamps!  It 's so fun to see what you can create by combining images from different stamp sets!


Supplies:
Stamps: Lawn Fawn Sweet Smiles, Fintastic Friends, Life is Good, Critters in the Sea
Dies: Lawn Fawn Small Stitched Rectangles Stackables
Ink: Memento Tuxedo Black, Ranger Tumbled Glass, Pumice Stone
Other: Copic Markers, White Gel Pen, Foam Tape, Ink Blending Tool

Wednesday, July 15, 2015

Copic No-Colouring Galore

Hi everyone! Marina here! I'm sure this technique isn't new to everyone but I would still like to share this card and share some tips I've learn and hopefully, it would benefits you.

You can use any light copic friendly ink. I use Distress Ink. Mainly because it's the only ink line that I have many colours of. I used the images from the Sweet Smiles set.

Tip 1 : I stamped the machine off to the side to create some kind of dimension even though everything is more or less one layer except for the sentiment. I really like doing this especially for one layer card.


Tip 2 : The great thing about no-line colouring is, you don't have to trouble yourself and create a mask. If you can see it in the image above, some of the balls overlaps. But because you will not see the line in the end result, this doesn't matter :) 


I hope you like this card as much as I did :) 

Tuesday, June 16, 2015

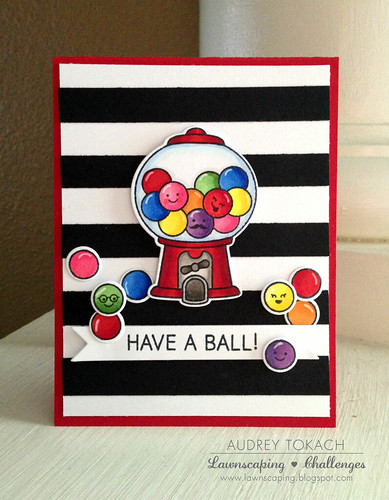
Have a Ball!

Hey there! Audrey here today with a fun card using the new Sweet Smiles stamp set that is part of the Lawn Fawn Summer release!  I just LOVE this stamp set.  It is so much fun to color, and the selection of little faces in the set make it worth the price alone! I can see myself using them with a lot of my other Lawn Fawn stamp sets.

To start my card, I took a piece of white cardstock, and I added 1/2" stripes of black cardstock along the length of the panel. I used my grid mat to help with placement and spacing.  Then I stamped, colored and diecut the gumball machine and gumballs.  I popped the gumball machine up on foam tape in the center of the panel, and then adhered the loose gumballs randomly, some glued with liquid glue, and some popped up on foam tape.  I stamped a sentiment from the set on a strip of white card stock and then cut banner ends before popping it up with foam tape.  Then I adhered the panel onto a red card base for an extra pop of color.


Have a Ball!

That's all for me today!  I hope you like my card.  If you don't have this stamp set, hurry and go put it in your cart!  You'll love it! ;)

Have a great day!!