Showing posts with label Small Stitched Rectangles Stackables. Show all posts

Tuesday, October 20, 2015

Let it Snow with Audrey

Hi there!  Audrey here with a rustic winter card to share with you!  I love kraft cardstock for winter cards because it really shows off the snow!   I started off using the Small Stitched Rectangles dies and cut the largest rectangle in the set from both kraft and white cardstock.  Then, I used the Snowy Backdrops die to add snow to the kraft rectangle diecut, and backed it with the white rectangle diecut.  The rectangles were a bit longer than I wanted, so I trimmed about an inch off of the bottom, and used the Stitched Hillside Borders die and Forest Border die to create a ground for my little snowman to stand on.  I stamped, colored and diecut the snowmen, their accessories, and the little birds from the Making Frosty Friends stamp set and then popped them up on the hills with some foam tape. I also adhered the panel up on a kraft card base with more foam tape. I stamped a sentiment from the Snowy Backdrops stamp set onto a strip of kraft cardstock using Versamark ink, and then heat embossed it with white embossing powder.  Then I hand cut flag ends on the banner, and popped it up with, you guessed it... foam tape.  I finished the card off with a bow using some jute twine.
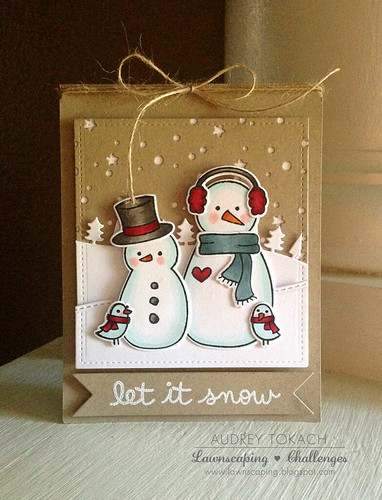
Let it Snow

I hope you like it!  Thanks so much for stopping by! :)

Tuesday, August 18, 2015

You're a Star Shaker Card!

Hello there!  Audrey here! :)

I want to apologize in advance if these pictures aren't the greatest.... it's rainy season in Florida, and with daily rain, my window for picture taking isn't a very long one.  LOL!

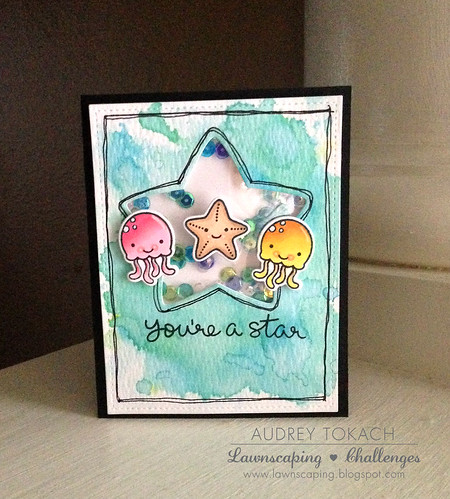
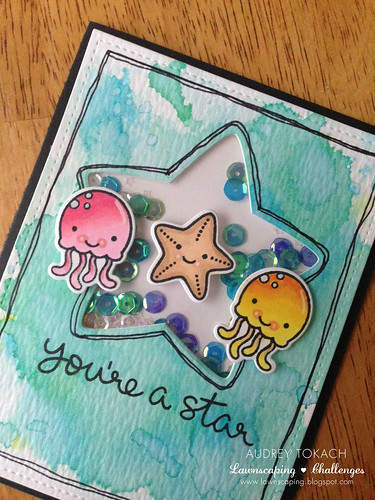
Today, I have an under the sea shaker to share with you!  I started off by watercoloring a piece of  watercolor paper with Distress inks.  When it was dry, I diecut it with the largest die from the Small Stitched Rectangles Stackables die set.  From that, I also diecut a star shaped window using the Puffy Star Stackables die set.  Before filling my shaker, I stamped a sentiment from the So Jelly stamp set, and then added my shaker contents.  I popped up some Copic colored Jelly fish and a cute little starfish, also from the So Jelly Stamp set, up on the front of the shaker window with foam tape. After seeing it all put together, the black sentiment seemed to really stand out, and not in a good way.  LOL!  So I added some doodled lines to frame the star window the the entire panel, and then popped everything onto a black card base to balance things out a bit better.


You're a Star!

Here you can see the shaker a little closer:


You're a Star!

Hope you like it!  Thanks for stopping by! :)

Supplies:
Stamps: Lawn Fawn So Jelly
Dies: Lawn Fawn So Jelly, Small Stitched Rectangles, Puffy Star Stackables
Other: Distress Ink, White Gel Pen, Copic Multiliner, Copic Markers, Foam Tape

Monday, August 10, 2015

Layering Clear Embossing Over Distress Ink for a Subtle Background

You're a Star Card by Jess Gerstner featuring Lawn Fawn Starry Backdrops Word Dies So Jelly and Stitched Borders

Hello crafty friends! It's Jess and today I have a card featuring some fun ink blending with embossing layered on top and the Lawn Fawn stitched borders for added interest. I really like how the stitched border can add a layer of texture to make the white space on a card more interesting. For more on how I achieved this look check out my video.


As discussed in the video I added some distress ink after masking off the stitched area with some tape. I love how the Starry Backdrops looked layered on the blending and how it gave me another way to use that fun scripty sentiment from So Jelly. This would be fun to create with any of the backdrops and word dies you happen to own.

You're a Star Card by Jess Gerstner featuring Lawn Fawn Starry Backdrops Word Dies So Jelly and Stitched Borders

I hope you enjoyed my card and video! Don't forget to participate in the latest challenge Back to School!

You're a Star Card by Jess Gerstner featuring Lawn Fawn Starry Backdrops Word Dies So Jelly and Stitched Borders

Tuesday, June 9, 2015

Father's Day Card using Best Pun Ever

Hi everyone! Kari back with you to share a fun simple Father's Day Card.  Father's Day is approaching quickly - and I wanted to show case the fun set Best Pun Ever to make this Father's Day Card.


I started out by creating some "gold" card stock.  I didn't have any in my stash, but I did have a Gold Pigment marker from Inkadinkado - Unfortunately - I believe these markers have been discontinued, but you can get the same effect probably from just applied some VersaMark Ink onto a piece of scrap white card stock and using some embossing powder, or there are some paper pads that have metallic papers in them as well.  Once I created my gold card stock piece, I stamped the trophy image from Best Pun Ever with Versa Fine Onyx Black Ink, as well as the #1 image in the middle of the trophy and then once all that was dry, I  die cut it using the Coordinating Dies.

Then, I worked on creating the layers for my card.  I have 3 different colors of card stock that I thought worked well together, as well as make the gold pop.  I created a 5x5 square card out of some red card stock, and then die cut a piece of navy card stock for the next panel using one of the Small Stitched Square Stackables dies, and then a piece of lighter blue using one of the small Stitched Rectangle Stackables dies.  I wanted these pieces to have some texture to them - so for the red card stock, I had a wood plank background stamp, and used my Versa Mark ink to ink up my stamp.  It is hard to see in the photo, but in real life it gives it a nice texture.  I did the same for the navy and lighter blue card stock panels using different background stamps - I used a thin stripe background for the navy, and a star background for the lighter blue.  

For my sentiment - I intended to heat emboss it in gold, but since I used Versa Mark for the background, I was afraid the embossing powder would stick to the whole panel once I stamped down my sentiment, and of course it did - although I let it dry and I used my powder tool.  I know there is a way around that, but I just continued on, and I stamped the sentiment down, and took my Gold Signo Broad Pen and went over the sentiment by hand.  I think it turned out fine.


I will give this card to my dad for Father's Day!!  Thanks so much for stopping by, and remember we have our fun Calling All Critters Challenge going on right now - so hope you are able to play along!

Kari


Tuesday, May 19, 2015

Watercolor Wheelie Like You

Hey there!  Audrey here with a fun card to share with you!  I am still loving the watercolor trend and I hope it never goes out of style!  I seem to be reaching for my watercolors on every other project!

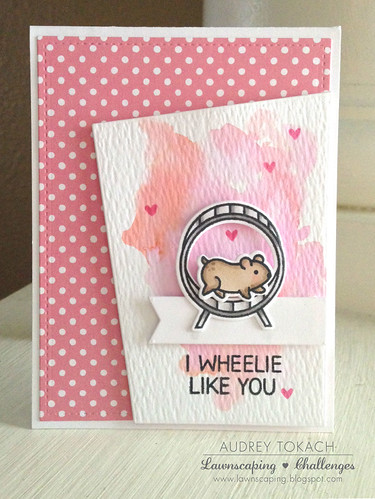
I started off with a piece Let's Polka Mon Amie 6x6 patterned paper and I die cut it with the largest of the Small Stitched Rectangles.  Then I angled a piece of Tim Holtz Distress watercolor paper, and trimmed around the edges so that it lined up with the edge of the rectangle.  I watercolored in shades of pink and coral using Picked Raspberry and Abandoned Coral Distress Inks (LOVE this combo), and then stamped, colored and diecut the adorable little hamster and wheel from the Wheelie Like You stamp set. To ground the little scene, I used the banner from the Stitched Journaling Card die set and stamped the sentiment below the banner.  I popped the banner, wheel and hamster up on foam tape, and then after I adhered the patterned paper to a card base, I popped the finished panel up with foam tape.

I Wheelie Like You

Hope you like it!  Thanks for stopping by!! :)

Tuesday, April 28, 2015

Cookies and Milk Tags

Hello there!  Audrey here today to share some fun milk and cookies tags with you! 
With the end of the school year fast approaching. I am trying to get ahead of the game with the papercrafted goodies that I need to make.  My son has decided that as the end of the year gifts for his teachers, he wants to give them giant chocolate chip cookie cakes.  Both of his teachers have families with lots of kiddos, so I think it's a great idea!  

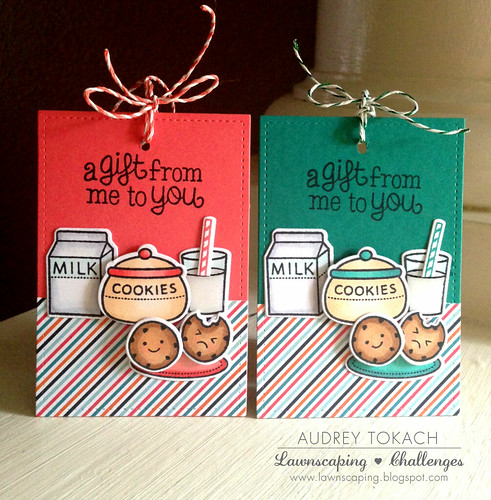
To personalize things am bit, I made these little tags to tie on to the cookie cakes.  I used one of the dies from the Small Stitched Rectangles Stackables die set and the base for my tags.  Then I stamped, colored and diecut some images from the Milk and Cookies stamp set.  I added some patterned paper from the Pint Sized Patterns: Beachside 6x6 paper pad, stamped a sentiment from Winter Gifts, and tied a bow using some Lawn Trimmings.


Milk and Cookies Tags

I hope you like them!  Thanks for stopping by!! :)

Supplies:
Stamps: Milk and Cookies, Winter Gifts
Dies: Milk and Cookies, Small Stitched Rectangles
Paper: Pint Sized Patterns: Beachside
Other: Coral and Green Sparkle Lawn Trimmings