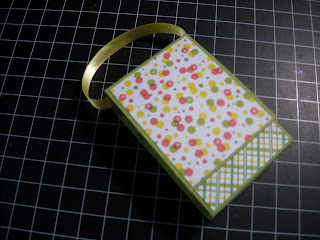
Here is a look at the featured supplies and finished product we will be putting together today.
You will start off by choosing your color of 8 1/2 X 11 card stock, and trimming it down to 3" x 11"
Next you will score at the following increments - 1/2", 1 1/2", 3 1/2 ", 4 1/2", 6 1/2", 7 1/2", and 8 1/2".
I know on the template it looks to be backwards from right to left - but at the time I didn't have my bigger sized scoring board and was using my Scor Buddy to do this and for some reason for me this was easier ( I like to make things hard on myself - HA!)
Next - you will take an oval punch - mine I used measures 1 3/4" X 7/8". Between the 1/2" and 1 1/2" scored lines you will punch an oval - you will go slightly passed the score line - as shown below
Then, it is time to choose the patterned papers you will want to use to decorate the outside. I chose two patterns - One for the main flap to close the holder - the very top of the holder, and the front base.
Those measurements are ( 2 x 2 1/2 approx - front flap, Front Base - 1 7/8" x 1 7/8" approx and the very top 3 1 7/8" approx)
It is now time to start assembling the holder - you will use Scor Tape or sticky strip or any type of strong adhesive and you will apply it on the very end of the 1/2" end.
And you will bring it up to the 6 1/2" score line and it will make a perfect square shape like below.
At this point I made sure that my sanitizer fits well - you have to go in at the side of the holder and angle it in from the top of the sanitizer and then slide in.
Now, take your prepped pieces of patterned paper and apply to the holder.
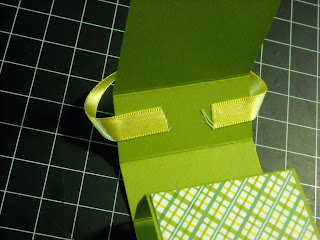
Now - its time to apply the ribbon to your holder - I would cut approx. 7" of ribbon, and put strong adhesive also on the ends of the ribbon.
Apply to the edges of the inside of the 7 1/2" block like below.
To keep your holder secure - you can apply a few different things - here I've applied some magnets ( these are by Basic Grey), but you could also use temp adhesive to keep in closed, but it would still open and not damage the holder.
Then, all that is left to do is decorate it a little more of how you'd like. Shown here - I have used some stickers from the Pink Lemonade collection
And, there you have it! Such a fun gift to give!! I've made these two years in a row for Christmas gifts for my co-workers - they love them!! I usually buy the sanitizers right around the time when Bath and Body works has them on sale for $5 for $5 - and I stock up. I still have some left over!!
Hope this tutorial has inspired you to give this a try!! I hope that I have explained well enough for you to make your own!! Once you made a few, they whip up pretty quickly!!!
Thanks for visiting today and don't forget to participate in our One Layer Challenge going on now - you only have a few days left!! See you soon!!
- Kari


Gorgeous, fantastic tutorial, thanks
ReplyDeletehugs Tamara
Adorable (and ingenious) idea! I love it! Thank you for sharing it with us!
ReplyDeleteEasy pictures to understand so well! thanks!
ReplyDeleteWhat a great idea and an awesome tutorial! I love b&b sanitizers...have quite the collection ;)
ReplyDeleteSuch a sweet gift.
Awesome tutorial....these are perfect gifts!
ReplyDeleteWhat an awesome gift idea, Kari!! Thanks for the photo tutorial!!
ReplyDeleteFantastic project Kari! Wonderful tutorial too!
ReplyDeleteWhat a wonderful tutorial! And perfect timing for back to school gifts! Love the papers, too! So so so fun!!! Thank you for sharing this awesome idea!
ReplyDeleteYou have really helped us a lot by sharing such a great information and your ideas are commendable... Thanks...
ReplyDeleteBeautiful Garden
That is such a cute project!
ReplyDelete