Hello there everyone! Laurel here... I trust everyone in the states is still full of turkey and dessert!! Here in the Beard household we unfortunately aren't done quite yet. The hubs wants to fry a turkey in his infrared turkey fryer tomorrow! Men and their gadgets! :) My waist line is paying the price.
Enough of that! I'm here for a purpose, I promise. I'm here to give you a little bit of a design team update...
First off, the sweet and fab Melissa Shea of the Design Team will be taking some time off.... We ARE NOT saying goodbye to her. We are just saying see ya in a few months! The wonderfully sweet and uber talented Annette Allen (who also happens to be a dear friend of mine) will be stepping in for Melissa..... She will join us beginning in December.
The sweet Jennifer McDermott of the Facebook Inspiration team will be stepping down after her term ends in December. I know, I know... I'm sad too! She is amazing!!!!! We love having her with us and we will continue to eat up all the moments in December while she is still with us. But you can all rest assured, she will be back guesting with us in 2014 as well as participating in the challenges! :) I'm not letting her go that easily, lol!!!!
With the bad news does come some good news. The fab Taylor Usry will be joining us on the Facebook Inspiration team starting in December...... :)
Please join me in welcoming Annette and Taylor....... And let Melissa and Jennifer know how much we will miss them....
TATA for now! :)

Showing posts with label Melissa Shea. Show all posts
Showing posts with label Melissa Shea. Show all posts
Saturday, November 30, 2013
Monday, September 9, 2013
Happy Everything!
Hello Fawnies!
Melissa here today with a card using products from Lawn Fawn's new line, "Into the Woods". I'm totally addicted to this line!

Melissa here today with a card using products from Lawn Fawn's new line, "Into the Woods". I'm totally addicted to this line!

The colors, the images...swoon.
I sketched this card idea out at work and I'm pleased that 1) I remembered I sketched it and 2) I remembered to use it!
Remember to check our Facebook Inspiration Design Team! They are so creative and it's hard not to be inspired!
Thanks for stopping by!
Melissa
Monday, August 12, 2013
Happy Birthday!
Hello Fawny Friends!
Melissa here today and I'm *such* a rebel! As you know our current challenge is to make a one-layer card and I made mine. Well, hmph, I wanted dimension!

I used "Bake Me a Cake" for this birthday festival! There's some glitter on those cupcakes, so just imagine sparkly yumminess!
You have until August 14th to make a one-layer card for our current challenge, sponsored by Simon Says Stamp!

Thanks for stopping by!
Melissa
Monday, July 8, 2013
Use Every Image
Hello Fawny Fans!
Melissa here with a fun mini card set that uses every image from the "So Much to Say" by Lawn Fawn.
A while back I thought it would be challenging to create a set of cards that uses only one stamp set and I had to use EVERY image!


Melissa here with a fun mini card set that uses every image from the "So Much to Say" by Lawn Fawn.
A while back I thought it would be challenging to create a set of cards that uses only one stamp set and I had to use EVERY image!

mini card with envelope

10 mini cards with Lawn Trimmings, simple coloring with Copics. Added glitter here and there

I added this one so you could see the whole individual card. They measure 3 1/2 x 2 1/4.
And here's the stamp set:
Thanks for stopping by! We hope you're LOVING the new Facebook Inspiration Design Team! You'll have to go "like" us over at Facebook to make sure you don't miss anything!
Melissa
Monday, June 10, 2013
What's your creative process?
Hi Fawny Friends!
Melissa here today with a get well soon card set!
Sometimes when I want to create but I don't know what, I'll start smaller. For example, do I want to color? What medium do I want to use? Is there a stamp set that's been calling my name? Do I want to make a set of cards?
I often pick my project like that. I don't have an end project in mind, so I just play!
So for these cards I wanted to color simple images with my Copics. I usually stamp out more images than I need because I like to mess up a lot, haha! So I had 3 of each image stamped out and colored.
Then I ended up with these:


Thanks for stopping by! Have a great week!
Melissa here today with a get well soon card set!
Sometimes when I want to create but I don't know what, I'll start smaller. For example, do I want to color? What medium do I want to use? Is there a stamp set that's been calling my name? Do I want to make a set of cards?
I often pick my project like that. I don't have an end project in mind, so I just play!
So for these cards I wanted to color simple images with my Copics. I usually stamp out more images than I need because I like to mess up a lot, haha! So I had 3 of each image stamped out and colored.
Then I ended up with these:


The sentiments are so cute paired with the adorable images!
You still have some time left to enter our current challenge
Thanks for stopping by! Have a great week!
Friday, May 24, 2013
Melissa's Crafty Space
Hello Fawny Friends!
I hope you're enjoying our crafty room tours! We know some of you have a table, or a corner or the floor, lol! But we wanted to share what we have because it's just fun to peek into other people's spaces!
My Story:
I always want to know the deets of a person space so I'll share with you. I don't have kids and we have a 3 bedroom house. My husband and I each have our own room (his is the man cave, mine is my studio).
My studio is 10' x 10'. My amazing and awesome and totally supportive parents helped me re-do my studio because I obviously needed an intervention, haha!
The Budget:
$300 by my parents and $100 from me.
The Strategy:
I have to see everything I own or it will be forgotten about. It also has to be easily accessible. And I'm short, 5'3", so I need to be able to reach everything!
I wanted one full wall of just shelves. 8' shelves in fact. We put up 5 of those. My second request was clip-it up for my stamps. LOVE seeing them ALL! Third request were shelves for my wood block stamps.
The Pics:


Thanks for stopping by! Let me know if you have any questions!
Melissa
Monday, May 13, 2013
Who Let the Dogs Out?
Hello Fawny Friends!
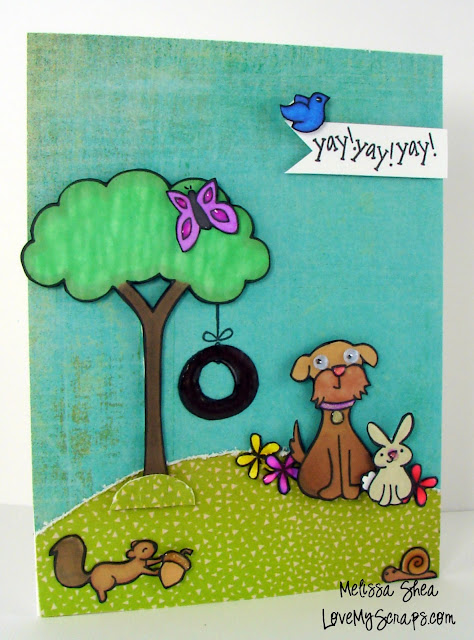
Melissa here today with a crazy fun Critters at the Dog Park card!


Melissa here today with a crazy fun Critters at the Dog Park card!

So fun! I busted out mists, distress ink, copics, the big shot, glossy accents, glitter and tons of dies!
The new Lawn Fawn set, Critters at the Dog Park, is so so so stinkin' cute! And I love that there are dies for each of the 5 dogs in the set! And I used my dies for Quinn's ABC's too.

Let me explain...I printed off a piece of notebook paper, tri-folded it and adhered the top portion of the notebook paper inside the card. Sorry for the lighting, my photo area is way smaller than the full length of the piece of paper but I had to show you!
I hope you like it! You have a few more days to enter our Bling It challenge too! Have a great day!
Melissa
PS-in case you missed THIS post...you must go see. It's fellow DT member Christy's crafty space! We'll have a few of the Lawnscaping DT girls show you their spaces in the following Friday's too! We all LOVE to peek at others junk, lol!
Monday, April 8, 2013
Mother's Day Magnet Card
Hello Fawny Friends!
Melissa here today with a fun interactive card that doubles as a little gift!


Melissa here today with a fun interactive card that doubles as a little gift!

The rosette is a magnet that the recipient can take off and use!

So, when the rosette comes off the card would look really bare so I decided to put a sticker and sentiment so the card would still look complete.
You just adhere one side of the magnet to the rosette and the other side of the magnet to the inside of the card!
You just adhere one side of the magnet to the rosette and the other side of the magnet to the inside of the card!
Super fun, super easy! And it jazzes up the already super cool handmade card!
Just a reminder you have until Wednesday to enter our current challenge! We have some AMAZING entries already to jump start your creativity! Simon Says Stamp is sponsoring us and the winner will receive a $25 gift card! Woohoo!
Thanks for stopping by, have a great week!
Melissa
Lawn Fawn Supplies for this card:


Lawn Fawn Supplies for this card:
Monday, March 11, 2013
Rosette Magnets
Hello Fawny Friends!
Happy Monday to you all! Melissa here with a fun project!
I'm obsessed with making paper rosettes, they are so fast and fun and can be used for so many different projects. Today I'm sharing some cute magnets I made using two of Lawn Fawn's new collections, Daphne's Closet and Pink Lemonade.


Happy Monday to you all! Melissa here with a fun project!
I'm obsessed with making paper rosettes, they are so fast and fun and can be used for so many different projects. Today I'm sharing some cute magnets I made using two of Lawn Fawn's new collections, Daphne's Closet and Pink Lemonade.


Above: the magnet on the back of one of the rosette's.
I used the Tim Holtz Alterations rosette dies (both sizes) and cut several flowers.
It's fun to embellish the centers too, you can add stickers, buttons, clips, all sorts of fun things.
This would be fun to add to a card and have the recipient be able to take it off and use as a magnet.
Here's a pic of the two collections for your drooling pleasure:
Thanks for stopping by! You have until Wednesday to enter our Texture challenge! Simon Says Stamp is sponsoring us and the prize is a $25 gift card! Woohoo!
Have a great week!
Melissa
Monday, February 11, 2013
Masculine Valentine's Day Cards
Hello Friends!
Happy Monday to you all! Melissa, here today showing my version of a masculine Valentines Day card!
I know masculine cards intimate some card makers, including myself, so I asked my hubs to tell me what made a masculine card. I'll share his hints after the photo.


Happy Monday to you all! Melissa, here today showing my version of a masculine Valentines Day card!
I know masculine cards intimate some card makers, including myself, so I asked my hubs to tell me what made a masculine card. I'll share his hints after the photo.

Ok, so here's the good stuff-man approved tips:
- No BOWS! If you must tie something pretty on the card, consider hemp or twine and only tie in a knot.
- KISS-Keep It Simply Silly (or Stupid, depending, haha!). Seriously, masculine cards are most likely clean & simple (CAS). So double practice points for trying masculine, you get to practice CAS also. Whoot!
- Think graphic, shapes, straight lines and more rustic embellies like staples, metal brads, etc when you're designing for a guy.
- And guys only glance at the card, so don't break a sweat!
I hope you'll find making masculine cards easier now :)
Remember, you still have until Wednesday, February 13th to enter our current challenge:

The prize is a $25 gift certificate to our awesome sponsor, Simon Says Stamp!
Have a great week!
Melissa
Monday, December 10, 2012
Make a Scene!
Hello!!
Melissa here today with a non-Holiday card! What was I thinking? Well, every once in a while my eyes need a break from all the lovely Holiday festivities!
I recently bought a set of American Crafts Chromatix alcohol markers and I love them (like Copics but WAY cheaper)! I have all of the Critter sets but rarely use them because I couldn't figure out a way to color that I liked! Well, finally, I've made a scene!
This is a special card for a little 6 year old boy, Sebastian. He needs some happy cards so I thought this would cheer him up! He has a surgery coming up and some happy cards will hopefully help heal him faster. Or least help heal his little heart :)

A few scene making tips (other than jumping up and down screaming in the middle of the grocery store!):
--Use dimension! Foam adhesive is your friend! You can double up on foam to get additional layers.
--Make something to ground the Critter's on like a grassy hill or a snowy hill or a log, etc.
--Cluster elements together so it doesn't look like you just sneezed all your pretties onto the card.
--Add special touches with glitter, glossy accents, googly eyes (perfect for all the Critter sets!).
--If you can't/don't like to color, paper piece!
--Take a black marker to the edges of cut out pieces to hide any cutting imperfections and to really finish off the piece.
--If you can't/don't like to color, paper piece!
--Take a black marker to the edges of cut out pieces to hide any cutting imperfections and to really finish off the piece.
Thanks for stopping by! I hope you have a great week!
You still have until Wednesday, December 12th to play in our current color challenge! Simon Says Stamp is offering a gift card to the winner! Whoot!!
Melissa
Monday, November 12, 2012
Playing with Washi!
Hello Fawnies!
Melissa here today with a fun idea that serves two purposes: 1) mass produce cards and 2) playing with washi!
I have rolls of washi that I collect and adore and decided to bust out some Holiday colors and make some super fun and easy Holiday cards! *yes, yes, it's not all technically "washi" but just go with it!*
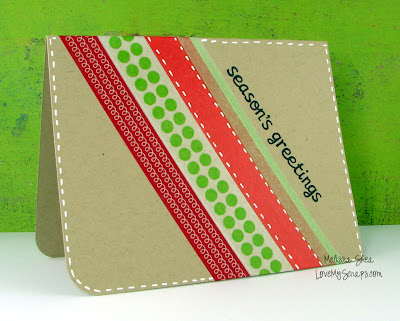
I picked different patterns and widths and just went for it! I placed them more to the left of the card to leave room for that adorable sentiment from the Lawn Fawn set, Let It Snow. I added the white stitching to the solid red washi as well as around the card. Rounded the bottom left corner to balance it all out and viola!
No fussy cutting, no embossing, no running out of embellishments! Mass production done quick and easy!
You have until the 14th to join in on our current challenge, Dust 'em Off! Simon Says Stamp is sponsoring this challenge so link up your creations!

Thanks for stopping by and have a fabulous week!
Melissa
Monday, October 8, 2012
So Thankful...
Hello Bloggers!
Melissa here with my first special project for Lawnscaping! Thanksgiving is fast approaching and I love the idea of creating warm and cozy home decor projects to make the holiday extra special.
I've made a "So Thankful" jar with the idea that family and friends could jot down something they are thankful for on a tag and drop that tag in a cute jar. If you do this each year, you'll have a time capsule of family memories.
You'll need some Mod Podge, a glass jar, paper and stamps. For one jar I even experimented with leaves from my backyard! The jury is still out on how the leaves will hold up, but for now they are pretty!
Take a look!

Above: Get out your circle punch and get punchy! I used Lawn Fawn Dewey Decimal collection pack. Date is stamped with Lawn Fawn Smitty's ABC's. TIP: since this is thick paper, wet the punched circles with water to help make the paper more pliable before adhering with Mod Podge.

Above: The leaves from my backyard! Cool texture, but like I said, I have no idea how these will hold up. Tag is stamped with Lawn Fawn So Thankful and Harvest Season. TIP: to get a cool bleed/blend look, take your water color brush and just trace over the stamped leaf! Also, use a hot glue gun for the trimmings around the rim.

Above: The tag in the background is stamped with Lawn Fawn Schoolhouse Backdrops. This is where people would write what they are thankful for. Then just drop the tags into the jar for a memory time capsule!
Thanks for stopping by! Please fell free to ask questions! Have a great week!
Melissa
Subscribe to:
Posts (Atom)