Showing posts with label milo's abc. Show all posts

Thursday, August 13, 2015

Hugs and fishes


Hello.
I have a fun exploding card for you today. 
 I used a tutorial from Balzer designs blog , it popped up on my Pinterest feed and I knew exactly what I wanted to do with it.
At first glance you might think this is a simple card. 
Well that's the plan so that once its opened you get a surprise  when it folds out.


You get some idea of the exploding part from the above picture.


This is almost fully opened but it wouldn't stay down for me to get a picture.
Its a one layer wonder inside so that it fold easily.


Another view. It really is very simple to make.
The actual folding part is very quick to do and how long you spend making it would depend completely on how detailed you wanted to make the design inside or out.


The instructions.

To start i cut some white card to 8 1/4 inches square and followed the folding described in the tutorial.
Then I die cut the scripty hugs from a post it note and placed on the card.
I used the mask rather than a die cut to keep the bulk down and to only have one layer.
Next I stamped all of my images from so jelly, and critters in the sea with black archival ink.
The longest step is the next one, fussy cutting the masks.
Once they were all in place I used distress inks to make the background.
Finally you can unmask and colour the images.

I used a mixture of Prisma color pencils, copics and  covered all the images with some wink of stella.
Extra details in white were done with white souffle pen and white signo uni-ball pen. 
You can add as much detail or keep it as cas as you like.
I hope I've inspired you to give this a try, it makes a really fun card.

Thanks for looking.


Wednesday, May 27, 2015

End of the Year Teacher Gifts

Hi everyone! Roxanne here today with end of the year teacher gifts that I came up with for both my boys. They each have 2 teachers, so I had to make this project affordable, cute and simple!

My husband always laughs at me, but I reuse all sorts of containers for gift giving. I think it's quite resourceful myself, but I do amass quite the collection of containers and jars and boxes...you get the idea here! For this project, I chose to reuse strawberry containers. Just the simple clear plastic ones you get at the grocery store. I washed them all out, let them air dry and began thinking of clever gifts to put inside.

I wanted to do a popcorn/candy and movie themes for these. I thought it was different and totally fun. Here is what I made up:


Inside the containers:
- About 1-1/2 cups of popcorn kernels
- Homemade popcorn seasoning inside a little jar (found those at the $1 spot at Target)
- Sixlets candies (also found in the $1 spot at Target; I bought 2 bags to split between all 4 gifts)
- 2 brown kraft paper bags (found on clearance at Micheal's for 19¢ each)
- AMC Theaters gift card


For the container, I simply measured the rounded indentation on the top and bottom of the containers to cover with fun papers. This hides the stickers I didn't want to sit and remove! What I did was make one for the outside and one for the inside of the container for both the top and bottom. I chose a double sided patterned paper and used one pattern on the outside and one on the inside. I simply rounded the corners and glued to the containers. Such a fun and simple way to repurpose a fruit container! Think of all the containers you could use - fruit, donut, muffin, egg cartons, jars, and so much more. The possibilities really are endless. It makes a fun presentation for gifts like gift cards that are more exciting to get when they're wrapped creatively. At least I think so.

For the tags, I chose coordinating papers to match the patterned papers I used to dress up the plastic containers. I did two different patterned papers and matching tags for each of my kids. I made 2 of each, as I had mentioned above, for the boys. I simply had them sign their names on the opposite side of the tags.


Here are the products I used for the tags and jar label:
- Lawn Fawn Scripty Thanks Lawn Cuts
- Lawn Fawn Happy Trails (the little clouds of exhaust I actually used for popcorn!)
- Lawn Fawn Tag You're It Lawn Cuts
- Lawn Fawn Triple Pack Natural Cord
- Lawn Fawn 6x6 Sweater Weather Petite Paper Pack
- Lawn Fawn Milo's ABCs
- Memento, Tuxedo Black Ink
- Versafine, Onyx Black Ink
- Spectrum Aqua Markers

The labels for the little jars of seasoning were also from the $1 spot at Target. I stamped "popcorn salt" onto the labels using Milo's ABCs. That font is so much fun!


I think this was one of my favorite teacher gifts I've created. I can't wait for the teachers to get them!!


So, save those containers and get crafty with them for gift giving this summer. AND if you have space to save them until then, they would make amazing holiday gift containers for gift giving - I can just picture a little loaf of bread inside one of these, or a line of yummy homemade cookies.

Thanks for checking this out! I hope you enjoyed my project today.


Thursday, March 26, 2015

Happy Easter Box

Hi, there! It's Roxanne here today with a cute little project I came up with just in time for Easter. I'm actually going to use for a decoration on my china cabinet because I love how it came out.

Here's a little secret on my project...I didn't use any Easter themed stamp sets from Lawn Fawn! Gasp!! I don't actually have any yet, so I had to get creative. I love making things out of unexpected sets.

These are the supplies I used for the project I'm about to show you.


The box was something I had a few of left in my stash. I just added the pink striped paper from the Lawn Fawn 6x6 Petite Paper Pack, Let's Polka. I sanded the edges to blend them in and smooth out the cuts I had to make to get it to fit.


Next, I created my tag from the Winter Gifts set. I stamped it with Memento in Tuxedo Black ink onto kraft cardstock (my fry box is kraft as well) and cut it out and punched a hole in the top of the tag. I colored in the border with a couple of my Spectrum Noir Blendable Colored Pencils.


For the Happy Easter sentiment, I stamped that using the word "happy" from the Happy Feast set and "Easter" was from the Milo's ABC's set. I used Versafine, Onyx Black to make sure it was nice and dark! I then set that aside to dry.

I stamped the pennants from the Winter Gifts set onto two different patterened papers from the 6x6 Let's Polka Petite Paper Pack and cut them to fit onto the tag. I used Memento, Tuxedo Black for those and foam adhesive to give them dimension.

On to my Easter basket! For the basket, I used the bucket from the Trim the Tree set and formed the garland from that set to create a handle for my basket. I then fussy cut it out and colored it in with the Spectrum Noir Blendable Colored Pencils.

For the eggs, I used the two round, striped ornaments from the Trim the Tree set and this time, I used the Lawn Cuts for the set to cut them out. I then colored them in with my pencils again.

To get the eggs in the basket, I cut a slit at the top of the basket from left to right, almost to the created handle. I then cut some in half, snuck them in and layered them to make it appear realistic.

I decided an Easter basket definitely needs a bow, so I used the bow from the Trim the Tree set with Radiant Neon in Electric Coral and diecut it with the coordinating Lawn Cuts. They really do make life easy!!

Next, I decided I needed something under the sentiment, so I grabbed the small ornament from the Trim the Tree set and those became my carrots! I chose to fussy cut around them so I could draw in a simple green topper to each of them as the leaves of the carrots. I used some trimmed down foam adhesive to pop them off the tag.

I just adhered the tag onto the box front with some foam adhesive and grabbed some lime green tissue paper and folded it and trimmed it at the top to mimic grass, and stuffed that inside. Really easy and super cute!


I hope you enjoyed my project today and that I've inspired you to look at your sets in new ways you might not have thought of before to create something fun and whimsical! Thanks for looking! Happy crafting :)

Tuesday, March 17, 2015

Watercolor Easter Tags

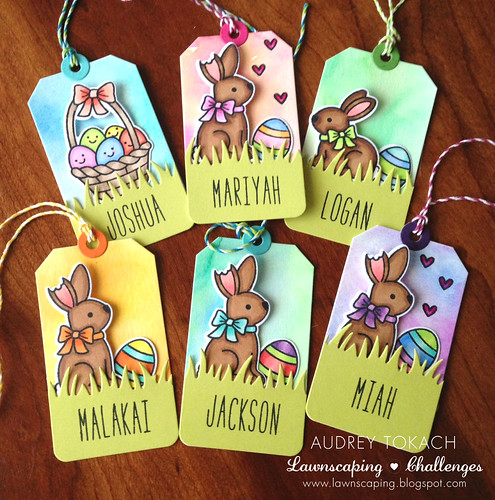
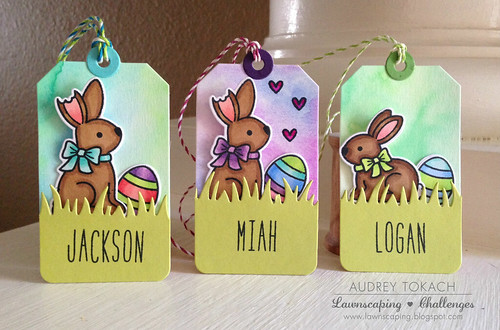
Hello there!  Audrey here!  Today I have a fun set of watercolor Easter tags to share with you!  Can you believe it's almost Easter?  Spring is on the way!

Watercolor Easter Tags


I've really been enjoying watercoloring lately.  I use several different mediums to watercolor, but these tags were painted with a cheapie watercolor palette from Michaels.  I started by diecutting several  Tag, You're It diecuts from watercolor paper, and then I painted them.  While they were drying, I stamped,  Copic colored, and cut out several images from the new Eggstra Special Easter stamp set.  I had a few colored already, but needed more for this project.  These images are so fun to color!  I used the Grassy Border die to add some grass to the bottom of each tag and then popped the images up using foam tape.  I personalized each tag using Milos ABCs.   I curled the edges of the grass slightly with my fingers, and added a hole reinforcer using coordinating card stock.  Finally, I thread each tag with different colors of Lawn Trimmings twine.  I can't wait to add these tags to Easter goodies for some of my favorite little people!

Here are a few close-ups:

Watercolor Easter Tags Watercolor Easter Tags

 I hope you enjoyed today's post!  Thanks for stopping by!

Supplies:
Stamps: Lawn Fawn Eggstra Special Easter, Milos ABCs
Dies: Lawn Fawn Eggstra Special Easter, Grassy Border, Tag You're It
Other: Watercolor paper, white and green cardstock, Lawn Trimmings twine, pan watercolors

Saturday, February 14, 2015

Falling (Die cut) Hearts!

Hi everyone! It's Marina :) So sorry, I know that I was supposed to post on Thursday but I had some delays for my flight and I got home late. I'm here now to share with you a card using some heart dies.


I'm taking various copic markers in different shades of pink and red. You can use any colour combinations or other types of medium, watercolour or even ink pads. I took the string of hearts die from the Lawn Fawn Stitched Journaling Card Die. I made sure to colour the cardstock first because it's much fasted to colour a big space then tiny hearts but it's your choice :) 


When that's done, I stamped out the jar from Lawn Fawn Bugs & Kisses stamp set from the top of the paper as though it looks like it's pouring out hearts. I decided to use the same concept for my sentiment. I took the letters from Lawn Fawn Milo's ABC and position them in a way that they also looks like they are falling out of the jar.


Tip : Position your letters first then use a large stamp press to pick up all the letters so that you stamp them all at once and with this you can even do multiple cards quickly.

Now I arrange the hearts until I like it and start to glue them down using Tombow liquid glue.


Hope you like it! 


Don't forget to subscribe to the Lawnscaping Challenge blog & join the Lawnscaping facebook group to catch the projects made by the Facebook Inspiration Team.  You can also catch more of me on my blog

Till next time!